-
Seitan: An Easy Mock Meat
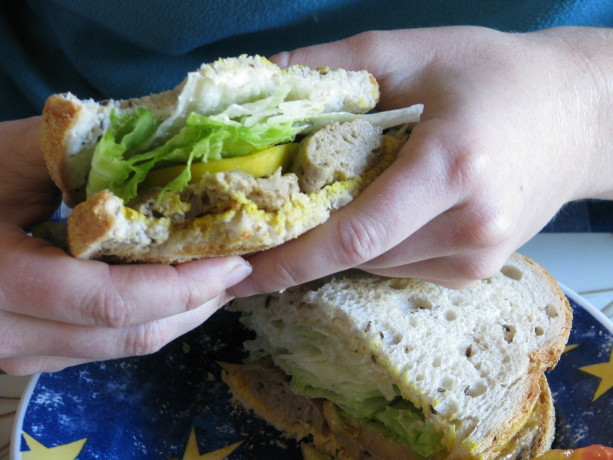
A juicy seitan sandwich is really, really good. For the past year I’ve been making my own vegan meat out of organic vital wheat gluten. This meat is called seitan (pronounced, humorously enough, say-tan, just like the fork-tongued guy in red). If you’ve eaten mock meats, especially in restaurants, you’ve most likely have eaten seitan.
I am not gluten intolerant, and I know that the current ‘epidemic’ of celiac disease is not what it seems. People eat far too much wheat in their diets, and that wheat is not only genetically modified, but sprayed with herbicides and pesticides, then processed until it has to have nutrients added back onto it to qualify as food, and then it is shipped and stored. The consumer has no idea when that poor tortured grain actually came forth into this world. As my good friend Bill says, “You can’t see the farm in it.” I believe that when people eliminate wheat from their diets they feel so much better because they aren’t eating all those hamburger buns, batters, snacks and other empty-calorie foods. They are also reducing the amount of pesticides and herbicides they consume.
I know about developing an intolerance to food. I’ve developed an intolerance to soy milk (organic, mind you), which made me realize how much of it I have been consuming. Now I drink rice milk or water mostly, and manage my soy intake while keeping an eye out for other products I may be indulging in too much. My grandfather Walter Brower in the 30’s had developed a bad dermatitis. He was in the hospital with it, being treated for all kinds of things with no relief. He was missing work, and he was the sole supporter of his family. Finally someone recommended that he visit a chiropractor… a chiropractor? For a skin condition? In the 1930’s? This was radical thinking. Thankfully he was desperate enough to go. He visited the chiropractor’s office, sitting across from him at his desk, and told the doctor about his affliction. The chiropractor asked what he did for a living. My grandfather was a delivery man for Bordon’s milk. The chiropractor said that my grandfather had developed a milk allergy due to all the dairy products he consumed. My grandfather went off dairy, and the skin problem disappeared within days. (This was at a time before cows were fed pellets of corn and chicken feces laced with antibiotics as they are today, too.)
All that said, I make my own meat with organic products, as well as my own vegan butter , and am now experimenting with vegan cheese (more on that later). Do I have a lot of time on my hands? No. I spend a couple hours once a month making the seitan and the butter, enough for a month, and freeze both.
Seitan isn’t pretty before it is cooked. It is grey and spongy. However compare it to the flesh of a butchered animal and it is beautiful. You can buy vital wheat gluten just about anywhere now, but different brands have different quality. I use Bob’s Red Mill which has outstanding flavor and never gets rubbery. I also use Bragg’s Liquid Aminos instead of soy sauce, tamari and often other salt. It is organic and nutritious, and a little bit brings out the flavor of soups, main dishes, salad dressings, scrambled eggs, and anything its added to. Compare prices online for both; Amazon.com has good deals if you want to buy a lot.
When seitan is frozen, the patties are quickly thawed in a lightly oiled pan. The ‘meat’ is juicy, flavorful and delicious, and can be used in place of chicken strips, ground up instead of meat for stuffing or sausage, used as is in a sandwich or hamburger, or cubed for stew, curry… whatever. The problem I have is wanting to eat it too often!
Basic SeitanAuthor: Originally from ShrimpGhost on Allrecipes.comRecipe type: Main DishCuisine: VeganPrep time:Cook time:Total time:Serves: 12Organic vital wheat gluten makes a yummy, all-purpose meat substitute for very low cost.Ingredients- 2 cups organic vital wheat gluten
- 1 teaspoon organic crushed dry rosemary (or minced fresh)
- 1 teaspoon organic dried thyme
- 1 teaspoon organic dried rubbed sage
- ¼ teaspoon organic cumin seed, lightly crushed
- ¼ teaspoon organic garlic powder
- 2 cups water
- ⅓ cup Bragg's Liquid Amino Acid (or tamari sauce, but it is saltier)
- 8 cups water
- ¼ cup tamari sauce
- ¼ cup Bragg's Liquid Amino Acid
- ½ teaspoon organic onion powder
- 1 4-inch piece dried kelp (kombu) (you may omit)
Instructions- In a large non-reactive bowl, mix together the vital wheat gluten, rosemary, thyme, sage, cumin seed and garlic powder. In a measuring cup mix the 2 cups water with the Bragg's. Quickly add the liquid to the dry and working fast mix thoroughly. The gluten will develop quickly; use your hands to work it to make sure there are no patches of dry gluten. There should be extra liquid. The gluten will be rubbery. Shape the gluten into a long loaf, about 3 inches in diameter. Allow to rest while you make the broth.
- In a tall stock pot combine 8 cups of water with the Bragg's, tamari, onion powder and kombu and bring to a boil.
- Cut gluten log into slices no wider than ¼ inch, or in strips (you can always cut the finished patties into strips later). Individually drop pieces into boiling stock (they'll stick together otherwise). Reduce heat to low, cover and simmer for 45 minutes. Drain and either store seitan in refrigerator in some broth for no more than 5 days, or layer seitan patties flat in a plastic freezer bag laid on a cutting board or plate and freeze. When frozen gently break apart patties in the bag and keep frozen, taking out what you need. Patties can be heated quickly in a pan, sliced and stir-fried, thawed and breaded and baked or fried, or used any way you'd like.
I tried several seitan recipes, most of which were either too bland or too strong and muddy flavored. This recipe I really like for all-purpose, chickeny seitan. I freeze the finished slices flat in a plastic bag so I can pull out however many I need whenever I want them. - Compost, Gardening adventures, Perennial vegetables, Permaculture and Edible Forest Gardening Adventures, Recipes, Seeds, Soil, Vegetables, Vegetarian
Perennial Vegetables: Jerusalem Artichokes
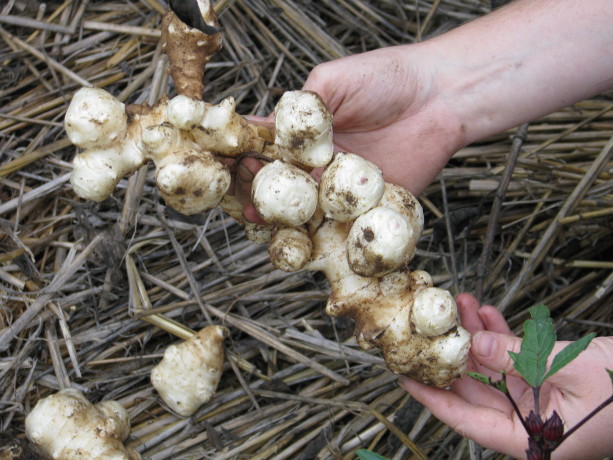
A knobby root of deliciousness. Jerusalem artichokes aren’t artichokes nor are they from Jerusalem. They are also called sunchokes, which sounds something like an unfortunate cosmic event to me. We grew them this year and I have only great things to say about them.
I ordered organic tubers from Peaceful Valley in California. By the way, all of the strawberries and rhubarb that I had ordered from them were inexpensive and yet of prime quality. The tubers grew into tall, sunflower-like plants that graced an area of the new kitchen garden that didn’t have the best soil in it.

JAs have beautiful sunflower-like flowers that pollinators love. They flowered most of the summer and just this month – October – began to die off. The plants had some difficulty with lace bugs, but with good soil fertility and some actively aerated compost tea foliar spray they rallied exceptionally.
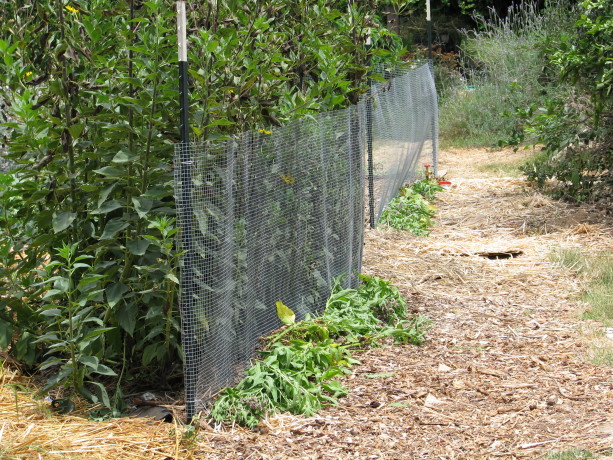
The Jerusalem artichokes made a nice living wall. Today, for our Halloween lunch, we thought some creepy-looking tubers would be appropriate. They share a basket with Black Beauty zucchinis (caught them small!) and our first sweet potato of the year, Spanish Red Improved, which we also steamed and ate – heaven!
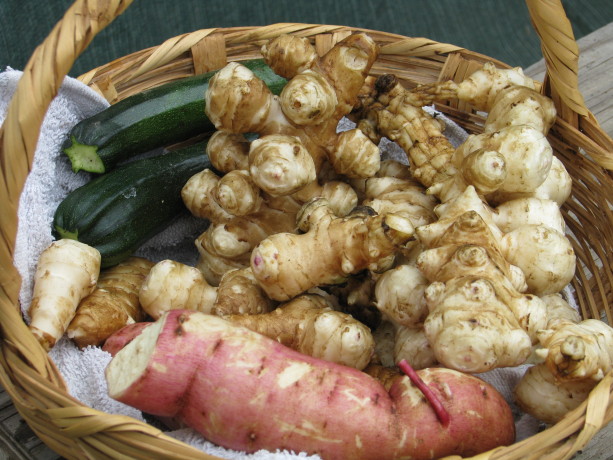
Our Halloween harvest. The ‘chokes are supposed to sweeten up after a frost, but here in San Diego county that might take awhile.
The chokes grow tubers all around the base of the plant, and also spread them underground. They are very easy to harvest; the plant wants the tubers to make new plants so they break off easily.
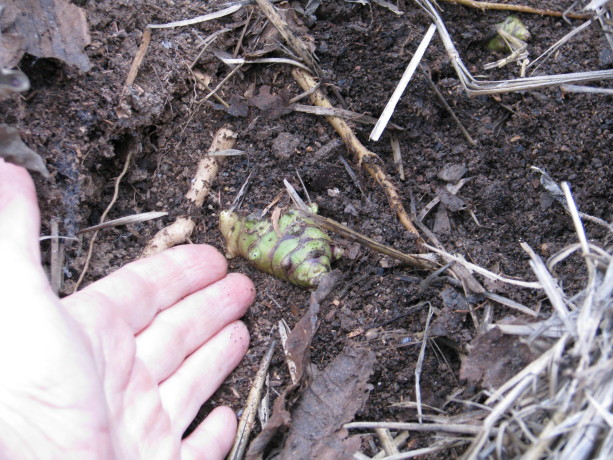
Cover green tubers back up so that they can continue growing. Although they are knotty, they wash off easily and the skin is thin and mostly easily removed with a vegetable peeler. I didn’t scrape all of it off and it wasn’t bitter or unpleasant at all. I roasted them after just washing them with a vegetable brush and the skins were a little firm and the insides very soft. There wasn’t any unpleasant taste.
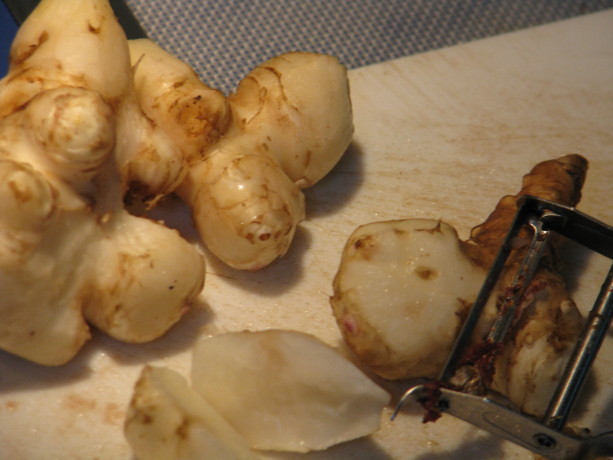
Peeling them is kind of easy, but the skin doesn’t taste bad. Raw they are crisp. Steamed, the JAs become very soft and – by gosh! – taste very similar to soft, buttery artichoke heart! Wonderful! My daughter and I ate them down with a little vegan butter . So wonderfully good. They can be easily mashed as well. We also roasted them along with other vegetables.
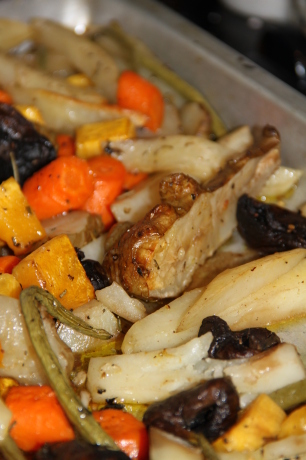
Jerusalem artichokes, carrots, beans, mushrooms, potatoes and squash are roasted with garlic, rosemary and olive oil. Yum. I mix all the veggies in olive oil with dried rosemary, minced fresh garlic and pepper, spread out on a tray and roast at 425F for about an hour, depending upon the size and thickness of the veggies. Roasting keeps them more solid yet tender, and sharpens their flavor a little. Absolutely fantastic.
I’m saving small tubers to plant ALL OVER THE YARD! What a great perennial vegetable – perennial in that you leave some tubers in the ground and they keep coming up every year. They are attractive, give shade to smaller plants, are great for attracting pollinators, create good mulch when the tops have died down, and have wonderful tubers. The tubers may be eaten raw as well; they are crisp and mild.
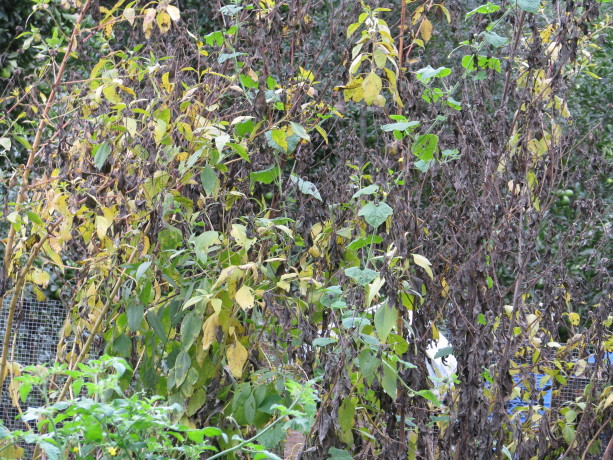
The foliage dies off in the Fall. I’ll cut the stalks at the ground level and lay them down on top of the bed to feed the soil. If you have a corner for some tall flowers, definitely try growing some organic Jerusalem artichokes. Yum.
- Animals, Bees, Birding, Building and Landscaping, Chickens, Compost, Fungus and Mushrooms, Gardening adventures, Hugelkultur, Microbes and Fungi, Natives, Natural cleaners, Other Insects, Permaculture and Edible Forest Gardening Adventures, Pets, Ponds, Predators, Quail, Rain Catching, Reptiles and Amphibians, Water Saving, Worms
Saving the Bees

The ponds at Finch Frolic Garden are cleaned by fish and plants, with no chemicals, algaecide, artificial aeration or filtration. Well-balanced water allows wildlife to thrive. I should have more accurately called this post, Saving All the Insects, or even Saving the Wildlife, because the answer to saving one is the answer to saving them all. We’ve been inundated for years – my whole lifetime, in fact, – with pleas to save our environment, stop whale slaughter, stop polluting, etc. I remember winning a poster contest in fifth grade on the subject of curtailing littering. Since Rachel Carson’s books woke people up to the hazards of DDT and how chemicals have many deadly side effects there has been a grassroots effort to stop the pollution. Since Al Gore’s An Inconvenient Truth came out the push for environmentally friendly lights, cars, LEED-certified buildings and many more positive anti-climate-change actions have grown furiously. Too bad no one listened to him decades before. A drop in the economy and the radical change in weather patterns have people exploring organics, making their own clothes and foods, changing their shopping habits and thinking about what they are bringing into their homes. However, this week the World Wildlife Fund released the staggering results of a study that states that between the years 1970 and 2010, 52% of the world’s animal populations are gone. Over half. Gone. On our watch. In my lifetime. I am stunned with shame. So what about the next 40 years? Over 97% of California wetlands are already gone. There are only 3% left in Los Angeles. The Colorado River hasn’t met the ocean for decades, except briefly last year due to major earthworks. We are pumping all that water overland, open to the sun for evaporation, to treatment plants that fill it with chlorine and other chemicals, then sell it to us to spray over lawns and flush down the toilet or let run down the drain while the water heats up. It is madness. All the wildlife that depended upon the Colorado River along that stretch are gone. All the insects, the frogs, lizards, birds, mammals, etc. that need a clean drink of water no longer have access to it. The only water they can drink is usually chlorinated domestic water in ponds and bird baths. Too often this water is treated with algaecide, which claims it doesn’t hurt frogs but it does kill what the frogs feed upon. We are killing our animals with poisoned domestic water.
![dry_colorado_new[1]](http://www.vegetariat.com/wp-content/uploads/2014/10/dry_colorado_new1-613x321.jpg)
One of the largest reasons we have extinctions in North America is mismanagement of rainwater in drylands (other than polluting the waters. Poaching, over-fishing, destruction of habitat and climate change are the main reasons). We have cleared and flattened the ground, and channel rainwater off into the ocean. Look around at your streets and houses. Are they harvesting water or channeling it? Any property that is slanted is channeling water away. Any property that is level – like the bottom of swales – is harvesting water. So many properties are inundated with annual rains because there is no water harvesting above them. When you harvest water, it runs into rain catchment basins and swales instead of roaring down the hillside taking all the topsoil with it. Water becomes passive and percolates down deeply into the soil. That deep saturation draws tree roots down into the ground. The roots break up hardpan, make oxygen and nutrient channels into the dirt and produce exudates (sugars, carbohydrates and starches) through their roots to attract and feed the billions of microbes that turn your dirt into rain-holding soil. That underground plume of rainwater then slowly passes through your soil, re-enervating subterranean waterways, refilling your wells and bringing long-dry streambeds back to life. We must harvest rainwater to save our animals and plants, and consequently ourselves. We must reestablish sources of clean, unpolluted chemical-free water for animals to eat and from which to drink.
Healthy pond water is off-color due to tannins, and is filled with tiny creatures. Some such as daphnia are visible, but just like soil microbes, many aquatic creatures are microscopic. Fish and frogs feast from this level of the food chain, and these creatures make the water balanced. They eat mosquito eggs. They clean up algae. They are as vitally important as soil microbes. Oh, and 83% of the frogs are gone.
I spoke with Quentin Alexander from HiveSavers today; he performs humane bee rescue around the San Diego area and has been trying to re-queen Africanized hives with calmer European queens which will breed nicer behavior back into the bees rather than having to kill the entire hive. He has had no luck in the past two years with European queens, even those bred in California. With very little wetlands left, and those often sprayed with DEET by Vector Control, or polluted with chemical fertilizers and oils washed out of front yards, streets and driveways, these insects must resort to drinking from swimming pools and bird baths. Again, these contain highly chlorinated water. Animals are being forced to drink poison, or not drink at all.
We MUST stop using chemicals on our properties, and we MUST harvest rainwater. We MUST stop spraying well water into the air but irrigate with it in dripper form under mulch so that it is cycled back into the ground rather than evaporated. One inch of rain on one acre in one hour is 27,154 gallons of water! It is so easy to harvest rainwater – dig level-bottomed swales! Dig small ones with a trowel. Fire up the tractor and turn road ways into swales, or cross-cut vertical paths with swales that have dedicated overflows. Dig rain catchment basins to catch a flow of water. Catch water as high up on your property as you can. If you have level soil, fantastic! You have it so easy!
Make gentle swales, rain gardens, rain catchment areas and sunken gardens to catch and percolate the water. Bury old wood perpendicular to water flow – its called hugelkultur.
Please watch this six-minute video by Geoff Lawton of the Permaculture Design Institute of Australia. You need to type in your name and email, but they don’t sell your information nor do they bug you with lots of emails. Here is the link. The title is Finding An Oasis in the American Desert, and it is about the Roosevelt swales dug during the dust bowl in the desert. If nothing that I say, nor anyone else says can convince you, then please watch this and see the effectiveness of rain harvesting. We MUST do this, and now before the rains come is the time. Catch all the water that falls on your property in the soil, and try to catch the water that runs into it. If there are flood waters channeled through your property, see if you can talk to the people who own land above you about harvesting water up there. It will reduce the flooding, save topsoil and benefit everyone’s property. Work towards keeping rainwater in your soil, reducing your domestic water, and making what streambeds are left come back to life. Keep our old trees from dying by watering deeply through rain catchment. If you have a pond or swimming pool and treat it with harsh chemicals and algaecides, seek out a natural pond professional. In the San Diego – Los Angeles region there is Bob Lloyd of PuraVida Aquatics, or Jacob Hatch of Hatch Aquatics. Jacob builds natural ponds and maintains large natural waterways. Bob maintains chemical-free backyard and display ponds that are full of wildlife. He can convert your pool into a clean swimming pond where the water is filtered by plants and thus is lovely year-round, provides abundant habitat and doesn’t need chemical treatments. No chlorine to burn your skin and eyes. How great is that? He can also create a constructed wetland that cleans your greywater with plants.
There are so many simple and inexpensive ways to harvest rainwater rather than allow it to flow into the salty ocean without penetrating the soil. Please, please, please do them, and if you already have THANK YOU and gently encourage your neighbors to do the same. We must stop the habitat destruction and start to rebuild what is gone.
- Animals, Bees, Birding, Building and Landscaping, Chickens, Cob, Compost, Composting toilet, Fungus and Mushrooms, Gardening adventures, Giving, Health, Heirloom Plants, Hiking, Houses, Hugelkultur, Humor, Living structures, Natives, Natural cleaners, Other Insects, Permaculture and Edible Forest Gardening Adventures, Pets, Photos, Predators, Quail, Rain Catching, Recycling and Repurposing, Reptiles and Amphibians, Seeds, Soil, Vegetables, Water Saving, Worms
Special Tours for Aug. and Sept., 2014
Come take a tour of a food forest! Normally tours of Finch Frolic Garden are held by appointment for groups of 5 – 15 people, Thursdays – Mondays. Cost is $10 per person and the tour lasts about two hours. By popular demand, for those who don’t have a group of five or more, we will be hosting Open Tour days for the first 15 people to sign up in August and September. They will be Sunday, August 10 and 24, Sept. 7 and 21, and Thursdays August 7 and 28, and Sept. 11 and 25. Tours begin promptly at 10 am. The tours last about two hours and are classes on basic permaculture while we tour the food forest. I ask $10 per person. Please reserve and receive directions through dianeckennedy@prodigy.net. Children under 10 are free; please, no pets. Photos but no video are allowed. Thank you for coming to visit! Diane and Miranda
- Breads, Breakfast, Cake, Condiments, Dessert, Frosting, Permaculture and Edible Forest Gardening Adventures, Recipes, Sauces, Vegan, Vegetables, Vegetarian
Making Ethical Butter

Vegan butter! I’ve labeled myself an ‘ethical vegetarian’ for nearly two decades. I stopped eating animals when I became horrified at the dichotomy of having glue traps under the house to catch wild rats and mice (and any poor, poor animal that happened upon it, such as lizards. Glue traps are horrendously cruel. I hadn’t put them there.) and a cage with an exercise wheel and specialty food for ‘pet’ mice in the bathroom. Justice is a man-made effort, and by not eating animals I was no longer approving of mass torture by buying into it. Although I no longer ate animals, I have still indulged in animal products, namely dairy products. Slowly it has sunk in how badly animals are treated for those, too. As someone who loves cooking, it has been difficult for me to wean away from dairy products. Butter is especially difficult. Unlike hens who have been bred to continuously lay without needing the services of a rooster, dairy cows must be lactating to produce milk. Cows are usually artificially inseminated, then after giving birth their calves are replaced by milking machines. The calves are most often slaughtered for veal. This process is repeated until the cow is used up from the constant pregnancies and lactating, and then she is slaughtered. This horrible practice is disguised by advertisements showing happy cows grazing in fields. That is a fantasy. ‘Grass fed’ and ‘pasture raised’ are sly terms that give you an image that is nowhere near to the truth. Please read Michael Pollen’s Omnivore’s Dilemma to understand where your food comes from and why.
To find an acceptable butter substitute has been an expensive and frustrating endeavor. For awhile I used a dairy substitute from Trader Joe’s, who I swear keeps tabs on what I buy the most and then discontinues it. All other butter substitutes either taste horrible, can only be used for spreading, or more commonly contain palm oil. The sudden fad for palm oil has created extreme clearance for the growing of palm in the areas which are habitat for the orangutan; indeed, if we don’t curtail our consumption of palm oil quickly the orangutan will go extinct within our lifetimes.
I finally found a recipe for a butter substitute that works pretty well for both spreading and baking. It is made mostly of refined coconut oil. At this point coconut oil is sustainably produced – please make sure that you support companies that do so. Refined organic coconut oil has no flavor or scent; unrefined has a mild coconut flavor and a toasted coconut scent. If you are using a batch of this butter for baking where coconut flavor is desired, then use the unrefined.
This recipe is by no means my own. I found it and a detailed description of the science behind it at VeganBaking.net . There are several options listed and a lot of cooking science behind the butter.
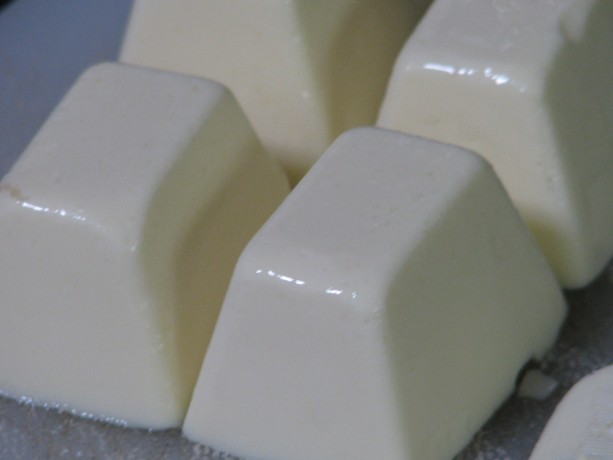
The mouth-feel is amazingly creamy and satisfying. I used the basic recipe, Regular Vegan Butter, Coconut Oil Base. The recipe calls for curdling the soy milk, which will drive the butter flavor. I tried the full teaspoon of cider vinegar, then half cider vinegar and half coconut vinegar, then just half a teaspoon of coconut vinegar, and finally no vinegar, and thus no curdling, at all. I found for my taste that the vinegar flavor carried through and was much too dominant. Even at just half a teaspoon it was so noticeable to me that I didn’t like it on toast. It was good, however, when my daughter used it on sourdough and topped it with fresh avocado. The slight vinegar flavor enhanced the avocado deliciously.
The batch I made without vinegar seemed perfect. The mouth-feel of this butter with or without the vinegar is creamy and all that a high-fat butter should be. It looks, cuts and spreads like butter. The flavor is creamy and very mild, almost like a slightly salted sweet butter. This was a winner for me. For the soy milk I used Trader Joe’s Organic Plain, which does have some sweetener in it. I’ll try with an unsweetened plain organic soy milk another time.
I keep my butter on the counter. I know that organic butter holds its shape better in the heat than processed butter, but both stay stable unless the temperature is in the 80’s. Coconut oil melts at 76F, and in my summertime Southern Californian kitchen, this vegan butter must be kept in the refrigerator. The butter is hard when needed, so the next batch I will take the author’s advice and swap out a tablespoon of coconut oil with regular oil to make it more spreadable.
I wanted to test the butter in cooking and baking. I melted it in a pan and cooked eggs and other breakfast items in it successfully. I used it on toast and on mashed potatoes with great success. The experiment with shortbread cookies went wrong, however, but I don’t think that that was the butter’s fault. These were lemon rosemary shortbread cookies, and contrary to my baking sense I followed the author’s (another blog) directions and didn’t sift the powdered sugar before adding it. There were lumps, therefore, in the batter and I mixed it extra to try and beat them out, which I believe was responsible for making the cookies tough. They were flavorful, but not crumbly. Oh well, I’ll just have to try again! The cookies rolled out, cut, and baked well, retaining their shape and performing as well as with cow’s butter.
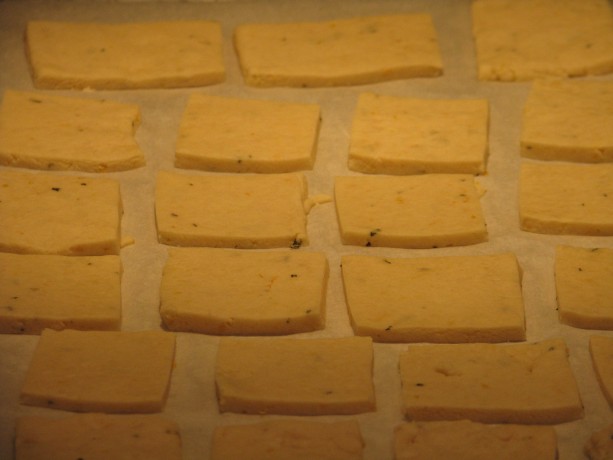
Shortbread didn’t spread using this butter, which was great. I don’t have a finished photo of the lemon-rosemary cookies because, well, they were eaten. As with all substitutions, there is always a difference and vegetarians and vegans have to embrace it. Of course fake bacon and ground ‘meat’ is not quite the same: the great part is that it is far more healthy for your body (lower fat, few preservatives if any, often organic, and not the pesticide-drenched and drugged animals that people eat) and doesn’t perpetuate the extreme cruelty to animals about which humans have become nonchalant. Yes, other animals aren’t kind when feeding off of other animals (those which aren’t vegetarians). Yet we as humans have the option the others don’t, to make eating choices.
Here is the basic revised recipe; please see the original blogpost on VeganBaking.net and give the options a try. I found xanthan gum from Bob’s Red Mill at my local grocery store, and liquid lecithin and coconut vinegar online through Amazon.com.
You can double or triple the recipe with no problem! Enjoy.
Recipe update: I’ve since made some changes to the recipe, exchanging some vegetable oil for some coconut oil for more spreadability, and adding a little more salt for a more satisfying (to me) taste when spread on toast. I’ve been using this butter for a month now, and have noted that: when melting in a hot pan it will brown faster than regular butter, so keep the temperature down, that it will melt and separate at room temperature (its summer now, so the kitchen is usually in the 70’s – in the winter it will be different) so I keep it in the refrigerator. I found butter stick molds that have the teaspoon markings along the side, so I’ve made 8x the original recipe and poured it into the butter molds, then wrapped each unmolded stick in wax paper and frozen them.
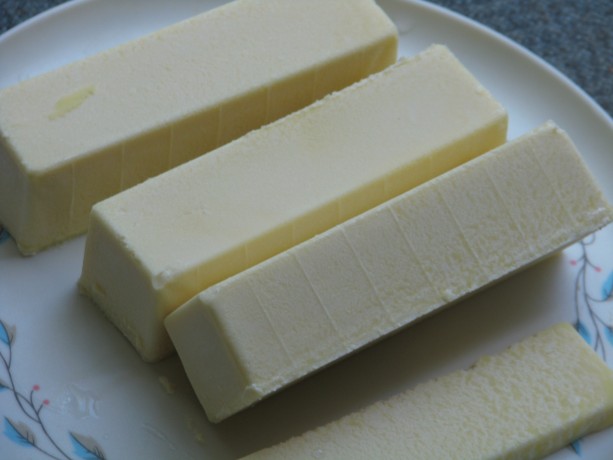
Vegan butter sticks with teaspoon markings along the side for ease in baking. I’ve also poured it back into the cleaned coconut oil jars and frozen them, keeping one in the refrigerator for unmeasured use. I’ve used it along with a non-dairy creamer in the Chocolate Ganache recipe and it is very chocolaty, but not as rich as the original. Part of that is due to the creamer; heavier creamer will produce creamier results, but in no way was it disappointing. It was very tasty, but not as heavy. When refrigerated it didn’t solidify as much as the other, so more chocolate might need to be added depending upon the type of creamer used but it was still spreadable and yummy.
Another Recipe Update:
I’ve been making the butter with unsweetened organic rice milk and it turns out well. At first it tasted too light to be satisfying, but when I had dairy butter at a restaurant it tasted greasy and heavy – my taste buds wanted the vegan butter! I found out that even when the kitchen is colder than the melting point of the coconut oil, it isn’t a good idea to leave the butter refrigerated because unlike dairy butter it will grow mold. The rice milk butter with the increased vegetable oil makes it perfectly usable from the refrigerator. I make sticks and freeze them in a freezer bag for baking and pour the rest into glass jars with screw-on caps for spreading. The jars are kept in the freezer until needed, then switched to the refrigerator. I’ve made biscuits, cookies, cakes, scones and breads with this butter, and with proper handling they all come out just fine. We offered both dairy and vegan butter to our holiday guests and they didn’t detect much of a difference. Since vegan butter is so much lower in calories, and coconut oil is so good for you, I don’t have to hesitate to use it. It is actually part of my weight maintenance program!
Ethical ButterAuthor: Mattie, at VeganBaking.netRecipe type: CondimentCuisine: VeganPrep time:Cook time:Total time:A wonderful vegan butter with no palm oil, but lots of options. My version is without curdling the soy milk. Please see the original excellent post for more explanations and options.Ingredients- ¼ cup + 2 teaspoons organic plain soy milk
- ¼ + ⅛ teaspoon salt (I increased the total salt to ½ t. for spreading butter)
- ½ cup + 2 Tablespoons + 1 teaspoon (130 grams) refined coconut oil, melted to room temp. (For more spreadability, I used ½ cup coconut oil and changed the 2T and 1 t to vegetable oil, along with the following 1 T for a total of 2 Tablespoons and 1 teaspoon vegetable oil.)
- 1 Tablespoon vegetable oil or light olive oil
- 1 teaspoon liquid soy lecithin or liquid sunflower lecithin or 2 ¼ teaspoons soy lecithin granules
- ¼ teaspoon xanthan gum or ½ + ⅛ teaspoon psyllium husk powder (I used xanthan gum)
Instructions- Combine soy milk and salt in a food processor or blender.
- Melt the coconut oil until it is just room temperature and barely melted.
- Add the coconut oil and the rest of the ingredients to the soy milk.
- Blend or process for about 2 minutes on low.
- Pour into ice cube trays, or into butter molds or trays.
- Freeze until firm, about an hour.
- Serve.
- Keep wrapped in refrigerator for a month, or frozen for a year.
- Makes one cup.
- Animals, Bees, Birding, Books, Building and Landscaping, Chickens, Cob, Compost, Composting toilet, Fungus and Mushrooms, Gardening adventures, Heirloom Plants, Hugelkultur, Humor, Living structures, Natives, Natural cleaners, Other Insects, Permaculture and Edible Forest Gardening Adventures, Ponds, Predators, Quail, Rain Catching, Recycling and Repurposing, Reptiles and Amphibians, Seeds, Soil, Water Saving, Worms
Permaculture Lectures At Finch Frolic Garden, June 2014
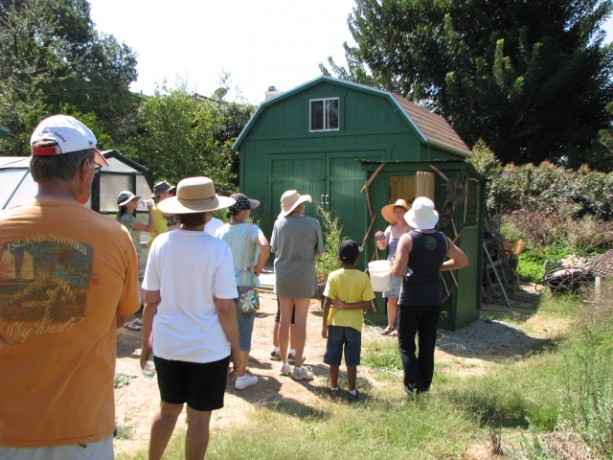
Tour Finch Frolic Garden! Permaculture Lectures in the Garden!
Learn how to work with nature and save money too
Finch Frolic Garden and Hatch Aquatics will present four fantastic, information-filled lectures in June. Join us at beautiful Finch Frolic Garden in Fallbrook, 4 pm to 6 pm, for refreshments and talks on…
Saturday, June 7: Introduction to Permaculture and Finch Frolic Tour: We’ll take you through the main precepts of permaculture and how it can be applied not only to your garden, but to yourself and your community. Then we’ll tour Finch Frolic Garden and show rain catchments, swales, plant guilds, polyculture, living buildings and so much more.
Saturday, June 14: Your Workers in the Soil and Earthworks: Learn the best methods for storing water in the soil and how to replace all your chemicals with actively aerated compost tea and compost.
Saturday, June 21: Aquaculture: You can have a natural pond – even in a tub! How natural ponds work, which plants clean water and which are good to eat. Even if you don’t want a pond, you’ll learn exciting information about bioremediation and riparian habitat.
Saturday, June 28: Wildlife in your Garden: What are all those bugs and critters and what they are doing in your yard? We’ll discuss how to live with wildlife and the best ways to attract beneficial species.
Your hosts and lecturers will be
Jacob Hatch Owner of Hatch Aquatics. With years of installing and maintaining natural ponds and waterways, and a Permaculture Design Course graduate, Jacob has installed earthworks with some of the biggest names in permaculture.
Miranda Kennedy OSU graduate of Wildlife Conservation and wildlife consultant, Miranda photographs and identifies flora and fauna and maps their roles in backyard ecosystems.
Diane Kennedy Owner of Finch Frolic Garden, lecturer, consultant, Permaculture Design Course graduate, former SDC Senior Park Ranger, Diane educates homeowners on how to save money and the environment while building their dream gardens.
Each class limit is 50 attendees, so please make pre-paid reservations soon before they fill up. Fee for set of four lectures and tour is $45 per person. Single session fee is $20 per person. Contact Diane Kennedy at dianeckennedy@prodigy.net for reservations and directions.
You will not want to miss this fascinating and useful information!
- Animals, Bees, Birding, Chickens, Cob, Compost, Composting toilet, Fungus and Mushrooms, Gardening adventures, Health, Heirloom Plants, Hiking, Humor, Living structures, Natives, Natural cleaners, Other Insects, Permaculture and Edible Forest Gardening Adventures, Pets, Photos, Ponds, Predators, Quail, Rain Catching, Reptiles and Amphibians, Seeds, Soil, Water Saving, Worms
Finch Frolic Facebook!
Thanks to my daughter Miranda, our permaculture food forest habitat Finch Frolic Garden has a Facebook page. Miranda steadily feeds information onto the site, mostly about the creatures she’s discovering that have recently been attracted to our property. Lizards, chickens, web spinners and much more. If you are a Facebook aficionado, consider giving us a visit and ‘liking’ our page. Thanks!
- Animals, Chickens, Cob, Compost, Composting toilet, Fruit, Gardening adventures, Giving, Grains, Health, Herbs, Houses, Hugelkultur, Humor, Living structures, Natives, Natural cleaners, Permaculture and Edible Forest Gardening Adventures, Ponds, Rain Catching, Recipes, Seeds, Soil, Vegan, Vegetables, Vegetarian, Worms
San Diego Permaculture Convergence, Nov. 9 – 10, 2013
There is a fantastic, information-packed permaculture convergence coming up at the beautiful Sky Mountain Institute in Escondido.
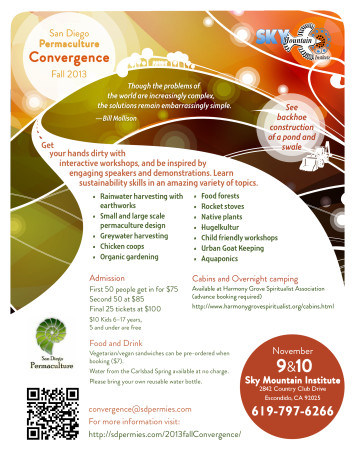 It will be two days packed with great information for a very reasonable price; in fact, scholarships are available. Check out the website at convergence@sdpermies.com. On that Sunday I’ll be teaching a workshop about why its so important to plant native plants, how to plant them in guilds using fishscale swales and mini-hugelkulturs. Come to the convergence and be inspired!
 - Compost, Gardening adventures, Permaculture and Edible Forest Gardening Adventures, Seeds, Soil, Vegetables
Crate Potatoes
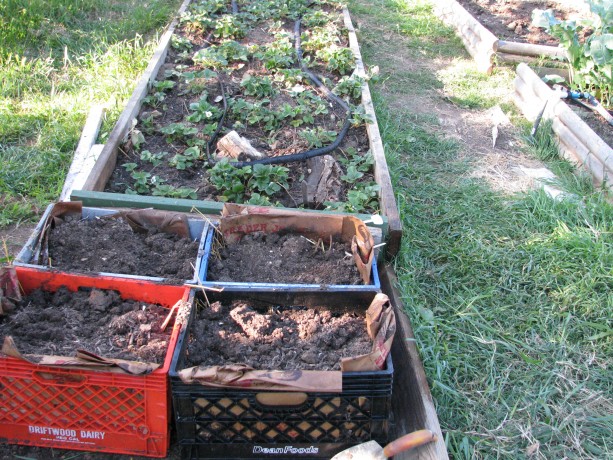
Milkcrate potatoes! This area receives sun for half a day and is shaded on the West side; perfect for keeping them cool. I’ve been frequently asked to write about trashcan potatoes. I haven’t yet, simply because I don’t have a trashcan to use for that purpose. Instead I used what I had and am experimenting with milkcrate potatoes. I’ll let you know how it works.
The potatoes that work in trashcans are any of the standard potatoes in the Solanaceae family, related to tomatoes and eggplants; sweet potatoes and yams are in the morning glory family and grow very differently. A good article with photos that shows growing potatoes in a barrel is at greenupgrader.com. There are many videos on the web about growing trashcan potatoes; a good one is at Farmers Almanac . Two things that she does in this video that I do differently is that after cutting the ‘eyes’ of the seed potatoes, I allow them to harden off for a day or so before planting, and also potatoes can grow with less than 8 hours of light a day which makes it a good over-wintering crop, especially here in Southern California. Potatoes like shorter daylight and cool night temperatures, so plant now! If you plant later, protect the trashcan from the afternoon sun. Hardening off means to allow the cut potato to sit in the shade for a day or so to allow the cut end to form a ‘scab’, or harden up before planting. It helps keep the potato eye from molding and provides protection from insect or bacterial attacks, and keeps drier soil from leaching water out of the potato. This is the same process you’d do when taking cuttings from cactus, geraniums and other easily-rooted, sappy plants. When watering trashcan potatoes, don’t overwater because you’ll rot them. Like their cousin the tomato they’ll do better slightly drier than wetter.
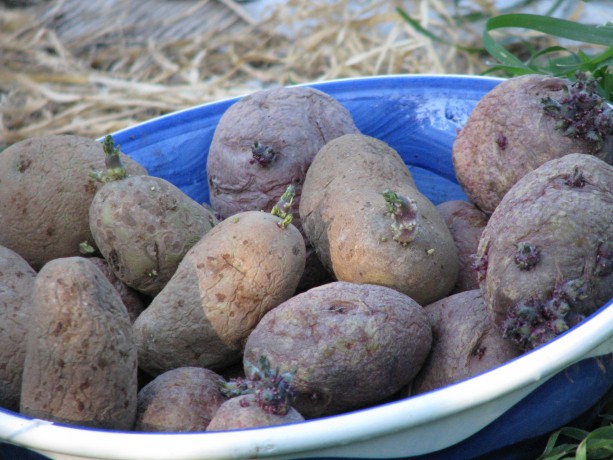
Organic chitted potatoes. ‘Seed’ potatoes aren’t potato seeds. They are small tubers that are ready to plant. Always buy organic seeds. Period. You can buy seed potatoes online or in nurserys available in Southern California just after Christmas, and sometimes in the late Fall. They usually purchase the seed from other states which have snow and don’t ship during the winter. Buying online or from organic catalogs allows you to shop among a wide variety of potatoes differing in size, color and purpose. However since we can plant potatoes in the Fall and don’t want to wait for shipping times, we can buy a bag of organic potatoes locally and sprout them ourselves. Non-organic potatoes have been treated so that they don’t sprout in the store, and are genetically modified (GMO) to last on the shelf. Sprouting potatoes is called ‘chitting’ and is very easy. Mine usually sprout in a bowl on my kitchen counter. Keep them in a light, cool area out of direct sunlight and they’ll grow. When the potatoes have chitted and ‘greened’ (have sprouts), you can either plant them whole or slice them so that each piece has at least one eye. Allow them to harden off and plant them. Give the extras to your neighbor!
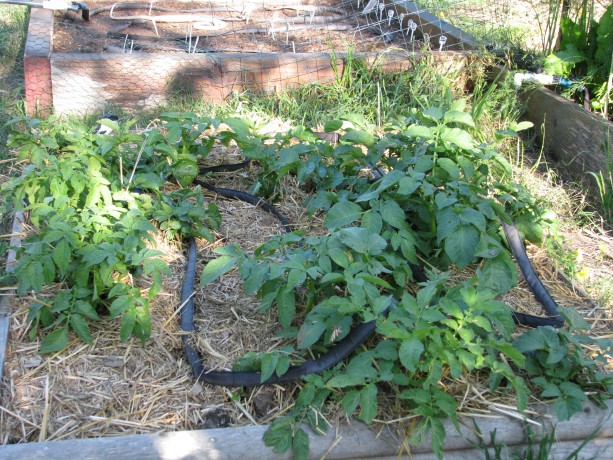
Potatoes can be grown in the ground, or in a raised bed, and then you hill up around the plant to produce more tubers. The reason for growing trashcan potatoes is that you can grow vertically, save garden space, and in particular save your back from trenching, hilling and then digging. The harvest is more productive, too, because you won’t be accidentally cutting through or spearing potatoes in the ground. Potatoes can grow this way because the tubers are actually specialized underground stems called stolons. Potatoes will produce tubers underground, but anywhere along their stems they also can grow a potato under the right conditions. Once you plant a potato ‘eye’, the eyes being the growth buds, it will send out stolons. The plant will produce potatoes below ground, and if you hill up around the stems they will also begin to swell and produce tubers.
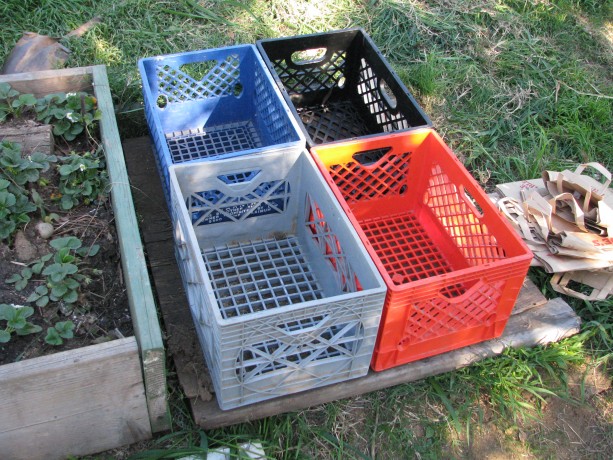
I have extra milk crates, and a source for more, so why not use them? When you plant in a trash can (with drainage holes!), as the greens shoot up you keep layering compost or straw or woodshavings or potting soil or whatever around the stems keeping a little green showing until you can’t fill the trashcan anymore.

I lined the bottoms and the outside edges with extra paper bags and watered them. When the plant is done growing the plant will bloom and sometimes even produce seeds. When the stems die back, you knock over your trashcan and harvest. Save some of the smaller ‘taters for seed for planting in the Fall.
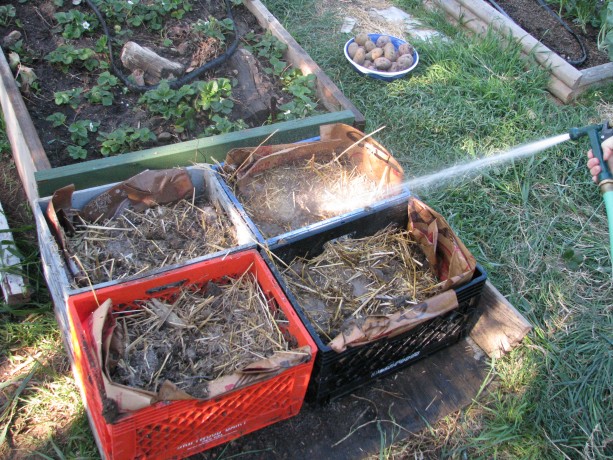
I filled the crates 2/3s full with compost mixed with chicken straw and watered well. You don’t want heavy soil or the potatoes will rot. You also want to insulate the potatoes from outside warmth. You can also root around in there earlier and pick new potatoes, or you can delay your harvest, keep water out of the trashcan and keep it in a cool spot, and harvest when you want them. The beauty of trashcan gardening is that you don’t need a trashcan. Very zen! You can drill holes in a plastic carrier, use burlap sacks, stack old tires, nursery containers, large plant pots or whatever you have. If you have a bottomless or rusted out trashcan, use it! Place it over good garden soil and allow the potatoes to grow down, too. You’ll have a little digging to harvest after you knock over your trashcan full of potatoes, but not much. To make holes in a plastic or aluminum trash can, borrow a digging bar (a long metal pry bar), place your trashcan right-side up on a dirt area, hold the bar high vertically over your trash can pointy side down and let it go. It should make a hole. Or turn the can over and use a hammer and something sharp like an awl or screwdriver (be careful you don’t shatter the top of the screwdriver! You don’t have to pound too hard. Be wise and wear safety glasses just in case). Do this multiple times to make as many holes as you can without making the bottom unstable.
Also be sure to keep the trashcan or crate potatoes in a cool place, especially if you are planting in the early spring here in Southern California. Warmth will keep the potato stems from swelling into tubers. Insulate the potatoes well and keep them cool while still allowing them enough sunlight. Fall and winter are the best times for planting potatoes here, as long as they have adequate drainage.
There is concern about leaching chemicals from plastic, or tires, or aluminum. Do the research and make yourself happy. I don’t think there is that much leaching to be worried about because the plants aren’t in there for a long time. You can always make a barrier between the soil and the sides of the containers with undyed paper or newspapers using soy ink. So save your garden space for other crops, and pop your ‘tatties in a can. Or crate. Or whatever.
Update: here is a very comprehensive article about planting potatoes. Rather than use commercial fertilizer, of course, we recommend rich compost, which will provide what your potatoes need. Also use dead garden debris such as old pea stalks (cut rather than pull them up to allow the nitrogen nodules on the roots to remain in the soil) in your planting bed or container.
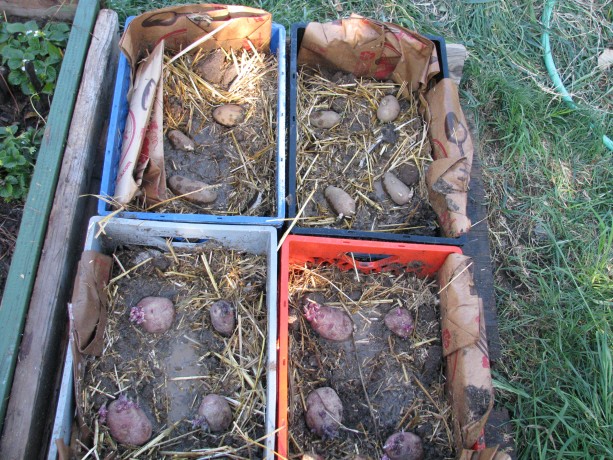
I planted whole potatoes just because I didn’t have room for lots of cut ones and these needed planting or tossing. I then covered them with about an inch of light compost and now I’m waiting! - Animals, Bees, Chickens, Cob, Compost, Composting toilet, Gardening adventures, Health, Heirloom Plants, Herbs, Natives, Permaculture and Edible Forest Gardening Adventures, Ponds, Rain Catching, Recipes, Salads, Soil, Vegan, Vegetables, Vegetarian, Worms
Southern California Permaculture Convergence! Be there!

Southern California Permaculture Convergence If you are interested in any aspect of permaculture, such as organic gardening, herbs, planting native plants, aquaponics, natural ponds, beekeeping, keeping chickens, and so much more, then you must come to the Southern California Permaculture Convergence. It happens on March 9th and 10th at the Sky Mountain Institute in Escondido. The keynote speaker will be Paul Wheaton, lecturer and permaculturalist extraordinaire of www.permies.com fame. Oh, and I’ll be one of the many speakers as well (cough cough). The Early Bird special of only $50 for both days ends at the end of January, and then the price will rise, so buy your tickets now!
Also, for a full-on demonstration of taking bare land and creating a permaculture garden, there will be a three-day intensive class taught by Paul Wheaton on site the three days prior to the Convergence.
You can read about the convergence here at the official website, which will give you the link perm.eventbrite.com where you may purchase tickets. Also visit the SD Permaculture Meetup page to see all the free workshops that happen monthly all over San Diego.
This convergence is such a deal, you really shouldn’t miss it! And such a bargain, too. One of the best things I find that come out of these convergences is the exchange of ideas and networking among the attendees, and all the practical information you can take home and use right away. One of the largest parts of permaculture is building community, which means sharing with and assisting others.
Really. Don’t miss this! Tell your friends!
