- Animals, Chickens, Compost, Gardening adventures, Permaculture and Edible Forest Gardening Adventures, Soil, Vegetables, Worms
Fifty Ways To Leave Your Compost

Its not fruit; its pre-compost! I have no idea how many years I’ve composted kitchen scraps. So many that when I see anyone dump veggie bits, egg yolk and shells, plate scrapings, old leftovers and even floor sweepings into the regular garbage it sets off all of my alarms. How can anyone waste all that good stuff? That is like throwing gold away! Its not dead stuff… its all living and ready to transform in to perfect soil, which shoots health into your plants! Most people say that they don’t have the time to compost, or they don’t want to turn a heap.
Well.
Here may not be fifty ways to compost easily, but certainly enough for ANYONE to keep their compostables out of the mainstream trash. And apologies to Paul Simon.

A blurry glimpse into my sink composting bucket. Egg shells, tea bags, banana peels, and tissues! 1. You Just slip out the back, Jack, with that little pail you have in or under your sink, into which you scrape everything compostable. They warn you about bones and meat because of animals digging through your heap to get to them, but if you bury your compost deeply, you won’t have that problem. I use a little bucket that they gave me for heaven-knows-what-reason at the hospital when I had my gall bladder out. It isn’t pretty, but it does the job. When I had both my children at home there was a lot more veggie peels to deal with, so in my kitchen I had a woven laundry basket, and inside I had two plastic liners, one for recycling and one for compost.

Big ol' basket, divided in half inside. One part recycling, the other compost. I only emptied it once a week. I didn’t like using so much plastic, but I’d put the plastic bag in the recycling. They sell all kinds of really nifty compost buckets now. Get one with a lid to keep those annoying little fruit flies from developing. Or if you have an open bucket like mine, just fill it partly with water so that the compost is submerged. It is easier to dump out that way and keeps cleaner, too. Especially if you’re going to…

Is it a Vita-Mix, or is it a composting machine? Make a new plan, Stan, and instead of making a compost heap, you put all those scraps (barring big pits and nut shells) with water into a blender and whip it up. Then march outside and pour that brew around your plants! You can always kick a little dirt over it if its thick. This gives your plants a fantastic compost boost. Since it is undecayed pureed plant matter, you don’t want to bind up the nitrogen around seedlings or young plants, so pour it outside the drip line (how far the roots come out), or in an area you are preparing to plant in the future. This compost will decompose with days, depending on how warm the ground is (cold weather kills off or slows down microbes and wormies). If it is snowy winter where you are, then you might just freeze the stuff, in ice cube form or in paper cups. When the soil warms, plant those cubes! (Be sure to label them when in the freezer so no one thinks they are smoothie-pops!)

Freeze your blended compost, then empty the cubes into a bag and LABEL. You don’t need to be coy, Roy, but depending on your neighbors you may not want them to see you burying your compost. That’s right, you don’t have to make a heap, or blend it up. Just march outside with your bucket and a shovel or trowel, dig some small holes and bury it! The wormies will turn it into soil for you in weeks. Sometimes you’ll get surprises, like when a potato sprouts…. free veg! Here again for those who have frozen winters, you can pop the compost as is in a bag in the freezer. The only problem is freezer space. Just think, though, every bit you can save helps your garden!

Dig it in! Just get yourself free from all your hangups about compost heaps and go buy a compost bin. I’ve a Rubbermaid bin for about twelve years. When my compost container is full I march it down, open the top, toss in the contents and away I go. When I pull weeds or thin the garden, I throw that in there too. Do I turn it? Heck, no! But if I wanted to I could very easily. The sides and two halves of the top fit together like enormous puzzle pieces, so I just need to take them all off, reassemble them right next to the heap, then pitchfork the compost back into it. The stuff that was on the top would now be on the bottom. Fresh compost can be shoveled out of a hole in the side on the bottom. Compost that is turned is not only matured faster, but is of a better quality and more broken down than that which isn’t turned. But as the bumperstickers say, compost happens! Stuff breaks down. Throw stuff into the top of the bin, and rake it out the bottom. Free your mind from compost regulations! Just go for it!

Throw it on! Compost happens! Hop on the bus, Gus, and become a real composter. You can build compost bins very cheaply. If you can nail things together so that they actually stay together (I can’t), you can build a three-section compost bin out of old pallets. There are lots of YouTube videos showing how. The best kind have removable slats in the front so that you can start low and gradually add to the front as the heap grows. Then when you want to turn it into the next bin, you may easily remove the slats for quick access. You can also just take a section of wire and make a cylinder out of it, then pitchfork in the weeds, grass, and throw in the kitchen trimmings. When its time to turn it, just undo the wire or slip it off, and set it up next to the pile again. Or have a line of wire cages. I have three, plus my bin. Do I turn them either? No. I keep throwing on excess weeds, and it keeps sinking down. Remember: compost happens!
You don’t need to discuss much with wormies because they can’t answer you: their little mouths are so full of your kitchen waste that they can’t talk! Make yourself a worm bin. Or buy one. You’ll need two dark plastic bins (one fits inside the other). Drill holes all through the lid for ventilation, and in just one of the bins drill some holes along the top of the sides, then drill tiny holes in the bottom for drainage. Fit the drilled bin inside the non-drilled bin. Put wads of newspaper, or paper from your paper shredder (unless you are saving it all to pack your mail-out Christmas gifts with instead of those nasty Styrofoam things) in the bin up to about half way. Lightly sprinkle with water. Throw a little soil in there, but not much for these kinds of worms. Find someone who has worms, or buy some red wigglers. You don’t want earthworms. Put these little guys gently into the bin. Take your compost and put it into one corner. Cover with a dampened sheet of newspaper and put the ventilated lid on the top. Keep the wormies from extreme temperatures. Some people keep a bin under their kitchen sink. Many school kids keep wormies as projects and for fun (baby wormies are white and wiggly!). As the wormies devour your compost they’ll leave behind castings, which look like sticky dirt. This is gold. If they had worm castings in Fort Knox instead of all that gold bullion our dollar would never fluctuate. What collects in the bottom bin is ‘worm tea’, which is just as valuable. Pour this stuff into your houseplants or directly on your plants. Commercial worm bins have several sections to hold more compost, are a little easier to manage and have a spigot for the worm tea. A perfect Mother’s Day gift! That or a compost bucket or bin!
Just drop off the key, Lee, with your housesitter when you go on vacation, and don’t forget to let her know to throw those kitchen scraps in with your chickens! Or goat! Or miniature pig! You don’t even need a heap when you have beaks! All those scraps are pure vitamins and minerals and chickens will not only devour them, but give you the best eggs you have ever tasted. Don’t forget to crush eggshells and give them right back to the chickens! They need that calcium to keep their eggs nice and hard. Chickens turn your compost into great eggs for you and great poo for the ground. Chicken manure can be used right away in your garden. Goaties will eat just about anything, as will piggies, so kitchen waste is perfect (slops).

Feed it to the chickens! And get yourself free from all that guilt that you shoulder when you throw food into the trash. Oh, and separate your recycling, too!
You May Also Like

Native Insects and IPM
- Animals, Gardening adventures, Heirloom Plants, Permaculture and Edible Forest Gardening Adventures, Ponds, Reptiles and Amphibians, Soil, Vegetables
Earth Day at Finch Frolic

Snowy egret hunting. "Get the bullfrogs!" In celebration of Earth Day, I worked in the garden. You can stop laughing now. Yes, I know that I work in the garden nearly every day, and then spend time not volunteering or exercising, recovering from working in the garden. It was an overcast day, which beach-bound teenagers probably cursed, but I found perfect for working outside.

Roses in bloom everywhere. I had a visitor wishing me a Happy Earth Day.

Do you notice anything about this wreath? This is an alligator lizard.

"Hello!" Hopefully he enjoyed the ride as I opened and closed the door several times to photograph him.

Alligator lizard from inside. Among other things today, I sifted compost. I had moved my compost bin, and this good compost was still on the ground from where it had been.

Sifting compost through a screen. I put it into a new raised (and wire-lined) bed.

Adding sifted compost to the bed, which has been dusted with organic non-animal based fertilizer. Then I planted two rows of rice in it. Yes, rice. It is an heirloom variety from Baker Creek Organic Heirloom Seeds (http://rareseeds.com/rice-blue-bonnet.html), and it doesn’t need to stand in water to grow. Just something new and fun to try out.

The rubber snake guards a freshly planted bed of rice. I’m also growing red seeded asparagus beans, the seeds of which were given to me by the woman who made the quail house. She also introduced me to Baker Creek, and for that I’m sincerely indebted. (http://rareseeds.com/red-seeded-asparagus-bean.html .)

Spinach, carrots, edamame, sesame, Kentucky pole beans, endive and tomatoes are finally coming up. The other veggie beds are finally sprouting, now that the evenings have warmed up.

Collards and carrots, transplanted from another bed and doing well. 
An incredible parsley setting seed, peas, parsnips, spinach, rhubarb, carrots and beans. 
Castor bean seeds were in the mushroom compost, and I'm pulling them quickly. Here are a few views from other areas of the garden. Three weeds until the AAUW Garden Tour. Yikes!
 and is irrigating native plants.")
General Mischief waiting near the quail house for dinner. The hose connects to the 700 gallons of cootie water (compost tea) and is irrigating native plants. 
A happy harvest. Strawberries and eggs. I'm freezing the berries for later to make jam. 
Lamb's Ear, whitebud, passionfruit and Bermuda grass 
Stunning blue iris in the pond. 
Fringe tree in bloom. 
Iris You May Also Like
Native Insects and IPM
-
Soil: Weeding by Sheet Mulching

Sow thistle For this next part of how to build soil by weeding, I’ll discuss one of the easiest and laziest ways. If you want nothing to grow in an area, and don’t care about how it looks or length of time, then sheet mulching may be for you. I’ve used cardboard and newspapers around my vegetable beds with great success. To fully knock out tough weeds such as Bermuda grass, you should put down a good inch of newspaper or cardboard (or a combination). If you are using newspaper, leave the sections intact or else the wind will blow it everywhere, or cover it with a piece of cardboard. Water it in and let it rot.
If you have old plywood lying around, drag it over to your weed patch and pop it on top. Walk over it all you want, just watch out for old nails.

Sheet mulching with plywood... at work! Another method is to water your weeds, then cover them with thick black plastic held down with rocks. On hot days the weeds will cook under the plastic. I’ve used this before successfully, but now I would only use it if I had the plastic already. I’m trying hard to not contribute to the creation of more plastic.

The area after the plywood was removed. Then there is sheet mulching where you actually build your soil over the top of weeds. The new catch-phrase for this is lasagna gardening. Start with a layer of corrugated cardboard or three layers of newspapers (or a combination!) right on top of your weeds and where you want to plant (this isn’t for clearing pathways). Water this in really well. Then gather together compost items such as coffee grounds, weeds (without seeds), grass clippings, shredded paper, seaweed or algae… whatever you can compost. Sort your compost into browns and greens. Browns are mostly dead stuff such as leaves, shredded paper, pine needles and dried plant clippings. Greens are fresh things like dinner scraps, green cut grass… anything with some life still left in it. Manure is perfect for your ‘greens’ pile. Chasing down landscapers as they rake leaves and bag up grass from their lawnmowers is a good way to collect ingredients. Now start layering. The best ratio would be two parts brown to one part green, but don’t stress over it. The green stuff will heat up and cook the browns. Depending on how much stuff you can layer, your bed should be about two feet high, and however long that you want it. Water it regularly. Within weeks your lasagna will have sunk down into fantastic garden soil. If you want to plant right away, then add several inches of compost to the top. Otherwise, let it sit a season and you’ll be able to plant right into it. The newspaper or cardboard at the bottom will help suppress weeds and keep it moist. Remember that the deeper your loam, the more rainwater it will hold and the less you’ll need to water.
What all of these methods of weeding does, is to decompose the weeds right where they are. The minerals that they hold in their leaves are distributed into the soil, and as their roots decompose they leave tunnels for worms and other soil creatures to move around in. You are keeping the soil moist and dark, which are wonderful conditions for our soil friends to flourish. I’ve left plywood down on pathways during the entire growing season, and when lifting a piece have discovered treasures such as newts and salamanders underneath, that I wouldn’t have seen otherwis. They are great bug eaters for the garden. Sheet mulch also can harbor slugs and ants, but they are easily dealt with, especially if you have chickens!
Sheet mulching is very easy, it combats even tough weeds, it builds soil, and it repurposes things you might normally put into the trash. So save all those boxes from Christmas, the contents of your paper shredder, what newspapers you didn’t use to light the fireplace, your garden waste, your kitchen waste, and whatever your neighbors want to get rid of (tell them you’re making lasagna with it!) and begin layering. You are helping your garden, helping your soil creatures, building loam, opening underground stores of minerals for usage by plants, making your fruit and vegetables rich with nutrition, lightening your impact on the dump, creating a beautiful garden, and all without backbreaking work and certainly no chemicals! Just say, “NO!” to Monsanto!
-
Soil: Weeding

Lesser goldfinch eating sow thistle seeds. Good soil is the basis of life as we depend upon it. Rich, loamy soil with a neutral pH is what every gardener dreams of. The smell of fresh soil is called geosmin, which is a scent released by happy soil. Good soil makes for healthy plants, which in turn grow healthy fruits and vegetables.
Soil is different than dirt. Dirt is what happens on a roadway after a lot of traffic passes over it and the oxygen is compressed out of it. Dirt is what is left when erosion is allowed to carry off topsoil. Dirt is what remains after unsustainable farming practices where chemical fertilizers are dumped onto plants year after year until nothing will grow anymore. Dirt is what most people have when they move into a new house, because to make the property level all the topsoil has been scraped off and buried. Dirt is nearly dead. But dirt is an ingredient in soil, and luckily Mother Nature is always trying to repair the soil. What we call weeds grow in dirt because these are plants on a mission to bring dirt back to life.
Plants have different jobs in nature. Some have deep tap roots to mine minerals from deep down, bring them up to their leaves which die and transfer the minerals to the surface. Some are groundcovers. Some attract insects. Some fix nitrogen in the soil. Some provide a shady canopy. Most provide mulch in the form of fallen leaves, twigs, flowers and fruit. Some provide habitat for animals, whose droppings fertilize the ground. Plants help each other in a symbiotic relationship, and permaculturalists call a set of these plants guilds.
Now look at weeds in a vacant lot and try to identify them. Wild radish? It has an enormous taproot that breaks apart hard soil, then mines deep minerals and delivers them to the topsoil in the form of leaves. It also attracts bees and other pollinating insects. As does mustard, which has a very tough root system that also breaks up hard soil and creates tunnels for worms and other soil creatures to move through. As the plants die off, so do the roots, which decay and feed the microbes and worms, whose castings turn dirt into perfect soil. Grasses hold onto the soil keeping it from eroding away, shades the soil from harsh sunshine, retains water and provides good habitat for worms as well as food for birds, depending upon what type of grass is growing. All plants have a purpose, even if they aren’t in their native environment.
However we don’t want our gardens to be like vacant lots. Usually, quite the opposite. Many people will look at their backyard full of weeds and poor soil and decide just to dump white sparkly rock all over it and stick in some unhappy cactus. These people are actually much kinder to the soil than those who start the relentless, expensive, laborious and deadly cycle of spraying chemical weed killer, dumping on chemical fertilizer, forcing plants to grow in areas not suited to them and yet never creating soil.
When you use permaculture practices in your garden, the most work is done in the first year. You plan your garden for functionality, plan plant guilds, plot out your own usages and desires, and then plant accordingly. You may plant close together, but keep in mind the needs of the adult tree. Don’t plant invasive plants unless they are properly contained. Don’t plant vines without installing support systems such as trellises first. Lay the groundwork for your garden. Don’t spray. Don’t pour lots of money into chemicals. Don’t even till unless your soil is horrible and you can’t wait to plant (and then, only till once and then never ever again!). There is a lot less physical labor to do in a first year permaculture garden than one with chemicals, and none of it involves poison!
Permaculture makes you look at everything in different ways, even things that conventionally seem bad. Instead of looking at your weeds as devil spawn, look at them with a view to what their purpose is in the garden. What are they telling you about the soil? I’ve talked about this in earlier posts, about what type of soil supports different types of weeds. For instance, nettle grows in high nitrogen areas. Now think of the weeds as a potential crop. Lambs quarters, purslane, even stinging nettle are all edible (boil the nettle briefly to dissolve the acid) and very healty for you. Dandelion wine! Or think of the medicinal values. Watch your weeds for awhile. Do birds eat the seeds? Are they covered in ladybugs? So now that you know your weeds a little better, you may think more fondly of them and perhaps allow some of them to live. Or even reserve a corner of the property for weeds to grow just for those birds, insects and your own harvesting. I’ve allowed purslane and scarlet pimpernel to grow over newly planted areas because they helped hold the soil, preserve moisture and helped prevent more nasty weeds from growing. Now you’re thinking: but what if they reseed? Well, of course they’re going to reseed unless you don’t let them live that long. Seeds are coming onto your property via air, animals and your own shoes every day. There is a horror about reseeding weeds that is all blown out of proportion. Have you ever cut all the weeds and had none come up the next year? Only if you dump Roundup or other chemicals on plants and kill them and everything around them in an annihilation of all that’s good along with all that you don’t want, do you keep anything from growing in that area. So how do you get rid of weeds? Okay, hold that thought.
How makes up good soil? Decomposed organic matter. It is actually the microbes and worms in the soil that make soil alive and healthy, and they are decomposing all that organic matter. How do you get good organic matter? Haul truckloads of horse manure from a farm? Save kitchen waste? Have a worm bin and harvet the castings every six months? Wait until trees are mature and harvest the leaves? Well, yes to all of these, but in the meanwhile, as it often is in nature, the answer is right in front of you: the weeds!
That’s right! Weeds are just compost that hasn’t happened yet. The fastest way to develop good soil when you have no other resources (or not enough resources) is to help nature along. Define your walkways (where foot traffic will compress the soil and where you don’t want anything to grow), and then when you pull weeds, toss them in your garden beds. If you weedwhip or mow, rake the cuttings into the beds. If you do this prior to the weeds setting seed, fine, but don’t lose sleep if you haven’t. You’ll grow some more weeds… great! More compost! I hand pull most of my weeds and then throw them in the guilds under the plants, root ball up. Within a few weeks they have decomposed, and all those nutrients they were holding in their leaves and roots have been delivered to the soil in the same areas. (If you have different types of soil on your property, keep the weeds near where they grew because they were busy amending that particular soil). The layer of weeds will also suppress other weeds from coming up, and will hold in moisture. Sure beats hauling weeds to a compost heap, and certainly beats having the trashman haul off plants that are holding nutrients from your garden soil!
There are exceptions to this practice. Invasive weeds such as Bermuda grass, Johnson grass, and anything that spreads via underground runners (rhyzomes) should not be handled this way. These useful plants for a vacant lot are terrors of your garden. However they can become useful. If you have a compost heap that really heats up, you can cook the weeds in it. What I do is put the weeds in an old trashcan, put the lid on it and let it sit in the heat for weeks until the weeds are cooked and completely dead. If it is Bermuda grass or Johnson grass, I also pound a stake through its heart. Then I compost it. Putting it in a trashbag works, too, but then you’d be contributing to the plastic industry in one more way and also to the landfill. I have set out trashcans with Johnson grass in it to go to the dump when I had so much that I had no place to cook it, and figured that sending organic weed material to the dump really can’t hurt.
How does one get rid of invasive weeds without spraying? Relentless hand-pulling in combination with occlusion, which is covering it with plywood, thick layers of cardboard, black plastic or whatever you have that will deprive it of what it needs to live.
This has been a long, lecturing post, and I apologize (if anyone actually has read to this point!) . I want you to look at the varied functionality of everything in the garden. If you have a problem, can you turn it into a benefit? For instance, if you have a wet clay area, why not harvest the clay from it to build a cob oven or garden feature, and let the depression become a natural pond? Or sheet mulch that area (what some people call lasagne mulching), which I won’t go into here but simply search the Internet for it and you’ll find hundreds of examples. Or plant peppermint or spearmint, or some other wetland-loving plant such as watercress… all of which are edible.
In subsequent posts I’ll talk more about different types of weeding and soil building. For now, go
- Animals, Bees, Birding, Chickens, Gardening adventures, Heirloom Plants, Other Insects, Permaculture and Edible Forest Gardening Adventures, Photos, Ponds, Rain Catching, Vegan, Vegetables, Vegetarian
Garden’s One Year Anniversary
Happy Anniversary! One year ago on Feb. 1, 2011, I signed a contract with landscape architect Roger Boddaert (760-728-4297) to create a permaculture garden. For twelve years I’ve had this sloping property that was covered in weeds and worthless Washingtonia palms. Not only do these 2 acres slope down to a barranca, but it was filled in due to catching all the rainwater that runs from the street and properties above. I have to give credit to friend Gary B., who brought up the subject of permaculture in a conversation the year before. I’d heard the term and thought I knew what it was about, but months later when I was researching what to do with my property I remembered him mentioning it, and looked it up. I found what I was looking for. I’ve been an organic gardener for many years, have owned chickens for their eggs, have refused to till the soil so as not to kill microbes, have worked naturally with animals and plants, have created habitat, composted, recycled, collected rainwater… and all of that was permaculture. And so much more. How can one not be attracted to the term Food Forest? Certainly not a foodie and gardener like myself.
What happened on the property starting the week of Feb. 1 for the next six months altered the land so that it is truly two acres of habitat. It is useful, it is natural, and it is beautiful. Roger’s team led by Juan built beautiful walls of urbanite, planted and hauled, worked in scorching sun and frosty mornings and made what was dreamed into reality. An integral part of the garden has been diverting the water from erosion points and into rain catchment basins and natural ponds, and that is where Aart DeVos and Jacob Hatch of Aquascape (760-917-7457) came in. They also installed the irrigation. Dan Barnes did the rough and the precise tractor work (760-731-0985) and I can’t recommend his experience and skill enough. Fain Drilling dug the well (760-522-7419) and the wonderful sheds were built by Quality Sheds of Menifee (http://www.socalsheds.com) .
Along with some volunteer help from Jacob, I am the sole caretaker of the property. I am planning the plant guilds, weeding, improving soil, moving problem plants and trees and, did I mention, weed? Oh yes, then there is weeding. On Saturday May 12th, the garden will be on the Garden Tour of the Association of University Women of Fallbrook, and hopefully many people will be inspired to go organic, to create habitat, conserve water and grow extra food for the Fallbrook Food Pantry. We’ve come a long way, baby!
The following photos are comparisons between the precise location last year at this time, and today.

The property last February. 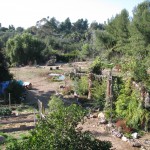
The property today. 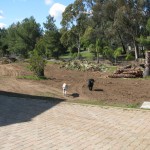
Sophie and General loved all the excitement. 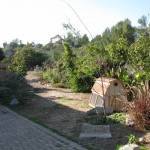
They love the new gardens and pond even more. 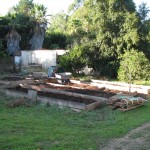
My veggie beds with the old sheds behind. 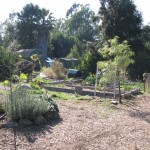
My veggie beds with the new sheds and greenhouse behind. 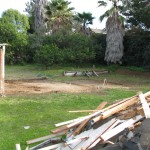
Where the big sheds were: everything usable was reused. 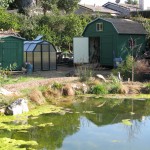
New sheds that aren’t a safety hazard, and the greenhouse. 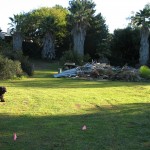
The lower area with shed debris (lots of mowing area!). 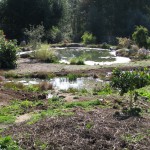
Hey, there are ponds there now! 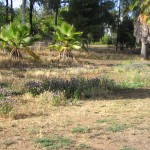
Not much for the neighbors to look at. 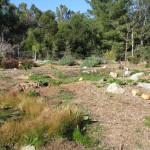
Quite a lot for the neighbors to look at! 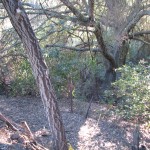
Access to the old oak was hazardous. 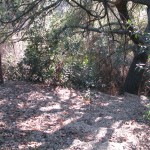
Palm stairs lead past the oak to a birding area. 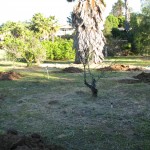
Stonefruit were old when I moved in. 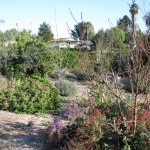
New stonefruit adorn what is now the Bee Garden. 
An erosion area sloping down to the barranca. 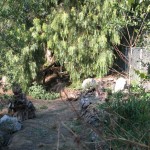
Water won’t flow through here anymore. 
Lots of mowing and palm frond removal. 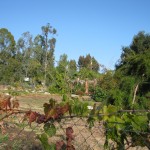
Not so anymore. 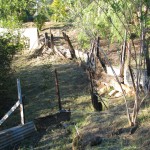
Horrible looking debris failed to hold back the embankment. 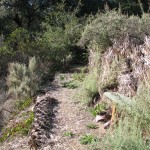
Palms were used to stabilize the new paths and camoflage the supports. 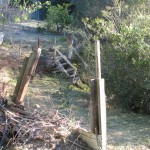
Old unstable stairs led to washout areas. 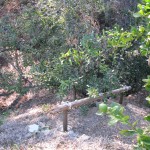
New railings, stairs and urbanite retaining walls lead to another viewing area. 
The view from my balcony. Part of the old shed remains. 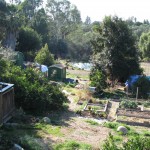
Hey, there’s a pond there! You May Also Like
Native Insects and IPM
-
Building a Rion Eco-Grow Greenhouse

Greenhouse in a box! Yes, I finally decided upon which greenhouse to buy. It took a year and a lot of research and waiting. I did go back and forth about just throwing some plastic over bowed PVC pipes, but I wanted something that lasted and didn’t look like a piece of junk. Most greenhouses that I wanted were over $1,000, and that was just not going to work. Also, I needed diffused light rather than clear glass or plastic because most of the year here the sun really cooks things. Diffused light will help keep the seedlings from scorching. Since I’m absolutely not a carpenter, and would be assembling this myself, I needed something that went together fairly easily. I found the Rion Eco-Grow, a small greenhouse that snaps together and yet can be enlarged later (http://www.riongreenhousekit.com/rion-ecogrow.php). It isn’t made of aluminum, which can bend easily, and the double plastic ‘windows’ diffused light. It is delivered by standard carrier, not flatbed truck, so the packages are manageable and you aren’t expected to help unload them. It came with a seven-year warrenty and had very good customer reviews on other websites. I not only bought it on sale, but it came with a choice of a gift, and I chose the solar light.

I guess they didn’t fit through the little package door! Last Wednesday I came home to find a couple of friends waiting for me. The boxes were about 60 pounds apiece, but I just levered them onto my garden cart (the best thing I ever bought!) and hauled them down to where the greenhouse was going.

Sorting the parts and leveling the ground took a whole afternoon. Well, it wasn’t easy, putting that thing together. After sorting parts, many of which were not labelled, and then leveling the area where the base would be constructed, it was already an afternoon shot. The next day I started fitting pieces together and trying to figure out the miniscule diagrams. It really is ingeniously thought out.

Pushing together the hardware was fun. Only when it came to fitting glazing on over the roof panels did the very, very bad time happen. I worked for a day and a half on just those glazing; they wouldn’t go in! They recommend soapy water. I had so much soapy water that it was dripping in my shoes. Finally I brought down my electric kettle and poured hot water on some of them. It worked for all except one end, which still isn’t going anywhere. It will have to stay like that.

In pergatory they make you try to assemble the roof parts… forever. When I started work, the ground was pretty dry. Then a puddle was forming in the mud at my feet and I realized that there was a leak in the pipe nearby, so I shut off the outside water until I can fix it. Then I was hurrying to be done before the rain last week, and I didn’t make it. Then, since it was very muddy and I was having so much trouble with the roof I thought I’d back out my riding mower out of the shed and haul the roof inside onto level flooring constructed using waterproof materials Miracote to see if that made any difference. I didn’t get far. I started the mower, tried to reverse, couldn’t clear the entrance way with the mower deck, then realized in only about two minutes time that the exhaust had filled the shed and I was getting sick. I shut off the mower and got out of there. That was the end of that work day, as I recovered my breathing and severe headache in the house. I tasted exhaust in my mouth for a long time afterwards.

Sophie checking on my progress. Then it rained again, and I spent a day running errands. Today I constructed the door and then noticed a spot in the middle that wouldn’t brush off.

What is that mark in the middle….? A spider had worked its way down between the lines of the panel and made a little web! He would certainly die in there, and I’d be watching him do it. So of course I took apart the entire top part of the door, wedged out the panel and blew down the lines, and he popped out the other side. Nothing I can do about the web he left, though.

A spider! Had to get that poor guy out of there I managed to complete everything except for placing the roof on the top. Tomorrow I’ll have help and we’ll do a ‘barn raising’, or, at least, raise the roof, after that, I’ll finally be able to start my project on organic greenhouse production.

All ready to raise the roof! Assembly tips: sort out every piece of equipment. Not all of the pieces are labeled, and some of the panels are only a hair’s difference in size, so measure and mark them all… it will save a lot of re-doing and cursing. Wear gloves. Not so much that the panels will cut you, but they really help save your hands when you are pressing and pressing and pressing and sliding your hands up and down plastic pieces to get them to fit together. If you have issues with your hands and wrists (as I especially do now!) this will be tough on you. Use lots of warm soapy water, and for pieces that either absolutely won’t go together, or for those that did and now need to come apart because they popped out of place, pour boiling water slowly down all pieces concerned. It really does help! Be sure to work on a level surface, even for constructing the roof. Give yourself a break and go do something else for awhile, then come back to the problem. Don’t use a rock to force a piece into place because the plastic will chip off. Ahem.
I’ll post a final photo when I set up shop!
-
Dragonfruit

Small ripening dragonfruit Dragonfruit have to have the most incredibly sensational color of any fruit. Their blooms are wild, showy and no better than they ought to be, and the fruit has colors so loud they bedazzle the eyes. Also known as pitaya or pitahaya, dragonfruit grow on either columnar or vining cactus plants. Their history is recorded with the Aztecs, and now they are grown in Vietnam and parts of Malaysia. Due to their soft texture, the fruit isn’t conducive to shipping and handling, so finding them at Asian marketplaces or Farmers’ Markets would be your best bet. However, the popularity of this plant is catching on and since they take up little room, can be grown at home.

There, amongst the proper cosmos, a wild flaunting beauty! I have two vining dragonfruit, which I’ve propped up on the trunks of two Washingtonia palm trees for support. They receive sun there, but some protection from the intense late afternoon sun, and it is a frost-free area. One morning in late summer I went out among the small cosmos and other English-style flowers of that yard, and suddenly noticed this enormous tropical flower looking so out of place. It was gorgeous, fragrant, and sultry next to the prim annuals. The flower of the dragonfruit has a nocturnal bloom, relying on bats and moths for pollination; apparently even those that are self-fertile, as this one evidently is, needs some interaction with bats and moths to set fruit. To insure pollination, growers will make an evening event of hand-pollinating, paint brushes and flashlights in hand. The flower slowly faded during the day and was limp in late afternoon; I’m glad I was lucky enough to see it in the morning at its most sensual state.

This gorgeous, fragrant flower was as large as my face. I didn’t think that the flower would set fruit, but the plant surprised me again when I glanced over last week and saw a red dragonfruit. This particular dragonfruit has red skin and crimson flesh. Some have red skin and white flesh, or yellow skin and white flesh. The most dramatic I’ve seen was a bright green skinned fruit with crimson flesh! All have small black seeds inside.

Hey, there's a dragonfruit! Dragonfruit is famed where it grows for its health benefits which are extensive, as well as the fiber and vitamins it contains. Dried dragonfruit is supposed to be more potent than fresh in some ways, and is a better eating alternative for those who don’t care for the texture of the fresh fruit. A good website honoring the nutrition aspect of dragonfruit is http://dragon-fruit.biz/ .

Red on the outside and crimson in the middle Propagation can be done by seed, which is slow, or by one-foot-long cuttings from fruit-bearing plants. Allow the cuttings to harden off before planting, just as you would any cactus or succulent. Plants will need support, especially the vining kind. They are tropical plants, so enjoy warm weather, regular watering without standing in water, and some humidity.
For sheer spectacular showiness, you can’t beat the neon colors of dragonfruit. Eat out-of-hand, in fruit salads, blend in smoothies or for sherbets, or dry to slightly chewy bits that are packed with nutrition. You will certainly impress your neighbors; in fact, invite them over for an evening pollination party! That ought to get the homeowner’s association all worked up!
-
Subversive Gardening

Veggies I’m going to cheat on original material in this link, and urge you to watch Roger Doiron (of Kitchen Gardeners International) talk about the gardening revolution. The important points are about the famine, obesity and monoculture problems and how we can save ourselves with backyard gardening… no different a message than Geoff Lawton’s, who says that all the world’s problems can be solved in a garden. The Doiron video is entertaining as well as informative, so please take a few minutes to watch it. I found it on a link from Treehugger.com, which has today several good articles about the Occupy movement, having a beehive, making a rocket stove and a wedding dress made of rubber gloves! Scroll down this link to watch the Doiron video here: http://us.mg201.mail.yahoo.com/dc/launch?.partner=sbc&.gx=1&.rand=7do57p67k7bh0 .
- Bees, Chickens, Gardening adventures, Other Insects, Permaculture and Edible Forest Gardening Adventures, Vegetables
Crazy-Pot Seeds

Crazy-pot mixture of veg seeds Today, the palindromic 11/11/11, was also Veteren’s Day and a day between two rainy weekends. A perfect day for spreading lots of seeds. With winter rains on their way in a month, it is important to hold the topsoil with rooted plants, and why not use a cover crop that also fixes nitrogen? My choices were hairy vetch and a tall native lupine.

Native lupine and hairy vetch seeds I would also have liked to use white or sweet clover but sources were sold out early this year. Both my choices will have flowers that offer plenty of nectar to bees, be lovely, hold the soil, set nitrogen, and can be, if needed, sacrificed. When you ‘sacrifice’ a nitrogen-fixer, you can either turn it under or cut the tops, leaving them in place on the soil surface to decompose.

Plant guild waiting for seeds I don’t agree with disturbing my soil microbes any more than necessary, so I won’t be tilling ever again. When you cut a nitrogen-fixer, the roots release the nitrogen they hold into the soil as the tops mulch then decompose bringing lots of nutrition to the soil surface. Vetch should be a winter crop, and lupine a spring crop, if they can tell the difference here in San Diego!

Mixing seeds with mushroom compost My method for spreading these two was to mix handfuls of each with a bucket of mushroom compost, and hand spread it in the most bare and most unfertile areas.

Broadcasting lupine and vetch seeds mixed with compost Adding the compost, I thought, helped the seed distribute more evenly, gave it a little cover since I wasn’t going to rake it in, and disguised it from birds a little.

The girls. Once done, I decided it was also a good time to do something I had been looking forward to doing for years: spreading old veggie seeds. I’d done a little of this in a raised veggie bed, with some success. I have so many old packets of veggie seeds that I’m not going to use in the raised beds (I have all organic seed now), and I can’t believe that it isn’t viable. If they sprout seeds found in ancient Egyptian tombs, then I’m sure mine can sprout, too. This seeding is a very important step in the edible forest garden.

Many old winter crop seeds This year’s abundance of herbs, squash and tomatoes has been fabulous… I still have some ‘feral’ tomatoes putting on enormous fruit which I pick, polish and eat out of hand in the garden while I’m working.

Pumpkins and squash on their way to the Fallbrook Food Pantry I opened all the packages of seed for cool-weather vegetables, such as carrots, radish, dill, broccoli rabe, and lettuces. Some such as garlic chives and onion I separated out and sprinkled near roses, since alliums are a companion plant for roses and help ward away aphids. The rest of it was mixed up in a lovely crazy-pot of seeds. I didn’t mix with compost this time, as there were fewer and smaller seeds involved. I sprinkled them then covered them with soil using my foot… the professional way to plant!

Scattering veggie seeds I am eager to see what comes up after the rain this weekend. It truely will be an edible landscape. Even if I allow the veggies to go to seed, the blooms will all be excellent bee food sources, especially the carrots and dill. None of these were nitrogen-fixers, because I used all the extra peas up in the vegetable beds this spring (see archives) improving the soil. Beans, and other warmer-weather seeds I’m holding back for February or March planting. I do have sweetpea seeds to plant out, but the lupine and vetch will be working their magic anyway.

Embankment with ragweed, now seeded with lupine and vetch 
Under the soil is now daffodil bulbs, lupines, vetch and mixed vegetable seeds About ten years ago I had a short story published in the young person’s magazine Cricket called Taking Tea with Aunt Kate. In it a girl lived with her mother who was a wild, messy gardener, spreading seeds all together and having veggies and flowers mingling in riots of color. The girl’s aunt is, by contrast, perfectly coiffed and takes her to a formal ‘high tea’ at a prestigious restaurant. The girl decides that she can be a little of each woman, a little wild and a little formal. I think I’m that child! I clean the dirt out from under my nails so that I can go to the opera.
I’ll be walking the garden in the next few weeks, waiting for tell-tale sprouts (and trying to figure out if they are weeds or not!), and watching the bare areas come to life. How fun!
You May Also Like
Native Insects and IPM
-
The Little Guys in the Soil
I know, I know, I’ve been very delinquent. However I have been working hard, reading a lot and studying. I’m taking a Permaculture Design Course in San Diego on most weekends, and the information has been dazzling. Even though I know a little or a lot of what is being presented, what amazes me is how related the information is and how it all works together. For instance…
Gardeners know that the best pH for soil is somewhere around 6.5. Higher or lower than that and the soil has too much acid or alkaline. Here in San Diego we have alkaline soil. Rainwater is excellent because it has a neutral pH. What is so important about that neutral pH? Well, I’m going to tell you. There are all kinds of nutrient in the soil in the form of trace minerals, such as iron, magnesium, copper, etc. However these nutrients are bound up in the soil because of the pH… some are bound by a high pH, some by a low pH. For instance, we have adequate iron in our soil, but because of the alkalinity, plants can’t access it and become iron deficient. If you have neutral pH, then plants are able to feed themselves nutritiously. To free up the iron, you should add mature compost and water as much as you can with collected rainwater.
Okay, so you knew all that. So did I. Here comes what I think is the interesting thing.
We know that the soil is teeming with little beings such as bacteria, fungi and nematodes. Some are good, some are bad. Such is life. Picture if you will the soil in a forest, which has a lot of large materials such as logs and sticks being broken down by various fungus. The soil in a vegetable garden, however, is loamy with small particulate matter. Well, in a forest situation, with an acid soil, there is high fungus activity and lower bacteria count in the soil. The soil isn’t usually turned over or bothered in any way. In a vegetable garden, a slightly more alkaline soil is perfect because it has less fungus and more bacteria. The soil is turned over frequently. Weeds such as grasses prefer a pH range that is slightly more alkaline. By changing the pH with the addition of different kinds of mulch, you can moderate the microbes in the soil, tipping the balance between fungi and bacteria, and edging out the grasses. Cool, huh?
Fungus is extremely important where longer-lived trees are planted, because fungus travels underground, linking with the spreading roots of the trees and actually causing communication between them! Fungus, it has been said, is nature’s Internet. Mushrooms are called nature’s teeth, too, but that is an image that perhaps you just don’t want in your head. Bacteria help soil that is often disturbed by helping leguminous plants fix nitrogen (yes, yes, I know, back to the darn legumes again), and help free up nutrients for the roots, usually by dying. That’s not a happy thought but, again, that’s the way it goes. If you till the soil, you kill off the bacteria and nematodes and fungus and all the other little critters. There is a rise in fertility, but only briefly because that rise is the nutrition released by the decomposing bodies of all your soil critters! Then there is just dead soil. Then farmers pour on the salt-based fertilizers (NPK), which is just salting the land and making sure nothing can live in it. The crops grow, but since there aren’t any friendly critters freeing up nutrients, the resulting nutritional value of the produce is poor. Only by mulching, composting, and cover-cropping can the soil come alive again, which nourishes the plants, which nourish us.
There is so much life in just a pinch of soil; so much going on that we still can only guess at. To build up your soil with mulch, compost and organic practices is to give life to gajillions of life forms (yes, that many!) which all work to make your plants healthy, your food more nutritious, and gain back some of the topsoil that has disappeared through man’s blundering.
I hope this was as interesting for you as it is for me!