Vegetarian
-
Caramel Ganache Shortbread Bars
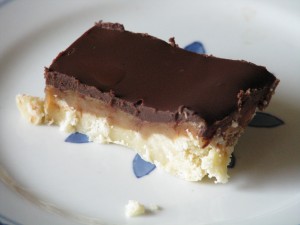 Just because I don’t post as often as I ought to, doesn’t mean that I’m not always preparing for posts. I take lots of photos, look up lots of data and try lots of recipes. Many recipes are researched, tweaked, photographed, made and turn out… icky. For instance, the no-bake cookies of last week that were only firm enough to cut at refrigerator temperature. At room temperature they turned into a pan of chocolate sludge, and at freezer temperatures they were too hard to cut. I have found, to my dismay, that many food bloggers post recipes even if they don’t turn out well, just so that they have something to post. I’m learning to read and heed the disclaimers.
The recipe I’m about to impart to you is not a fluke. It is, frankly, heavenly.
At a baby shower a few months ago I ate a bar cookie that was supposed to taste like a Twix candy bar. It was very good with its layers of shortbread, caramel and chocolate. I asked for the recipe and reproduced it at home. The recipe called for crushed pre-made cookies (the Keebler elves had made them, apparently) topped with melted caramel candies (unwrapping all those little buggers took time), and spread with melted milk chocolate chips. The result was tasty, but I couldn’t get over the store-bought flavor of the shortbread. This cookie has three simple flavors that need to complement each other, and since I don’t usually eat store-bought baked goods, it took some adjustment for my palate. However, they froze very well and defrosted quickly.
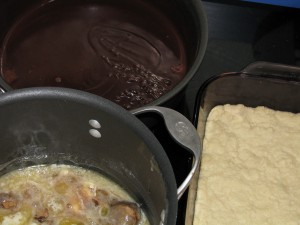
Ganache, baked shortbread and caramel mixture beginning to boil. Then I found a better recipe. And then I made it perfect. It is a basic shortbread cookie crust, topped with a simple homemade caramel, then topped with chocolate ganache. The driving impetus for this improvement was that I had leftover heavy cream in the fridge from making homemade ice cream, and needed to use it before it went bad. The ganache topping adds a bright, lighter flavor which keeps the cookie from being cloying. Yum.
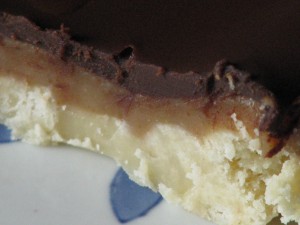
Eat a small piece with some hot tea and be very, very happy.
Caramel Ganache Shortbread BarsAuthor: Diane C. KennedyRecipe type: DessertPrep time:Cook time:Total time:Serves: 16Chocolate ganache atop firm homemade caramel and buttery shortbread. What else is there to say besides it is quick and easier than you may think.Ingredients- For shortbread:
- ⅔ cup butter, softened
- ¼ cup granulated sugar
- 1¼ cups all-purpose flour
- For ganache:
- 1 cup heavy cream
- 4 tablespoons unsalted butter
- 8 oz. semi-sweet or milk chocolate, in small pieces
- For caramel:
- ½ cup unsalted butter
- ½ cup packed light brown sugar
- 2 tablespoons light corn syrup
- ½ cup sweetened condensed milk
Instructions- Preheat oven to 350 degrees F.
- In a medium-sized bowl, mix together the ⅔ cup butter, granulated sugar and flour until crumbly.
- Press the sandy shortbread mixture into a 9-inch square baking pan.
- Bake for 20 minutes or until shortbread begins to lightly brown around edges.
- Meanwhile make the ganache. In a small saucepan combine heavy cream and 4 tablespoons butter.
- Bring mixture to a simmer.
- Turn off heat and add chocolate, swirling to cover all the bits.
- Cover pan and let sit for about 5 minutes until chocolate is melted.
- Stir until smooth and creamy and set aside (don't refrigerate).
- In a 2-quart saucepan, combine ½ cup butter, brown sugar, corn syrup and sweetened condensed milk.
- Bring to a boil and continue to boil for five minutes.
- Remove from heat and beat quickly with a wooden spoon for about 3 minutes.
- Pour caramel over baked crust (warm or cold).
- Cool until caramel begins to firm, or chill.
- Pour ganache evenly over firm caramel.
- Cover dish with plastic wrap and chill completely in refrigerator until very firm.
-
Two Sure-fire Zucchini Recipes
Zucchini plants are like cats: They both look harmless when small, so you think the more the merrier. One plant is always enough, but it is hard to plant just one seed in case it doesn’t come up. Then the sprouts are hard to thin.. what if something eats it? Then before you know it, there are five enormous plants growing giant green clubs in the dead of night, just after you’ve checked all the plants. Well, that’s my situation anyway. Too many cats; too many zucchinis. When there are enough all at one time, we’re taking them (the zucchinis, not the cats) to the Fallbrook Food Pantry along with pumpkins and tomatoes. Until then, we’re exploring new ways to eat them. And I refuse to sully cheesecake with zucchini! (yes, there is such a recipe!).
My son who is studying Culinary Arts at the University of Hawaii sent me a link to smittenkitchen.com with an exceptional zucchini pancake recipe… not sweet, very light and completely tasty. I’ll include my version. But first I want to explain my ‘discovery’, which everyone but me probably knows about anyway.
SAUTEED ZUCCHINI
I had grated zucchini for bread and had some left over. It was dinnertime and I was alone, so I experimented. I heated a skillet with a little olive oil in it, threw in the grated, undrained zucchini, and stirred it around on medium-high heat for about five minutes. When it was beginning to wilt and brown a little on the bottom, I sprinkled sesame oil on it lightly, and then gave it a touch of Bragg’s Amino Acids, which I use for many things. A light soy sauce may substitute, but Bragg’s is high in nutrition, low in salt and a wonderful flavoring. Buy it online or in health food stores. The zucchini came out tasty and with a mouth-feel of wet wide noodles. It was fantastic. I’ve since made it for my daughter a couple of times, and each time we wanted more! Imagine that! On the plus side, it used up a medium zucchini.
You really must give these pancakes a try.
Fabulous Zucchini PancakesAuthor: Diane C. Kennedy (adapted from smittenkitchen.com)Recipe type: BreakfastPrep time:Cook time:Total time:Serves: 4A light, flavorful, really good pancake that uses up a lot of zucchini and tastes like zucchini bread.Ingredients- 2 large eggs
- 3 tablespoons olive oil
- 2 tablespoons sugar (optional)
- ¼ cup buttermilk or soured milk
- ½ teaspoon vanilla extract
- 2 cups shredded zucchini
- 1 cup all-purpose flour
- ¼ teaspoon table salt
- 1 teaspoon baking soda
- 1 teaspoon ground cinnamon
- ⅛ teaspoon ground or freshly grated nutmeg
- ¼ cup semi-sweet chocolate chips (optional)
- Oil, for coating skillet
Instructions- In a large bowl whisk eggs, olive oil, sugar, buttermilk and vanilla until smooth.
- Stir in zucchini.
- In a smaller bowl, combine flour, salt, baking soda, cinnamon and nutmeg.
- Stir dry ingredients into zucchini batter, mixing until just combined.
- Stir in chocolate chips.
- Heat oil or butter in a large, heavy skillet over medium heat.
- Scoop ¼-cup rounds of batter in pan so they do not touch.
- Cook until bubbles appear on the surface, about 2 to 3 minutes.
- Flip pancakes and cook another minute or two.
- Keep pancakes warm in on a tray in the oven set on low or in a toaster oven.
- Repeat with remaining batter.
- Serve warm with or without traditional pancake toppings.
- Pancakes freeze well.
- Gardening adventures, Heirloom Plants, Permaculture and Edible Forest Gardening Adventures, Vegetables, Vegetarian
Fun Vegetables

A small green zebra, not quite ripe In a past post I related how my mother had witnessed a woman staring hands-on-hips at the produce selection in a grocery store and exclaiming, “I wish they’d come up with some new vegetables!” How true is that? How many ways can you cook the limited offerings in your average supermarket produce section without going out of your mind? That’s where a trip to an ethnic grocery store can be a life-saver. Or, plant some fun new varieties in your garden.
Thanks to Baker Creek Heirloom (Organic) Seeds and their fantastic catalog, I was spoiled for choice. I also buy a lot from Botanical Interests , an organic seed company which has packets for sale in stores such as my neighborhood Joe’s Hardware. Their wildflower seed mixtures are highlights of my garden and attract birds, butterflies and other insects. Here are some newbies I tried this year, and the keepers:
Zucchino Rampicante : an heirloom zucchini that grows on a vine. This squash grows curled or straight on long vines that need support. The fresh squash can be used like zucchini, but are firmer and have a mild butternut flavor that goes well with everything. I am completely in love with the taste of these.

Some zucchinos are straight, some follow their own tune PLUS: if you leave the squash on the vine, it grows huge and unlike those monsterous zucchini clubs that are practically inedible and unwanted, zucchino then hardens and you can store it and use it as a winter squash! How marvelous and unwasteful is that! Zucchini without the pressure. No more alienating your neighbors and friends with excess squash.
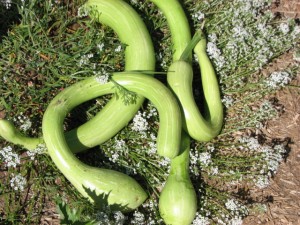
Zucchino shapes are marvelous Green Zebra Tomato :a large, lime-green striped tomato that develops a slight yellowish tinge between the stripes when ripe. These gorgeous tomatoes are rich and slightly tart, but without heavy acid. Marvelous on a open-faced sandwich or in a caprese salad to show off the color inside.
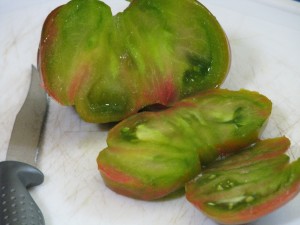
Green Zebra: beautiful inside Thai #2 Red Seeded Long Bean: The seeds were given to me by the woman who introduced me to Baker Creek Seeds, and who built my chicken and quail coops. I planted the seeds by stakes that turned out to be too short for the vines.

Long beans growing very long. However, these beautiful flowers eventually came, followed by spectacularly long thin green beans two feet long! One bean per person! (Just about, anyway). They are good stir-fried. I haven’t tried to tempura one yet, but its tempting.

Six long beans slice up to a serving for two! Mortgage Lifter Tomato : Now THESE are the ultimate sandwich tomato. These heavy pink-red fruits have mostly meaty insides and have an incredible savory flavor. I have found my favorite red tomato. Beefstake has nothing on this baby. It also has a cool name.
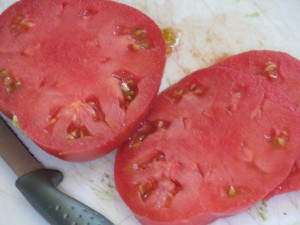
Mortgage Lifter is very meaty and savory 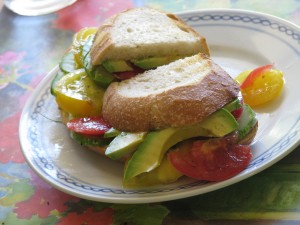
Rice Blue Bonnet: the jury is still out on this one. This is a dry-land rice. I didn’t thin it when I should have, so it is growing in clumps and hasn’t progressed beyond the thin leaves. My fault. It is growing and would probably be successful if I handle it right.
Basil Custom Blend HEIRLOOM Seeds : I planted a row and have regular and purple basil, lime basil, and cinnamon basil (one of my favorite scents). Today I used the regular and purple chopped over an open-faced tomato sandwich, and my daughter added leaves from the other two to a fruit salad.
Sesame, Light Seeded : Beautifully flowered plants with seed pods full of sesame seeds! How great is that?

Sesame pods. Broad Windsor Fava Bean : I planted a lot of legumes to help build the soil (they set nitrogen), and tried fava beans this year. They grow like crazy, take a lot of neglect, and produce a fantastic protein source in the form of a tasty bean. They are a little trouble to shell, but well worth it. I wrote about favas here.
Blue Potatoes: These I started several years ago from an organic blue potato I bought at a grocery store. Since there are usually some small tubers left in the soil, I have volunteers sprouting every year. These blue potatoes – whatever their true variety is – are a lovely purplish blue outside, with a lovely purple center as well. They aren’t starchy, but are best used like red potatoes. Very fun.
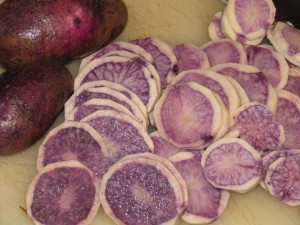
Peeled purple potatoes - Compost, Gardening adventures, Permaculture and Edible Forest Gardening Adventures, Soil, Vegan, Vegetables, Vegetarian
Fava Beans

Fava flowers Have you ever eaten Italian, Greek or Middle Eastern food and found some enormous beans in it? Most likely those were fava beans. Commonly called broad beans or horse beans, these ancient beans are native to Africa and Asia, but can be found in cuisines worldwide.
There are a lot of reasons to grow them, even if you don’t eat the beans. First of all, they are nitrogen fixers, being a legume. However they don’t tendril like green beans do. The plant is a tall stalk (different varieties grow different heights) that sets beautiful flowers down the trunk. From these flowers grow some very weird-looking veggies. The pods look like clusters of swollen green fingers, I kid you not. The stalk can grow unsupported, but may topple over once the heavy pods are set.

Another reason to grow them is that they are hardy and can tolerate cold, and soils that are heavy in clay and salts (which pretty much describes my yard). Often broad beans are grown as a cover crop, then cut and allowed to decompose on the soil surface while the roots release the nitrogen under the soil.
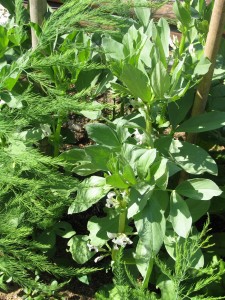
Then there is the reason that these very industrious plants produce an interesting protein-rich bean that enjoys notoriety worldwide (hence, easy to find different recipes for them!). The young leaves and flowers are edible as well.
To harvest favas, pull the swollen (but not too lumpy or they’ll be tough) pods from the stalks. Here comes the drawback: you have to shell the beans and it is a chore. Turn on a movie, pull up a bag of fava beans and an empty compost bucket, and go to. You may want to use a sharp knife to run down the seam, but I just used my fingernails. I watched the 1980’s TV show Cheers, which I never saw because I haven’t had television in about 17 years. Three episodes and I finished a big bag of favas!

When you’ve shelled the beans, you must blanch them for 3 minutes, then drop them in an ice bath. Rub the beans to remove a waxy coating. Then you can sautee them, mash them with potatoes, use them in fritters and soups, try an exotic Middle Eastern recipe with them. Fry them until they are crisp and serve salted as a snack. If you want to freeze them, then give the beans the blanch and ice water treatment, dry them and freeze them on a cookie sheet. Put them into a freezer bag. When you want to use them, then thaw, remove waxy shells and use. Some people don’t remove the coating, but its better if you do.
Fava beans have a nutty, slightly bitter and earthy flavor that becomes quite addictive. Two warnings, though. Some people, particularly those of Mediterranean decent, may be allergic. Also if you are taking anti-depressants, the beans are rich in tyramine and should be avoided by those taking monoamine oxidase (MAO) inhibitors – a type of medication used to treat severe depression.

Add fava beans to your garden and landscape. Just tuck the seed into the ground and stand back. Mine weren’t nibbled by rabbits or bothered by anything; however last year I grew six plants in a raised bed, and something opened all the pods and ate the beans. This year I have them planted all over the property to help build the soil, and the harvest appears to be all mine. I’m glad that Cheers ran so many seasons!

- Gardening adventures, Heirloom Plants, Permaculture and Edible Forest Gardening Adventures, Recipes, Vegan, Vegetables, Vegetarian
Kohlrabi: A New (Old) Vegetable

Cute hot air balloon veggie Once, my mother came home from the grocery store and was laughing about a woman who stood hands on hips in front of the produce section and announced, “I wish they’d come up with a new vegetable!”
I entirely sympathize.

The whole plant is edible! This year I planted a vegetable that I hadn’t grown, and perhaps had never eaten before. Kohlrabi. It certainly isn’t new; its been mentioned since Roman times and used on many continents. But it was new to me. The name is German, and it can be found in (East) Indian, Italian, French as well as Asian cuisine. It is very low in calories, yet very high in fiber, potassium and other vitamins and minerals.
It also is very cool looking. You can either imagine an alien, or a hot air balloon. The entire plant is edible, and can be eaten raw.
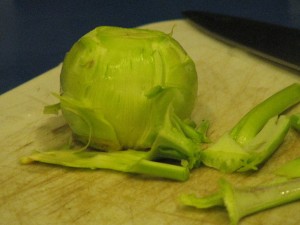
Peel the outer layer of older bulbs. When young, the leaves, stems and bulbous base can just be munched on, chopped up in salads, grated for slaw, used like jicama for dips, stir-fried, and even barbecued. When older the leafy parts should be separated from the tougher stems, like older chard leaves. The base should then be peeled before use.
The flavor is very mild, and is kind of turnip-radish-broccoli tasting. There are two types, a purple and a light green. I grew the light green, but have read that the purple variety is sweeter. I don’t know if that’s a good thing or not, but I may try that next year.
I braised and steamed the leaves, ate some of the bulb raw and stir-fried the rest. It was tasty. It was cute. It was fun to say. It was NEW.

Stir-fried kohlrabi with sesame oil and seeds, served with brown rice noodles and fresh orange. And, if you want to send a grocery store checker into confusion and hold up the line, buy some kohlrabi. They’ll have no idea.
-
What I Punch Now
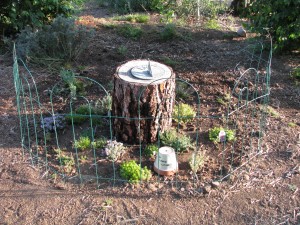
Sundial on the stump Its a Thyme Clock. So clever of me, I can hardly stand it. There is a sundial that I picked up at a thrift store, which sits on a stump. Around it are planted fourteen kinds of thyme! A Thyme Clock! I don’t have to punch a time clock at work… I can ‘punch’ (theoretically speaking that is) a Thyme Clock in my yard! (Or is the concept of a time clock too lost in history?). Ha!!!!
Sorry. Too much time in the sun (or should I say Thyme in the sun!) preparing for the Garden Tour tomorrow. I’m thinking its bedtime. Or bedthyme!!! No, it won’t stop anythyme soon. But it must, somethyme.
Sorry again.
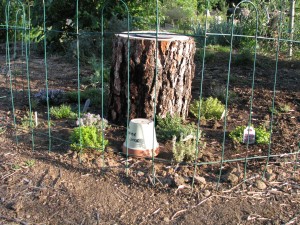
The Thyme Clock -
Lavender Cookies with Rose Water Drizzle

This is not the everyday, lunchbox type of cookie. This is the cookie you put a sign next to with the name on it, and listen to the oohs and ahhs and hmmms when it is sampled. These coconut keto cookies are buttery and with no added extract have a very light lavender flavor. The rose water icing and coconut oil should be added sparingly; it is better even to make the icing the day before to let the rose fragrance mellow some. You don’t want cookies that taste like hand lotion.
That said, these are fun to make, smell great, taste good, and are perfect for teatime or to bring to a ladie’s function. Don’t forget the sign.
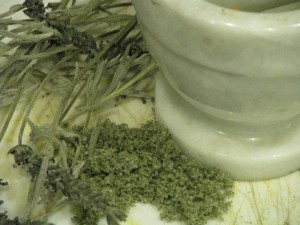
Most lavender recipes require dried blossom. This recipe calls for dried leaves. If you don’t have dried leaves, you can set a few sprigs in the sunshine on a hot day, or dry them at lowest temperature in the oven or toaster oven. My toaster oven has a ‘dehydrate’ setting, and it did an admirable job drying some fresh sprigs. You don’t want nasty bits of leaf in your cookie. Use a mortar and pestle to grind up the dried leaves. The result should be like fluff. Yep. It doesn’t powder, it fluffs.
Rose water can be found at International markets, some grocery stores, many liquer stores, or online. If you can’t find it, or just don’t like the smell or taste of rose, then leave the icing unflavored, or add a drop of vanilla.
 Lavender Cookies with Rose Water DrizzleAuthor: Diane C. KennedyRecipe type: DessertPrep time:Cook time:Total time:Serves: 4 dozenAn English teatime-type cookie.Ingredients
- ½ cup butter, softened
- 1 cup sugar
- 2 eggs
- 2 teaspoons lavender, crushed until fluffy
- 1½ cups flour
- 2 teaspoons baking powder
- ¼ teaspoon salt
- For icing:
- 2 cups powdered sugar, sifted
- 5 - 6 teaspoons water
- 6 teaspoons (or less... try it!) rose water
Instructions- Preheat oven to 375 degrees F.
- In a medium bowl, cream together the butter and sugar.
- Add the eggs.
- Add lavender, flour, baking powder and salt.
- Drop by small teaspoonfuls onto an ungreased cookie sheet. Leave space between for spreading.
- Bake 10 -12 minutes, until edges begin to turn brown.
- Cool on racks.
- To prepare icing, mix the powdered sugar with water and rose water until it has a nice, non-globby drizzly consistency.
- Drizzle over cooled cookies.
-
A Painless Breakfast, and a Bombilla

I'm all over this medicine! Food is the ultimate resource for health. As my body complains ever louder about all the years of abuse I’ve put it through, I’m turning to diet to help with the pain. Certain foods have anti-inflammatory properties, and they aren’t hard to eat at all. Cinnamon, turmeric, and ginger are high on the list. Cooked asparagus is excellent for kidneys and liver, and there is speculation that it cures serious illness as well. Whole eggs are much more healthy to eat than separating out the white and throwing away the yolk. The two parts compliment each other. As well great sources of protein, eggs are excellent for the eyes. The vitamin C found in fruit is an essential boost to your immune system, and helps other vitamins work better.
I also take some supplements. I take a multi-vitamin, a couple of natural menopausal relief pills, a vitamin C, and a couple of glucosamine/chondroitin tablets. G/C is a miracle supplement if you have arthritis. It helps keep the joints juicy.

Hot ginger tea; good for your tummy and good for your joints. So for mornings after a full day of weeding, carrying, hauling, flinging, and planting, I need everything I can get to help get my hands and back moving again. My ideal painless breakfast is: an egg from one of my hens, sprinkled with a turmeric and pepper combination (pepper is supposed to aid turmeric), some Trader Joe’s frozen grilled asparagus, heated, a piece of toast liberally sprinkled with cinnamon and coated with organic (sometimes home-harvested) honey, orange juice and a hot cup of ginger tea. I keep a small white container of cinnamon on the table, as well as a small bowl of the turmeric and pepper combination. That way I don’t forget to sprinkle it on my food. Inflammation is the source of almost all illness. If you can fight inflammation naturally, you’ll be a long way ahead health-wise. You’ll be relieved from pain that you never knew you had!

Bombilla I considered giving the bombilla its own post, but it was in the breakfast photo so I’ll talk about this wonderous gadget here. A bombilla is a metal or bamboo straw with a strainer on the end. Ingenious! Common in South America, it is commonly associated with the drinking of the new old fad tea yerba mate. However, to my delight it works perfectly with loose leaf and herbal teas! Instead of snapping and screwing and pressing tea strainers, I just put loose tea in my cup, brew it and drink it via the bombilla! So easy! Afterwards I scoop the spent tea into the compost, rinse the cup and the bombilla, and its good to go for the next batch. Loose leaf tea is such a better experience than using tea bags. With the bombilla, I now have herbal or loose leaf tea almost every time. Bombillas have transformed my drinking experience! I believe they are available at international marketplaces, but I bought mine online at Amazon.com. I bought two for me and my daughter, who took hers to college, and another as a gift for my son, and then two more as extras at home. Never can have enough bombillas! What a concept! A perfect drinking implement! My life will never be the same. Better still, I can now sip hot tea without losing my place in my book, or steaming up my glasses!
-
What To Do With Grapefruit
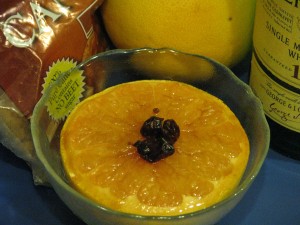
Grapefruit, all grown up. Every once in awhile someone gives me a grapefruit. One or two a year are just about all I can eat. Its not that I don’t like grapefruit. I certainly respect it. It is high is vitamin C and is supposed to be a good diet food. I think that is probably because it is so sour and bitter – even the pink kind – that you can’t taste anything else for hours after eating one.
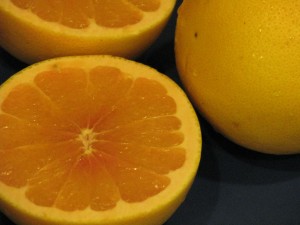
Bare naked grapefruit. My mother would serve us grapefruit halves. She had a set of grapefruit spoons I always coveted that had serrated edges, but they disappeared at some point and I’ve never seen any like them. The sharp edges would allow you to dig out the grapefruit sections without actually arm-wrestling with the fruit. She’d also often ‘section’ the halves, using a paring knife to cut each section free so that all we had to do was scoop them out. She left little reason for us to not eat them. Of course, not eating my mother’s cooking was unheard of anyway.

If you section the grapefruit first, you could probably get more whiskey in there. To make grapefruit much more appealing, she would doctor it up with brown sugar, whiskey and then broil it and serve it warm. Wow did that ever improve the taste! Since grapefruits are making the rounds right now, and no one else I’ve spoken with seems to have heard of this method of serving them (their ears sure perk up when I tell them, though!), I thought I’d do everyone a favor and print the recipe. The Grapefruit Diet suddenly doesn’t look so bleak.
Broiled GrapefruitAuthor: Diane C. KennedyRecipe type: SidePrep time:Cook time:Total time:Serves: 2This method of preparing grapefruit I learned from my mother, Beth Cywar, a fabulous cook and a nutritionist before her time. She also believed that food wouldn't do anyone any good if they wouldn't eat it.Ingredients- One grapefruit, cut in half widthwise.
- 1 - 2 teaspoons brown sugar
- 1 - 2 teaspoons whiskey
- A few fresh or dried berries (optional)
Instructions- You may section the grapefruit or not; your choice. Sectioning would probably allow more whiskey to seep in, and would be a little easier to eat, but it is optional.
- Place halves on foil or an oven-proof dish, or on a broiler pan.
- Start the broiler. A toaster oven works great.
- Sprinkle the grapefruit halves with the brown sugar.
- Slowly drizzle the whiskey over the halves.
- Broil until warm and slightly brown and sizzling, about ten minutes.
- Adorn with fresh or dried fruit, or if you want to be retro, a marashino cherry, and serve.
-
Passionfruit Curd
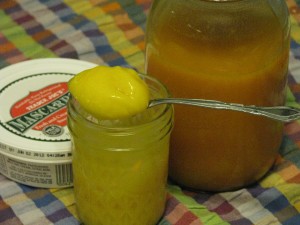
Passionfruit curd. Yum. Rather than post photos of the rabbits eating my vegetables,

or other Eastery things, I thought I’d put in a recipe that is rather exotic. If you have a passionfruit vine (the ones that produce edible fruit) you may be inundated with the fruit about now. Also the flowers were named passionflowers because of the Christian symbolism read into the shape of the flowers. I always wondered about this, but I figured that faced with ‘heathens’ who ate this aromatic, voluptuous and kind of sexy fruit, some Christian missionaries decided to put the stamp of Christianity onto the plant rather than try to ban its consumption. That’s just my theory, of course, but it makes sense. Therefore a post on passionfruit for the passion of Christ on Easter. Yep, I’m stretching it, but you’ll like the recipe.
Anyway, passionvines have abundant growth (as I mentioned in my post about building a trellis for them http://www.vegetariat.com/2012/03/questionable-carpentry/).

Gorgeous flowers. There are many colors of flowers of both the ornamental and edulis varieties. The flower has a tiny fruit all ready to go and awaiting some friendly bee to come rub herself all over the anthers and stamens (the missionaries are shuddering) and pollinate.
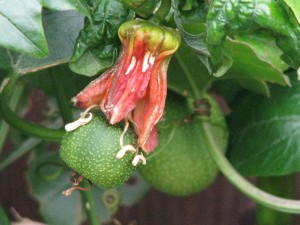
Looks like the fruit is wearing an Easter bonnet! Kind of. Okay, it doesn't. The fruit grows as the flower fades. There is some mother-child allusion somewhere in there but you’ll have to go there yourself.
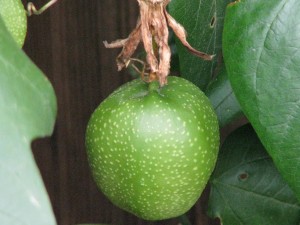
A developing passionfruit. When the fruit is ready to fall, a good shake of the vines will make them come down. Usually they are still smooth-skinned at this point. You want to wait until the fruit starts to wrinkle before it is sweet, ripe and ready. (I’ll not touch that one at all.)

The fruit falls off still smooth... wait until it wrinkles to use Don’t eat the skin, but cut the fruit in half. Many people like to eat the seeds as well as the pulp. I’m not one of them, and neither is my daughter who very patiently sieved the insides of about 80 passionfruit to obtain the juice. I like to add the juice to tangerine juice for breakfast. We’ve also successfully made a hedonistic passionfruit ice cream that was stupendous. This time we decided to make passionfruit curd.

Wait until they're wrinkly, then scoop out the insides. I’ve posted already on how to make lemon curd (http://www.vegetariat.com/2011/03/when-life-gives-you-lemons-make-lemon-curd/). (You’re wondering, what is UP with this woman and curd, anyway?). The passionfruit curd is slightly different, but yet has that nice bite to it that doesn’t make it too sweet. I thought this curd came out tasting a little eggy, but I believe that is because we used eggs from our own spoiled hens, which have a definate healthy flavor to them. The eggs, not the hens (that we know of, nor will we find out). It was all okay, though.
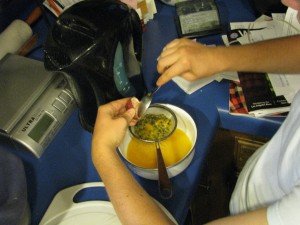
Scoop and strain. We made two half-pints, and I didn’t ‘can’ them. However you may sterilize the jars and lids, add the hot curd, and give them a 15 minute hot water bath and the curd will last for months. I still refrigerate it, just to be on the safe side.
I found the original recipe in Nigella Lawson’s How To Be A Domestic Goddess. She stirs some passionfruit seeds back into the curd, which looks nice (if you like the fish egg look to your food) and can certainly be done for all of you who enjoy the seeds. I like my curd seedless. On scones. With mascarpone cheese. Mmmm.
Happy Easter!
Passionfruit CurdAuthor: Diane C. KennedyRecipe type: SpreadPrep time:Cook time:Total time:This wonderful spread based on Nigella Lawson's recipe can be used to top baked goods, put in a pie shell, in a jelly roll cake, or used any way you would lemon curd, jam or jelly. It makes an exotic gift, too!Ingredients- 12 passionfruit
- 2 large eggs
- 2 large egg yolks
- ½ cup granulated sugar (superfine if you have it)
- 8 tablespoons unsalted (good quality) butter
- 2 sterilized ½ pint jars
Instructions- Cut the passionfruit in half and scoop out the insides into a sieve.
- With a spoon, strain the juice into a measuring cup. You should have about 10 tablespoons, or a scant ⅔ cup of juice. If you'd like seeds in the curd, reserve the pulp of the 12th one instead of straining it.
- In a bowl beat the eggs, yolks and sugar together.
- In a saucepan, melt the butter over low heat.
- Stirring continuously, add the passionfruit juice and then the sugar mixture, being careful not to cook the egg.
- Keep cooking and stirring until the mixture thickens, about five minutes. It should coat the back of the spoon.
- Take the pan off the heat. If you have reserved the pulp of that one last fruit, here is where you whisk it into the mixture.
- Pour the curd into the jars and seal.
- Store in refrigerator. Try it on scones with mascarpone cheese. Really. I mean it.
- Makes two half-pint jars full, about 1¾ cups.