Vegetarian
-
Plum Clafoutis!

Plum clafouti. Yum. OMG! How could I not have told you about clafoutis yet? If you have ripe plums, peaches, apricots… any stonefruit… and you need something to do with them, this is it! Clafoutis (clow-FOO-tee) is a baked dessert (or breakfast!) that is simple to make and absolutely yummy. Ripe fruit, especially those that are a little too ripe to eat fresh because of the texture, is topped with a flour and custard batter and baked.

Serve plum clafouti warm or at room temperature. So yum. The result is firm enough to not gross out those who don’t like the texture of custard (like my daughter), not too sweet, and makes the flavor of the fruit bloom in your mouth. This is different than Plummy Skillet Cake, which is also wonderful. Of course clafoutis

Because of its simple ingredients and low sugar, clafouti is wonderful for breakfast. Peach clafouti is shown here along with asparagus and soy sausage. is good with ice cream, but just powdered sugar on top for decoration or plain is fine. You can make it with liquid egg substitute and non-dairy milk substitutes; I used our hen’s eggs and organic soy milk. Plums are absolutely delicious in a clafoutis, but we’ve used peaches and apricots as well with great results.
Plum ClafoutisAuthor: Diane KennedyRecipe type: Dessert or BreakfastCuisine: FrenchPrep time:Cook time:Total time:Serves: 6A simple and delicious baked fruit dessert.Ingredients- (You can halve the ingredients and bake in a square pan instead)
- ¼ cup butter (or veg oil or coconut butter)
- Pitted plums cut into thin wedges (think what size you like to bite into) (five cups)(you can use a mixture of stonefruit, too)
- ½ cup granulated sugar, divided (you can eliminate or reduce this amount if you like a tart dessert, if your fruit is very sweet, or use a sugar substitute)
- 4 eggs or equivalent liquid egg substitute
- ½ cup unbleached all-purpose flour (or a mix of other flours)
- ½ teaspoon salt (opt)
- 1 cup milk or milk substitute
- 1 tablespoon vanilla extract
- ½ teaspoon almond extract
- Confectioner's sugar for dusting
Instructions- Move oven rack to the middle and heat to 400F.
- Place butter in a 9 x 13 inch baking dish and put in oven to melt butter.
- In a medium bowl, toss the plums with ¼ cup sugar.
- With oven mitts, remove hot dish from oven and swirl melted butter to coat bottom and partially up the sides.
- Spread plums evenly on bottom of baking dish.
- In a medium bowl, whisk the eggs until blended.
- In a separate bowl, whisk the remaining ¼ cup sugar with the flour and salt.
- Whisk the sugar and flour mixture into the eggs.
- Whisk in the milk, vanilla and almond extracts.
- Pour the batter evenly over the plums.
- Bake 40 - 45 minutes until the clafoutis is lightly browned and the center has puffed up.
- Cool on a wire rack.
- Dust with confectioner's sugar and serve warm, plain or with ice cream. Or hard sauce. Or whatever you like. Use a French accent when announcing dessert.
- Eat within a couple of days or it becomes soggy.
- Store covered at room temperature.
-
Black Plum and Basil Granita
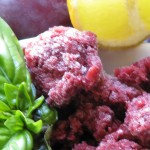 This is an interesting and delicious way to use some of those plums that ripen overnight. Basil is also in season, and combining it with the heavenly, winey flavor of ripe black plums is amazing. If you grow other types of basil such as lime basil or cinnamon basil, use those instead, reducing the lime juice to 1 tablespoon.
Granita is juice that is partially frozen, forked around a little, then refrozen. You don’t need an ice cream maker. Easy, quick and nutritious, too!
Black Plum and Basil GranitaAuthor: Diane C. KennedyRecipe type: DesertCuisine: AmericanPrep time:Cook time:Total time:Serves: 8½ cup servingsBasil and allspice give a wonderful depth of flavor to winey black plums in this frozen treat.Ingredients- 1 cup water
- ⅔ cup granulated sugar
- ¼ teaspoon vanilla extract
- ⅛ teaspoon salt
- 6 whole allspice (if you don't have allspice berries, use a small piece of cinnamon stick)
- 1½ pounds black plums, pitted and quartered
- 2 tablespoons fresh lime juice
- ¾ cup basil leaves (not packed)
Instructions- In a large saucepan combine water, sugar, vanilla, salt, allspice and prepared plums and bring to a boil.
- Reduce heat and simmer for 15 minutes or so, stirring occasionally, until the plums begin to fall apart.
- Pour into a small bowl set in ice water in a larger bowl and cool completely.
- Fish out and discard the six allspice.
- In a blender or VitaMix process plum mixture, basil and lime juice until well blended.
- Press the plum mixture through a fine sieve over a bowl and discard solids. If you have a VitaMix you may not have any residual solids; the granita will be cloudier but will be more nutritious. Don't worry about it.
- Pour the mixture into an 8-inch square glass or ceramic baking dish.
- Cover and freeze until partially frozen, about 2 hours.
- Scrape with a fork, crushing any lumps, and smooth down again.
- Freeze for 3 more hours, scraping with a fork every hour so that it doesn't freeze as a cube, until completely frozen.
- Serve in small scoops; really nice paired with little vanilla cookies.
-
Spicy Chocolate Squash Bread

Cocoa + squash + habinero = YUM. My collegiate daughter needed a recipe to use up leftover frozen kabocha squash. She found a chocolate kabocha bread recipe, adapted it for ingredients she had on hand, and sent me the recipe. I’m such a proud foodie mom: this is the first recipe she’s sent to me. She had substituted yogurt for the oil, and only had cinnamon as a spice, but really liked the results. She said that it was kind of like hot chocolate in bread form; not too sweet and not too plain. Hot chocolate in bread form? I’m so there.
Today has been cold and a little rainy. My shoes and socks were wet from standing in wet grass trying to coerce my 100-lb tortoise back inside his heated room before he became too cold to move. I had some thawed pink banana squash puree leftover from making pumpkin scones for my son last weekend. It was so squash bread time.
I had all the spices, but I changed them up a little. I added some freshly ground nutmeg in place of some of the cinnamon. Due to conversations with others in my exercise class about eating fresh homegrown fruit with chili pepper and other warming spices sprinkled on them (spring fantasies!) I thought I’d heat up this recipe, too. Before Christmas I purchased some habinero powder at Old Town Spice Merchants in Temecula, and fell in love with their habinero sugar which they sprinkled over samples of dark chocolate brownies. I added some habinero powder to this recipe and it is fantastic.
The loaf took an hour and five minutes to bake. It was slightly crispy on the crust and dense, moist and dark on the inside. Yet it wasn’t cloyingly heavy or too wet. The cocoa flavor was satisfying; too often cocoa recipes taste as if the chocolate was just a coloring rather than a flavoring. This was good. The spices were just enough and not overpowering. The habinero powder was just right, making just a little heat in the mouth that really accented the chocolate flavor and warmed me up from the inside. I am freezing the rest of it, just so I don’t eat any more today. It was really wonderful, and it had vegetable in it, too! Thanks, daughter of mine!
I’m sure you could eat this with cream cheese, marscapone cheese, or dust it with powedered sugar, but it doesn’t need anything. Not even, apparently in my case, a fork or plate. So much for dieting today.
Spicy Chocolate Squash BreadAuthor: Diane and Miranda KennedyRecipe type: DessertPrep time:Cook time:Total time:Like spicy hot chocolate in bread form.Ingredients- 1½ cups all-purpose flour
- ⅓ cup unsweetened cocoa powder
- 1 teaspoon baking soda
- ½ teaspoon ground cinnamon
- ¼ teaspoon ground nutmeg
- ¼ teaspoon ground ginger
- ¼ teaspoon ground cloves
- ⅛ teaspoon habinero powder (or ¼ teaspoon if you like it spicier. It will be a slow warm heat in your mouth)
- ¼ teaspoon salt
- 1⅓ cups sugar
- ⅓ cup vegetable oil or plain yogurt
- 1 cup squash or pumpkin puree (or plain canned pumpkin)
- 1 large egg
Instructions- Preheat oven to 350 degrees F.
- Grease and lightly flour an 8½ x 4½ inch loafpan.
- In a medium bowl, sift together all the dry ingredients.
- In a large bowl combine the oil, puree and egg until well combined. Beat in dry ingredients until well blended. (If using electric mixer, beat on low speed. You don't want a lot of air in the batter).
- Pour batter into prepared pan.
- Bake 350 degrees F for 1 hour and five minutes, or until a toothpick stuck into the center comes out clean.
- Cool on a wire rack for fifteen minutes then cut around loaf and turn out onto a plate or wire rack.
- Serve warm, or any way you'd like to!
- (Options: serve with cream cheese, marscapone cheese, or dust with powdered sugar. It is also great drizzled with chocolate frosting (what isn't?) or with chocolate ganache. Both recipes can be found on my blogpost on Buttermilk Chocolate Ganache Cake).
-
Cooking with Nettles
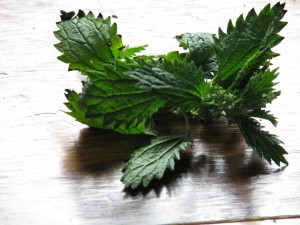
Stinging Nettle Yes, I mean stinging nettles. I’ve already covered in another post about the highly nutritious qualities of this lawn and wetlands weed. One of my friends has taken up the cause and has prepared nettles in soup and as a cooked green for her family. Eat your weeds! (Just be sure what they are, first.)
Stinging nettles (Urtica dioica) are annual plants that come up in nitrogen-rich soil that is well watered, such as in lawns, around farm animals and by streams. The plants are covered with tiny sharp hairs that are tipped with chemicals that cause a stinging sensation when handled. The sting may cause a slight bump on the skin and will go away on its own without spreading. A dab of vinegar will de-acidify the affected parts and should reduce or eliminate the sting. The effect is not like that of poison oak (Toxicodendron diversilobum) which contains an oil that spreads to whatever touches it.
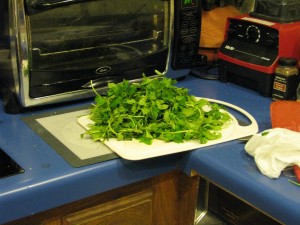
This amount of nettles cooks down to 1/4 – 1/2 cup. You’ll need a lot more for this recipe. Nettles are known throughout Europe as a spring green and there are many recipes available for cooking it. The leaves are delicate and fresh-tasting, and the stems a little tougher but also edible.

Crustless nettle quiche tartlet To harvest nettles, wear gloves or use a plastic bag turned inside-out over your hand for protection. As with most greens the youngest are the most tender. Wash the nettles while wearing rubber gloves. Blanch the nettles 1 – 2 minutes in a pot of boiling water. That eliminates the stinging chemicals completely. Don’t cook longer at this point because the leaves will fall apart. You can now eat the nettles or use them in another dish. I’d advise chopping up the stems before or after blanching because they can be stringy. Use blanched nettles in soups, quiches, or fillings as you would spinach. Hint: don’t tell your family what they’re eating until after they’ve eaten it!
Crustless Nettle QuicheAuthor: Diane KennedyRecipe type: Main dish, side dish or breakfastCuisine: EuropeanPrep time:Cook time:Total time:Serves: 6Substitute blanched nettles for spinach in this simple crustless quiche for more nutrition and fewer weeds!Ingredients- 1 Tablespoon olive oil
- 1 chopped onion
- 10 ounces blanched chopped nettles (measured after cooking)
- 5 eggs, beaten
- 3 cups grated cheese such as Munster, or a mixture of parmesan and mozzerella, or whatever you have that isn't too tangy.
- A pinch of ground nutmeg
- Salt and pepper to taste
- Optional: cooked vegetarian bacon or sausage, crumbled.
Instructions- Preheat oven to 350 degrees F.
- Lightly grease one 9-inch pie pan or 6 - 8 tart tins or Pyrex custard cups.
- Wearing gloves, harvest and wash enough nettles to make 10 ounces cooked, about one stuffed plastic grocery bag full or more.
- Blanch nettles in boiling water for 1 -2 minutes.
- Chop nettles into fine pieces (the stems can be stringy if kept long)
- Heat olive oil in a medium skillet over medium-high heat.
- Cook onion until translucent, 8 - 10 minutes
- Add nettles and stir until the extra water is absorbed.
- Add ground nutmeg to the nettles.
- In a large bowl combine the beaten eggs, cheese, salt and pepper and vegetarian meat if using.
- Add spinach mixture to eggs and stir to combine.
- Pour into prepared pan or pans.
- Bake 30 minutes or until centers have just set. Don't over bake.
- Cool for ten minutes before serving.
- Animals, Bees, Chickens, Cob, Compost, Composting toilet, Gardening adventures, Health, Heirloom Plants, Herbs, Natives, Permaculture and Edible Forest Gardening Adventures, Ponds, Rain Catching, Recipes, Salads, Soil, Vegan, Vegetables, Vegetarian, Worms
Southern California Permaculture Convergence! Be there!

Southern California Permaculture Convergence If you are interested in any aspect of permaculture, such as organic gardening, herbs, planting native plants, aquaponics, natural ponds, beekeeping, keeping chickens, and so much more, then you must come to the Southern California Permaculture Convergence. It happens on March 9th and 10th at the Sky Mountain Institute in Escondido. The keynote speaker will be Paul Wheaton, lecturer and permaculturalist extraordinaire of www.permies.com fame. Oh, and I’ll be one of the many speakers as well (cough cough). The Early Bird special of only $50 for both days ends at the end of January, and then the price will rise, so buy your tickets now!
Also, for a full-on demonstration of taking bare land and creating a permaculture garden, there will be a three-day intensive class taught by Paul Wheaton on site the three days prior to the Convergence.
You can read about the convergence here at the official website, which will give you the link perm.eventbrite.com where you may purchase tickets. Also visit the SD Permaculture Meetup page to see all the free workshops that happen monthly all over San Diego.
This convergence is such a deal, you really shouldn’t miss it! And such a bargain, too. One of the best things I find that come out of these convergences is the exchange of ideas and networking among the attendees, and all the practical information you can take home and use right away. One of the largest parts of permaculture is building community, which means sharing with and assisting others.
Really. Don’t miss this! Tell your friends!
-
Delicious and Fun Thai Custard-inna-Pumpkin

Thai Custard-inna-Pumpkin I know that you lose sleep over trying to figure out how to get more vegetables into your dessert. Well, snuggle up for a good long snooze, because here’s a recipe to bring you peace! I found this recipe in the Heirloom Gardener Winter 2012- 2013 edition. The magazine is created by the people who bring you Baker Creek Heirloom Seeds (organic). A wonderful article about Thai cooking by Wendy Kiang-Spray features this intriguing recipe, and I had to try it. You hollow out a small Thai or Kabocha squash (they are drier in texture), fill it with a coconut milk custard, steam it, and Bob’s your uncle!
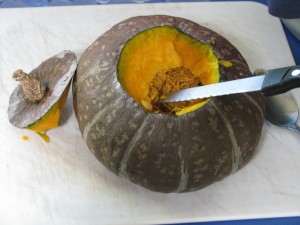
Scoop out the seeds and fibers and feed them to your chickens! I just happened to have a 2.5 lb homegrown Kabocha squash handy, so I made the recipe (adding a little cinnamon). Not wanting to be scared alone, I brought the whole cooled squash over to my friend Lara’s house, who helping me fulfill last year’s New Years resolution by teaching me basic piano. Being a vegetarian and a loyal friend, she was game to try it. It came out very good. I was impressed. I will do this again!
Troubleshooting: whisk the ingredients together. I thought I’d be fancy and put them into my VitaMix on the lowest setting, but even that added a little too much air to the custard mixture.
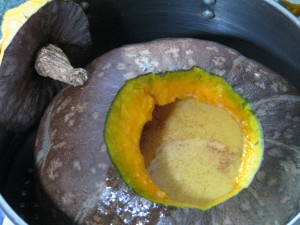
Don’t fill all the way up. Steam the lid off to the side. The top of the custard that I could see was yellowish, and I figured that this was due to the dark yolk in the eggs from my chickens, but I don’t know. Once cut into, though, the custard as a lovely white.
I turned my steamer on high until it was boiling, then turned the temperature down low and the custard wasn’t done in the allotted time. Next time I’ll keep it at a higher boil so that the steam is hotter. I cooked it much longer (I think too long because I was doing other things) and the squash split a little as it was very soft. I kept it in the steamer with something between the soft side and the inside of the steamer so that the squash would keep its shape as it cooled. After it was room temperature, I put it in the refrigerator for a short time and it the squash didn’t fall apart when I removed it.
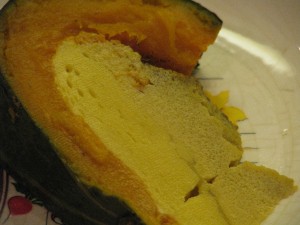
Creamy coconut custard and dry delicious squash. Ms. Kiang-Spray states in her article that this recipe is known in Thailand as Sankaya and is a classic dessert. With all the eggs and tasty squash, I’d call this breakfast or lunch, too!
Thai Custard-inna-PumpkinAuthor: Diane C. Kennedy (adapted from recipe by Wendy Kiang-Spray)Recipe type: DessertCuisine: ThaiPrep time:Cook time:Total time:Serves: 6A simple, fun, lovely dessert that people will remember as they get their beta carotene.Ingredients- 1 2 -3 pound dry-fleshed squash such as Kabocha or Thai pumpkin.
- ¾ cup coconut milk
- 5 eggs (preferably at room temperature)
- ⅓ cup sugar
- Pinch of salt
- 1 teaspoon vanilla extract
- ¼ teaspoon cinnamon
Instructions- Bring two quarts of water to a boil in the bottom half of a steamer pot.
- Use a cup to trace a circle around the top of the pumpkin.
- Cut the lid off around the guideline.
- Hollow out the inside with a spoon, making sure to get all the fibers.
- In a bowl gently whisk until combined the rest of the ingredients.
- Place the squash into the steamer basket.
- Pour custard through a sieve into the pumpkin leaving an inch to the top (filling will rise).
- Include the squash lid next to, but not on top of, the squash.
- Steam covered and undisturbed for 55 minutes until a knife inserted into the custard comes out clean.
- Remove steamer basket from over heat and allow squash to come to room temperature.
- Slice into wedges (in front of admiring company!) and serve.
- Serve at room temperature or chilled.
-
Awesome Candy Alert: Cayenne and Cashew Brittle

Spicy brittle I’m not big into candy; give me cake, pie or bread, or a good rice pudding instead. However I’ve made this brittle at Christmas for years now, and it is always a big hit. The cayenne makes a nice mild burn to counter the sweetness of the brittle. Cayenne is good for you, too, as are cashews (no matter how creepy it is that cashews grow!), so it makes sense in some distorted way that this candy is good for you. It is so easy, too. I have much less salt tolerance than the general American public. If I eat out I find myself desperately thirsty for days. The original recipe was made for high salt intake, but I have shown options on cutting it back. You don’t need it, for the delight of the candy is in the burn with the sweet. I also don’t like very hot (spicy) foods, but I like this. Make some and try to share.
Cayenne and Cashew BrittleAuthor: Diane C. KennedyRecipe type: DessertCuisine: AmericanPrep time:Cook time:Total time:A yummy easy-to- make brittle with a slow spicy burn.Ingredients- 2 cups unsalted roasted cashews, whole or pieces (you can use salted, but I don't)
- 10 tablespoons (1¼ sticks) butter (if using salted cashews, use unsalted butter)
- ½ cup sugar
- ¼ cup packed light brown sugar
- 1 tablespoon light corn syrup
- 1 teaspoon cayenne pepper
- ¼ teaspoon salt (optional)
Instructions- Butter a nonstick baking sheet and set aside.
- Combine all the ingredients in a large nonstick skillet.
- Stir mixture over low heat until the butter melts and the sugars dissolve.
- Increase heat to medium and boil.
- Stir constantly until mixture turns golden brown, thickens and masses together, about 5 minutes (if you cook it longer it won't be as shiny; too little and it will be soft but still yummy).
- Immediately pour candy out onto the prepared baking sheet and quickly spread evenly using a spatula to help.
- Cool completely.
- Break into pieces.
- Makes about 1⅓ pounds
- Cob, Gardening adventures, Permaculture and Edible Forest Gardening Adventures, Soil, Vegan, Vegetables, Vegetarian
Harvesting Sweet Potatoes with Gratitude
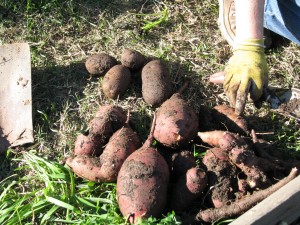
Beautiful yam harvest. I am in sensory heaven. Outside frost is again settling – a rarity here in Fallbrook, CA. Inside…. mmmm. My daughter is juicing today’s harvest of oranges. On the stove I’m poaching the last of the Harry and David pears my son sent before Christmas, in a bath of Julian apple cider (I’ve had frozen since October!), cinnamon and vanilla. There is a touch of woodsmoke from the wood burning stove. The mingled aroma of vanilla, orange and cinnamon in the air is incredible. In the fire are two homegrown potatoes in foil baking for dinner, and I’m cutting squares of homemade bread (it rained the other day… great baking and soup day!) to toast in the fire on fondue forks with mozzarella cheese and drizzled with Just Dip It (an olive oil, vinegar and herb blend from Temecula Olive Oil Co.). I am saturated with contentment and gratitude.
I wanted to write a blogpost for the first day of the year about gratitude. Instead I’m writing about harvesting yams and sweet potatoes, which, I believe, amounts to the same thing.

Tiny Russian Banana potatoes I grew in a nursery container Today the air was clean and almost 60 degrees F. Maxfield Parrish clouds filled the sky making it hard to pay attention to anything else. My daughter and I finally fired up Harry Mud, the cob oven. We experimented by baking small frozen pizzas, to success. Then in went homegrown, wrapped sweet potatoes, garlic and russet potatoes to slowly bake in the ashes. I hope I can convey sweetness of sitting outdoors on New Year’s Day eating pizza and smelling home grown potatoes and garlic cooking in a mud oven that we built, from mud from our property, as a snowy egret watched us carefully from the pond and our hens figured out how to beg. Peace. Enjoying the payoff of hard work. Eating health.
In the last few days we’ve dug up several patches of yams and sweet potatoes, the greenery of which had just been frosted black. I plant them all over the property to fill the groundcover niche of the plant guilds. I also grew some in my raised veggie beds. Some of the sweet potatoes had been small last year and so I left them in the ground. They grew.
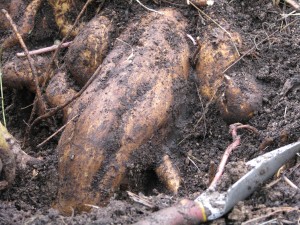
This enormous one was six pounds! The flavor of homegrown, organic potatoes is beyond description. You don’t need sugar and marshmallows dumped on the yams; potatoes aren’t just a vehicle for toppings. I steam them, eat them with butter, salt and pepper. Phenomenal. On Christmas I roasted wedges of yams with garlic and olive oil, and not only were they terrific, the leftovers I mixed into a hash for breakfast and it was sensational.
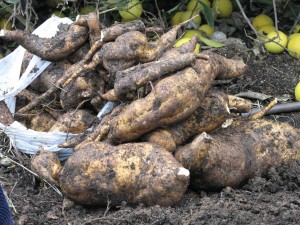
Freshly dug sweet potatoes Yams and sweet potatoes are what Americans call the orange or white tubers, respectively, sold in the grocery stores. There are actually hundreds of varieties of sweet potatoes of many colors and flavors. They are semi-tropical and like warmth. To grow, buy an organic sweet potato or yam and allow it to sprout on your counter. This is the easiest way. You may also buy slips from organic growers. Please, please don’t buy non-organic seed, slips or bulbs. Please don’t be Round-up Ready.

Colorful yams full of antioxidants. Take a sharp knife and cut slices from your sprouted yam, each containing at least one sprouted ‘eye’ , and lay them out to air dry for a couple of days in a cool, dry place out of direct sunlight. This hardens them off. Don’t plant a whole potato because the plant will have all the food it needs to produce greenery and won’t feel the need to make as many tubers. Plant the slips in well-drained soil that isn’t heavily manured; as long as water doesn’t sit around the roots, they will probably grow. I’ve had luck in many kinds of soil. The plants will spread out in a lovely, glossy-leaved groundcover that protects the soil and reduces weeds. Let the vines run and enjoy the small yam flower. Harvest in late fall, or when the greenery dies off.
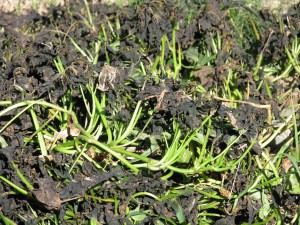
Frosted leaves of sweet potatoes Carefully dig and lift the potatoes. The skin will be more delicate than on yams store-bought. Lay the dirt-caked potatoes out to dry off before you store them in a cool dark place. Keep small slips and roots for replanting. The flavor of homegrown organic potatoes will make you wonder what the tasteless mushy things you’ve been eating have been.
This last year had its share of terrible losses, worry, pain and disappointment, along with great joy and contentment if I opened my eyes to them. They say that you reap what you sow, and as the garden and my experience deepens, and as my life mellows, I feel the truth in it. This morning we had fresh juice made of passionfruit, guava, oranges and pomegranates, all of which we grew. The potatoes, garlic, squash, greens, pickles, passionfruit curd, strawberry jam, dried tomatoes, all are at hand because of planning, sowing, nurturing, harvesting and preserving or storing. This may seem incongruous, but I am astonished at how many friends I have gained this year, through my volunteer work and exercise classes, in addition to those gained while working with County Parks, Sullivan Middle School, and the SDZoo Safari Park. So many that I wrote out the names and counted and marveled. Perhaps the list would be small for others; I don’t know, but it is wondrous and enough for me. At age 51, I have more friends and good acquaintances than I’ve ever had in my life. I am so grateful. I not only reap what I sow, but just as in my garden harvest, I have more than I could have imagined.
I do not follow a religion. In Buddhism it is said that life is a walking meditation; that every step you take is a prayer. As I put one foot in front of the other walking through the last part of my life, as I dig yams and eat them redolent with the health of good soil, as I watch those Maxfield Parrish clouds, as I laugh and work with friends who miraculously smile when they see me, I wordlessly pray my gratitude to the universe.
I very truly wish for you a year filled with gratitude and peace, and health-giving food that nourishes your heart and soul as well as your body.
-
Preserving Squash and a Terrific Pumpkin Chai Recipe!

Beautiful patterns on the banana squash shell. Four sugar baby pumpkins that I’d kept for myself, and three pink banana squash, were all in need of preservation. They were not keeping well due to the warmth of our hot San Diego county Fall. During a rainy break in the weather I did something about it. You can preserve cooked pumpkin and winter squash best by freezing it. If you have a pressure canner you may can pureed pumpkin or pumpkin pieces in liquid, but since I only use the water bath method that wasn’t an option.

Even sugar baby pumpkins can be difficult to cut when raw. There’s a better way! Roasting a squash isn’t difficult at all. In fact, you only have to wash it, put it on a tray in a 350F oven for about an hour (longer if its a really large pumpkin), and then slice when cooled.

Roasting a whole pumpkin makes the scooping so easy! Its easy to scrape out the seeds and then spoon out the cooked flesh out of the hardened shell. This is what I did for the sugar baby pumpkins. There was too much banana squash to fit whole into the oven, however, so I cut them into chunks, scooped out the seeds, covered them with aluminum foil (it helps steam them) and baked 350F for forty-five minutes.
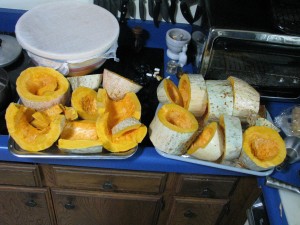
Three banana squash is a lot of squash I have more details here. I also roasted the pumpkin seeds.
Then I had a lot of squash to puree! These squash and pumpkins were dry, so I added a little water to the VitaMix and tossed in the chunks.
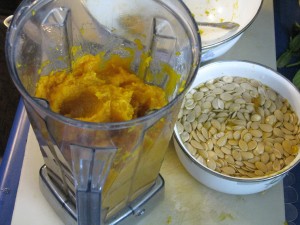
Pumpkin and seeds. I pureed batches until smooth, then spooned cups full into freezer bags. My pumpkin scone recipe calls for only half a cup, so I froze one-cup batches, as well as two-cup batches for pie. The secret to ‘vacuum-packing’ freezer bags is to close the top of the bag around a straw and then suck all the air out. It really works well, and is kind of fun, too.

Get a straw, suck out the air and presto: vacuum packed! However, the best thing that happened out of all this squashing was that I had a little less than a cup of pureed roasted squash left in the VitaMix, too little to freeze and really irritating to scoop out. It was a cold day and past lunchtime. I had an idea and spooned in what was left of some Chai tea mix, poured in vanilla soy milk, blended it until it warmed up and sat down to drink. Heaven! I’m not one for pumpkin flavored things, but this was the real deal.
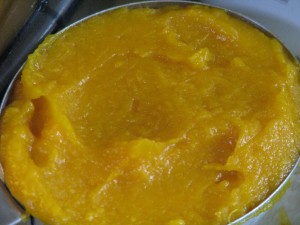
Pumpkin puree. It was so good that the next day I took a cup of the pureed squash that I refrigerated, poured in 1 1/2 cups of vanilla soy milk, a touch of orange syrup left over from candying orange peel, added cinnamon and blended until it was hot. It was thick, satisfying, a little sweet, spicy and full of beta carotene, fiber, protein and other good things. I’m sure you can do the same thing with canned pumpkin and other liquids, such as milk, rice milk, almond milk or coconut milk. If fact, I insist that you try it.

Hot Yum! Pumpkin ChaiAuthor: Diane C. KennedyRecipe type: BeverageCuisine: AmericanPrep time:Cook time:Total time:Serves: 2Cold or hot, spiced pureed pumpkin or squash mixed with the milk of your choice is extreme comfort food that is actually terrific for you!Ingredients- 1 cup cooked pumpkin or squash puree, fresh or canned.
- 1½ - 2 cups vanilla soy milk, or milk of your choice. (Less for a thick drink).
- ½ - ¾ teaspoon cinnamon, pumpkin pie spice or up to 1 scoop Chai tea mix.
- Sweetener (optional); a natural syrup would do or honey.
- ½ teaspoon vanilla (optional)
Instructions- For cold pumpkin chai mix all ingredients briefly in a blender or VitaMix.
- Taste to adjust seasonings, thickness and sweetener, and serve.
- For hot pumpkin chai, heat milk and add to the rest of the ingredients in a blender and process. If you have a VitaMix, you can add all cold ingredients and then process until it is hot.
I’m going to make some more for me right now. -
When Is Tuna Fish Not Tuna Fish?

No-kill “tuna” salad! Prior to being a vegetarian, many years ago, I did enjoy a tuna sandwich or salad now and then. A perfect dish for a hot afternoon. During my almost twenty years of vegetarianism I’ve sampled many tuna substitutes, with various results. Most of them were discontinued, or were imported to a store on the East coast and then resold and shipped. Have you ever noticed how foods that are marketed as substitutes for other foods either have quotations around their names as if someone was whispering it behind their hand? Or else the names are spelled wrong, like Tuno or Bakon. There is also the saner although still questionable method of placing the word ‘mock’ in front of the word, such as ‘mock-tuna’, which is better than misspelling. Anyway, back to the topic, in trying to keep my carbon footprint low I’m eliminating the purchase of goods that require so much shipping.
This week I discovered a marvelous tuna substitute (I say, “discovered” when really I’m probably the last to know). It is low calorie, high in protein and fiber, inexpensive, easy to prepare, doesn’t kill tuna or dolphins, and they grow here in California. I can also buy them organic. They are garbanzo beans, otherwise known as chickpeas.
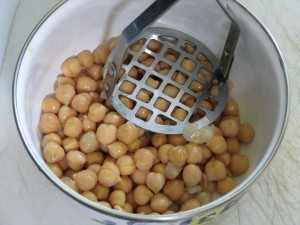
Mash garbanzos (what a great name for a bean!) until they are almost smooth. The flavor of garbanzo beans is very mild and takes well to light seasoning. Substitute mashed garbanzo beans in your favorite tuna salad or sandwich recipe. If you use Veganase – a dairy-free mayonnaise substitute – then you have a mock tuna salad or sandwich that won’t be dangerous to eat at picnics because neither the beans nor Veganase spoil quickly. Incorporating dill into the mix gives the mix a fishier flavor, since dill is so commonly paired with fish. Simple, nutritious, inexpensive and very yummy. Can’t go wrong with that!
Mock Tuna SaladAuthor: Diane C. KennedyRecipe type: EntreePrep time:Total time:Serves: 2-4A high-protein and fiber, low-cost tasty tuna substitute without any trace of mercury or dolphin!Ingredients- One can organic garbanzo beans
- 2-3 tablespoons Veganase or mayonnaise
- 1 teaspoon minced dill, preferably fresh
- 2 stalks celery, chopped
- 2 -3 cups cooked, cooled small shaped pasta, such as shells
- ¼ teaspoon ground cumin
- Salt and pepper to taste
- Chilled iceberg lettuce
Instructions- Drain and empty canned garbanzos into a small bowl.
- Mash with a potato masher until almost smooth, keeping some of the lumps for texture.
- Stir in Veganase, dill, celery, cumin, salt and pepper.
- Stir chickpea mixture into cooled noodles until well mixed.
- Serve over iceberg lettuce with a dill pickle on the side.
