If you ever go to England, go to Cornwall and spend at least a day at the Lost Gardens of Heligan (http://www.heligan.com/ ). Due to a flat tire we only spent four hours there and we didn’t see even half of the 400 acres of incredible restored gardens. The story is this: a thousand acres on the southern coast of Cornwall has belonged to the Tremayne family for about 400 years. At the end of the 1800’s, one of the Tremaynes had built extensive theme gardens. There were walled gardens, enormous hedges, glass houses, cold frames, a pineapple pit where the only pineapple grown in Cornwall grew warmed by horse manure. Melon houses, leisure gardens, formal flower gardens, woods, kitchen gardens and unbelievably, tropical gardens, filled the estate. Due to Cornwall’s position by the English Channel the climate is such that with care tropicals can be grown there. The estate was fantastic; then came WW I, and almost half the family and staff were killed. The gardens were abandoned. Subsequent wars and taxes took their toll, and the gardens became overgrown. Vines, brambles, trees and weeds ran rampant, breaking through the glass roofs, pulling apart brick walls, upsetting carefully laid pathways and covering every trace of the gardens under a head-high blanket of tangled, thorny brush.
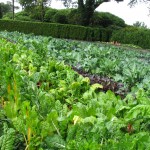
Twenty-one years ago, the Tremayne who inheirited the gardens, asked one of the founders of the neighboring Eden Project ( http://www.edenproject.com/ ) to try and restore the gardens. The task was phenomenal and reads like a mystery. Hacking through the overgrowth they found the walls, the foundations and the clues as to what had been. Since then the gardens have been restored. They are everyone’s dream of a garden combined. There is a mound that was a beacon mound during Nepolianic times, but then discovered dates back to the Armada, and then back to Medieval times! There is a jungle with massive gunnera plants and palm trees, about half an acre of vegetables all grown from seed that dates from the late Victorian time, walled flower gardens, ‘antique’ poultry and cattle, unique sculptures recently added, and a wildlife garden to encourage the existence of so many insects, birds and animals that are disappearing. Even with weeding through photos I came up with so many that I want to share, that I’ll just post them below. Visit the website and read up on the Lost Gardens, voted Britain’s Finest Gardens. They are magical.
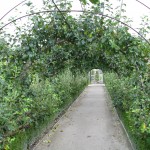
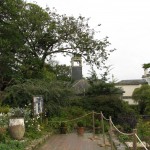
Entrance to a magical world.
The Tremayne who built the gardens holding a single Gunnera leaf in front of his famous pineapple pit.
Flavors of ice cream… we didn’t get to have any!
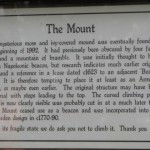
A mysterious mound was uncovered and thought to have been a beacon site in Nepolianic times, and for centuries beyond that.
Stone steps into the ravine
The Italian garden
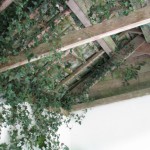
Ivy coming through the roof, trying to reclaim the building once again.
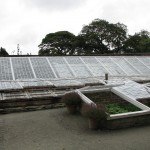
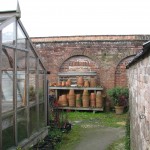
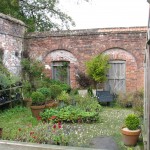
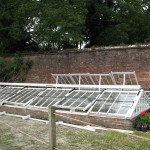
Hot houses and cold frames
Cold frames for veg.
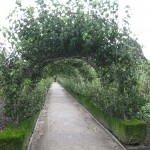
Espaliered pears of many varieties.
Writing on the wall of the ‘thunder room’, or original composting toilet
All plants and veg grown are from the late Victorian period
Espaliered fruit trees make use of warm wall space
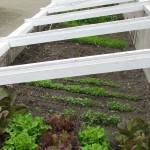
About a quarter acre of mixed greens.
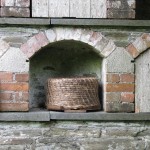
Bee skeps (baskets, pre-movable hives) were kept in boles for winter protection.
A bee skep in a bee bole
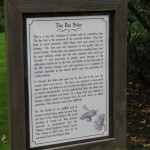
History of the Bee Boles
A banana grows in Cornwall!
Melon houses
Potting shed with greenhouses in a walled area. Sigh.
Cold frames in the potting shed
A robin watches, just like in The Secret Garden
The overgrown remains of mud brick walls
A very steep pathway lined with chicken wire to prevent slipping
The Jungle
A wire sculpture of a woman with her arms out… can you see her?
People either love or hate figs. Figs were grown long before wheat became a crop. They are members of the Ficus family, which includes such spectacular specimens as the famous Banyan tree that grows enormous roots and support trunks from air roots. The fig tree, and members of the ficus family such as the Bodhi tree, are mentioned in all three major religious texts.
However, figs are not fruit. Nope.
Figs are swollen, fleshy stems called syconiums.
Figs are swollen stems.
A fig is actually a swollen, hollow stem that has internal flowers!
The insides of figs show the flowers
When the flowers are ready for pollination, the end of the stem opens slightly to allow in the fig wasp, its only pollinator.
The end opens.
The syconium will then set seed inside, which is the time when they are usually harvested. Happily for fig eaters, many fig types are self-pollinating. Now you can amaze your friends and family with this interesting trivia over the dinner table!
In the last four years I’ve done a little traveling. I’ve flown and drove in England, Scotland and soon Cornwall, and flown to tour Ecuador and the Galapagos Islands. Also I’ve been traveling back and forth to Oregon to see my daughter in college. I’ve learned a few tricks; I’m sure I’ll learn more the hard way each time I travel. Here are ten tips that I find useful and perhaps you may, too:
1. Don’t rely on travel agents to do the right thing.
For my first vacation four years ago, I made a trip to my AAA office. Since I was traveling to England, they couldn’t help me except for booking the plane flights. I looked into all kinds of tours, and finally gave them all up and booked our lodgings, rented a car and off we went under our own sails. We stayed at interesting places and received good rates, too. However, the travel agent booked our return flight to the US and the connecting flight home so closely together that it didn’t take customs into consideration and our flight was gone long before we even collected our baggage (which also goes through customs.) Fortunately it wasn’t one of the major flights. Look online and find the configurations of the airports, and see how far it is to get from one terminal to another, especially if you must switch airlines. Remember that you have to check in at the desk when you change airlines, even if you’ve been ‘checked through’ at the beginning. Otherwise your luggage will be enjoying a tour of your destination while you await another flight. I overheard one woman frantically calling her travel agent because her plane landed in San Diego but her connecting flight was booked from Carlsbad airport, and she didn’t know. After a frantic and expensive taxi ride she found the plane was late, which made everyone miss all connecting flights. She wasn’t happy.
Also when booking online through TripAdvisor, Expedia, Travelocity, or any of the other dot-coms, keep comparing. TripAdvisor compares costs of flights from many different organizations, but try going through the airline’s website. For my upcoming trip to Cornwall, TripAdvisor came up with roundtrip for two at over $5,000. I almost dumped the whole trip. I went outside, visited the chickens, cooled off, then came in and checked United, where I have the Mileage Plus program. The trip came out to roughly $2500. Still a lot of money, but half of what had been proposed. Plus I earn mileage for the trip which I can use when booking flights to and from my daughter’s university. If you want to do it right, do it yourself! The best laid plans can go awry with one late plane or a little fog over San Francisco (I try to avoid changing planes there), so go with the flow.
2. Bring dental floss
When we went on an 8-day boat tour of the Galapagos Islands, something inextricable wedged in my teeth. On a small boat for eight days, I had no way of obtaining floss. My gum swelled and was distracting. I wish I had brought dental floss. Besides its regular use, dental floss is strong enough to be used as string or thread to tie up or on errant clothing, luggage tags, bandages, and much more. Plus it has its own built-in cutting device that isn’t considered a weapon.
3. Leave lots of time to switch terminals.
If you have an International flight, you will probably have to go to a different building entirely than the domestic flights. You’ll probably have to not only walk a great distance with your luggage, but take a tram to the other building. It can take 45 minutes from gate-to-gate if you are a fast walker and the tram isn’t full, and then you must check in at the desk and deal with your luggage again. So when booking your flight, make sure you leave a lot of time between flights.
4. Read reviews of airports.
Often when you book flights online, the information given is a pack of lies. Reading reviews of the airports and flights may give you tips about surprises that would have completely messed up your trip. For instance, a flight into England with a connecting flight to somewhere else in Britain may not even be at the same airport, and the fine print or initials may escape your notice. In fact, for many flights you must travel from Heathrow to Gatwick airports, and reviews say that with traffic it could take a couple of hours to travel, plus going through customs, gate check in, etc. Some flight packages say there are only one or two stops, but actually there is a third hidden one where you must deplane and board another. This happened in Bogotá, Columbia on the way to Ecuador. Machine-gun –bearing, camouflaged soldiers stood guard all throughout the airport since it is such a hotbed for drug smuggling.
5. Pack as little as possible, under 22 lbs.
You really don’t need to bring much: you aren’t moving. Bring a bar of soap for washing yourself and your clothing and invest in some good travel clothing that dries quickly. An excellent way to dry wet clothing is to lay it flat on a towel, roll the towel up, then with a partner or by stepping on one end, wring the towel as hard as you possibly can. The clothes inside will be just barely damp and will have a better chance of drying overnight hung out in the bathroom or over the heater in the room. By packing light clothes and washing often, you can get away with a small rolling suitcase and another small bag or purse or backpack, neither of which need to be checked as luggage. Keep the weight of a bag to 22 pounds or under if you will be traveling on small aircraft because many have weight regulations. Leave a little leeway for souvenirs on the return trip. Besides, waiting for your luggage to magically appear can add half an hour or more to your airport time, and if your luggage is lost, getting it back can be chancy.
6. Switch to solids or powders if possible; use tiny plastic bottles for everything else.
Liquids must be in containers no larger than 3 oz, and all liquid containers must fit neatly in a sandwich bag. I have no problem with security regulations because that is what must be done to try and protect us from the crazies. To make life easier when traveling, use creams, solids or powders when traveling to keep the liquids to a bare minimum, and transfer any liquids into small plastic travel bottles that you label clearly and put tape over.
7. Put all pharmaceuticals into plastic zip-lock bags, liquid or not.
Something will spill. Count on it. A lid will pop off or something will break, and then toothpaste will be all over your jeans, or nail polish all over your medications. I put soap and razor in one plastic baggie (the soap will be wet when I put it back in), medications, bandages, Imodium, travel sickness pills, daily small baggies of vitamins or daily medications, and any other dry stuff, into another plastic bag. Toothbrush and paste and floss go into another. When in the hotel, I put the bag with the soap in the shower, the bag of toothbrushes by the sink, and the other bags on the counter so everyone with me can get at them. It is so easy to pack up and keep anything wet or breakable from contaminating everything around it. I have also been told that putting your passport, license, and money into a plastic zip bag is a wise thing to do, so in case you survive a crash landing in the ocean, getting home will be very easy because all of your important things have been waterproofed. I haven’t done that. I’m taking my chances.
8. Be polite and kind to airline personnel, particularly those at the gate.
What an awful job! As bad as working at the DMV. These people are smiling through gritted teeth while being insulted and harassed and cursed at by people who are suffering through their travels. These scapegoats have loved ones and sore feet and car trouble, just like everyone else. Be nice to them with a smile, especially if they are grumpy looking. They are probably that way because the last guy just made life hell for them.
9. Drink lots of water.
By the time your body tells you it is thirsty, you are already a little dehydrated. Travel dehydrates the body. Drink lots of water, even if you need to squeeze down the aisle and cram yourself into the tiny lavatory because of it. All those germs your body is trying to get rid of will be washed away better, your digestion from the strange food will be eased, and swelling and aches from sitting so long won’t be so severe when you have adequate water in your muscles. Tea, coffee and alcohol dehydrates, so drink pure water.
10. Bring your own food.
It is no longer a given that you will receive a meal on a flight, or even the so joked about packet of peanuts. Many flights offer nothing, or just beverages, or have a selection of horrible foods to purchase. Often boxed lunches include a cold sandwich, a packet of salty pretzels or chips, a packet of cookies, and more condiments than you could ever hope to use. Being vegetarian, it is very difficult to eat adequately on long flights that don’t offer standard meals. However the vegetarian food when we do get it has been pretty good, all-in-all. Since I used to travel with children and with my mother who needed to keep her blood sugar up, I’m used to baking small muffins or sandwiches the day before the trip. I try to make things that will last several days. Even after reaching our destination we’ve resorted to eating our snack foods for several days between meals. For most people who are used to fast food and eat meat, it is easier to buy from one of the stores at the airport and carry it onboard, but I find home cooked food helps keep tummies stable.
Hopefully these tips can help if you aren’t already familiar with them. If you like to travel, don’t put it off. See what you want to see while you can. Time flies, and so should you.
Strawberries are the quintessential food of summer. Whether served plain, dipped in sugar, chocolate or a sweet fondue, mashed and drizzled with balsamic or flavored vinegar, chopped and mixed with vanilla ice cream, strawberries are happily both delicious and nutritious. Between summer’s heat spells, take time to light up the oven and treat yourself to some strawberry shortcakes. They taste as if they were difficult to make, but they aren’t.
Grate frozen butter into the flour.
Before you begin, throw 1/2 a cup of unsalted butter into the freezer.
These scrumptuous, not-too-sweet cakes are ideal for a summertime dessert or for a special breakfast or brunch. You can even serve them at high tea!
Ingredients
2 cups all-purpose flour, plus more for dusting
½ teaspoon salt
1 tablespoon baking powder
½ teaspoon lemon or orange zest
5 tablespoons sugar, divided
½ cup unsalted butter, frozen
1 large egg, beaten
½ cup cream or ½ and ½
1 large egg white, lightly beaten
10 - 12 ounces fresh ripe strawberries
1 tablespoon sugar
1 cup whipped cream
Instructions
Heat oven to 425F.
Stir together the flour, salt, baking powder, zest and 3 tablespoons of the sugar in a bowl.
Grate the butter into the dry ingredients, then with your fingers or pastry blender gently incorporate the butter into the flour.
Whist the egg into the cream and slowly pour into the dry mixture while mixing with a fork, just until the dough begins to form (you may not need all the liquid).
Turn the dough out onto a lightly floured area and roll gently to about ¾ ".
Dip the cutter in the excess flour and cut out rounds.
Place the shortcakes one inch apart on a greased baking sheet, or one lined with parchment paper.
Gather the scraps of dough and continue rolling and cutting until used up.
Brush the tops of the shortcakes with egg white and sprinkle with one teaspoon of remaining sugar.
Bake for 10 - 15 minutes until golden brown.
Allow to cool on a wire rack (you'll want to eat them while warm).
Slightly crush the strawberries to release the juices.
Sprinkle with last teaspoon of sugar. You may also drizzle with balsamic or flavored vinegar, stir in fresh snipped mint leaves, or stir with a tablespoon of whiskey.
Split each shortcake lengthwise and add strawberries and a dollop of whipped cream, then top with the other half of the shortcake like a little hat.
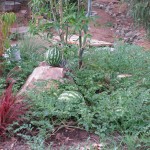
This year I grew watermelons. I planted organic seed in my raised vegetable bed, protected from gophers by aviary wire, grown in excellent soil and fertilized with organic fertilizer, watered often, and the vines produced three melons the size of grapefruit. The chickens enjoyed them very much. However, a non-organic watermelon from a six-pack stuck in the ground under a bamboo, decided to take over the world. Not only did it’s foliage cover a good portion of the upper soil, but it grew and has grown enormous beasts of watermelons. One we call King Watermelon.
King Watermelon is in the foreground, laying in wait.
My daughter and I watched a YouTube video on how to tell if a melon is ripe. One way is to watch the tendril opposite the stem of the watermelon, and when it turns brown the melon should be ripe. The area where the stem connects to the fruit should also turn a little brown. Also, under the melon should be a pale spot where it rests on the ground, and when that area turns from white to yellowish, that is another sign. King Watermelon had no spot. We checked every few days for weeks as the beast grew larger and larger, it’d tendril tenaciously green. Then suddenly, it was brown. Much celebration. My petite collegiate daughter crept up on King Watermelon and swiftly cut it’s stem. Then staggering with it, brought it into the house where we weighed it. It was an incredible 28 pounds. It is a wonder that any other plant in the area got any irrigation! Normally we’d slice the melon on the countertop, but King Watermelon was so large that he had to go into the kitchen sink, and he barely fit! It was there that he was butchered, in consideration of all the juice that might come out.
So large it had to be 'butchered' in the kitchen sink!
The insides were perfectly sweet, juicy and crunchy. I couldn’t believe how perfect it was.
Beautiful inside; sweet and crisp.
My daughter cut and cut, saving some for our dinner (all that extra water before bedtime wasn’t a great idea, though), and wrapping the rest. The chunks had to be stored on cookie sheets to distribute the weight on the shelves and protect from leaking juice. We had watermelon the next day too, and fed some to our very grateful and thirsty tortoise during the heat wave. There is a lot of King Watermelon left. It is scary to look into the refrigerator and see it all. Even cut up and wrapped, that melon still has an attitude. And I think he won the battle after all.
Wrapped sections for infinite eating.
And there are more melons ripening with each passing minute. Gulp.
Cucharas served with hot rice and homemade dill pickle.
Cucharas is one of my favorite eggplant dishes. With several huge Black Beauty eggplants ready to eat, it is time to make these treats. There are several steps, but none of them difficult. The eggplant doesn’t need to be salted or oiled, and the result is tasty hot or as leftovers. It doesn’t taste particularly eggplanty, so for those who don’t think they like eggplant, they may want to try this recipe.
Halve, then quarter the eggplant.
The word ‘cuchara’ in Spanish means spoon or scoop. The eggplant ‘flesh’ is cooked then gently stripped away from the skins, which are reserved. The insides are then mashed with yummy ingredients and then plopped back on the skins, then baked. The process is very forgiving, so if the skins tear, it is okay. It all sticks together with filling in the end.
Scoop out the ‘flesh’ from the cooled skin, and save the skins.
If you are using larger eggplants, then when filling the skin, just cut them in half. The cucharas should be either small enough to be picked up and eaten out of hand, or eaten with a fork.
Cucharas make great finger – food as an appetizer.
The original recipe is from Sundays at Moosewood Cookbook.
Author: Diane C Kennedy (From Sundays at Moosewood Cookbook)
Recipe type: Main dish or appetizer
Prep time:
Cook time:
Total time:
Serves: 16 coucharas
Ingredients
2 medium eggplants with smooth skin
3 garlic cloves, minced
3 eggs beaten
2½ cups grated cheddar cheese
½ cup grated Romano cheese
¼ cup matzo meal or bread crumbs
2 Tablespoons olive oil
salt and freshly ground pepper to taste
freshly grated nutmeg
Instructions
Stem the eggplants and cut each in half lengthwise.
Cut each half crosswise into four pieces.
In a covered suacepan, simmer the eggplant chunks in water to cover for 15 minutes until pulp is tender.
Drain the eggplant in a colander and set them aside to cool.
Whjen you can comfortably handle the eggplant, use a teaspoon to separate the pulp from the skins, taking care not to tear the rectangles of skin.
Reserve the skins. Should any tear apart, save them anyway because you can overlap two torn pieced to form a single iece and the filling will hold them together.
In a bowl, vigorously mash the eggplant pulp with the garlic, or use a food processor or blender.
Mix in the remaining ingredients, except for ½ cup cheddar cheese and nutmeg, and combine thoroughly. Add more matzo meal if the mixture seems too thin.
Place a skin, shiny side down, in the palm of your hand.
Mound it with the eggplant mixture about an inch thick.
Place it on a well-oiled baking sheet. Continue until all the skins and mixture are used.
Sprinkle a little of the reserved cheddar and a bit of nutmeg onto each couchara.
Bake 350 degrees F for 20 minutes or until golden brown on top.
The preparation can be done ahead of time and the coucharas baked just before serving.
Are your sunflowers being stripped? Are the leaves acquiring non-snail-like holes and then disappearing altogether? You may be feeding the birds, but not with the seeds!
Lesser goldfinches apparently are nuts over sunflower leaves. They will tear little bits of the leaves off and injest them, and within a day or so there will be nothing but a stem and a flower.
If your goal is to feed the birds, then this is okay. If you have bird problems on your vegetables such as peppers, then you may want to plant sunflowers off to the side to distract them.
Why do they eat sunflower leaves? They must like a little salad with their seeds, and sunflowers are particularly yummy for them. In searching the Internet for suggestions as to why they like sunflower leaves so much, there were many postings about the incidents, and yet most respondents insisted that the birds were after bugs on the leaves, or that snails came in the night and ate the leaves!
This occurrence seems to happen mostly in California, and other than bird nets (which one person said that the lesser goldfinches chewed through!) or planting sunflowers thickly (one for them, one for you), you may as well just enjoy the show. Ours come up from dropped or buried birdseed, and when the plants are growing their flowers, suddenly they are beset by birds who skeletonize the plant. We’re okay with that; it saves a little cost on the very expensive Niger thistle seed! (Oh, and by the way, Niger thistle isn’t thistle seed at all).
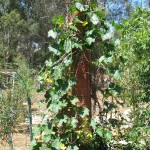
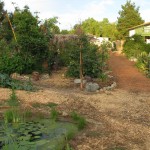
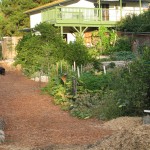
Plants have been enjoying the beautiful weather and the constant irrigation from the well, and the garden is flourishing. So, unfortunately, is the Bermuda grass, but that is another tale. Since I see it everyday I don’t notice the change so much, but when I show someone around I am thrilled all over again with the incredible change that has happened on this property. There are so many birds, insects, reptiles and other animals either already here or scouting it out that I know the project is a success. It is a habitat, not just for me and my family, but for native flora and fauna as well. It wasn’t so long ago that I had a cracked, weedy asphalt driveway, a termite-ridden rickety porch that needed pest control, a house with a stinky deteriorating carpet and old splotchy paint, a tile kitchen counter with the grout gone in between and a cleaning nightmare, and a yard full of snails, weeds and Washingtonia palm trees, with the embankment eroding each rainfall. Over the last four years we’ve survived some pretty intense construction projects (none of which were done on time, no matter what they promised!). My house still has some repairs that need to be done but I no longer am embarrassed to have anyone over. The garden is wonderful to walk in and explore. I’ve taken some photos this evening to show you how things are growing:
Bees enjoying purple coneflowers
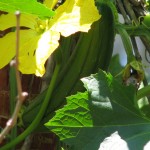
The luffa squash has mighty asperations.
A luffa squash and bloom. They are edible small and green, but I’ll leave them to dry.
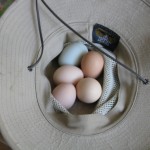
Five eggs today! Each laying hen participated for the first time! The little girls have grown up.
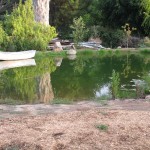
The small lower pond and the palm pathway.
The veggie bed.
Rushes, fleabane, waterlilies and other plants are growing in nicely around the big pond. The boat is still on loan from Aquascape.
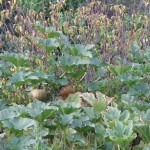
A pumpkin tree? This apricot isn’t healthy, but the pumpkins sure are.
These bare areas I’ll fill with plants that will make up guilds, each plant filling a niche to help the others grow.
The entrance to the bee garden.
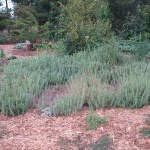
Native vinegar weed loves a place we left untouched, and so do the bees.
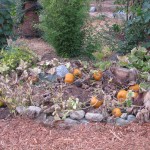
Sugar pumpkins ready a little early for Halloween.
A feral zucchini, still producing at least one a day.
Melons, passionfruit, pitcher plant and many others under the back porch we call the Poop Deck.
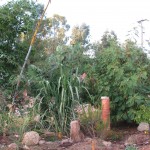
Very eager bamboo, sugarcane and hops.
Olive trees tied to painted PVC pipe to make a hut.
The ‘Nest’ beyond the dry stream bed.
A thud and a swish… with no warning the neighbor’s tree fell across the fence.
A green roof for the entranceway, just beginning to show.
The watermelons in the vegetable beds were tiny… these monsters are wild. That one grew on the rock on its own.
Entranceway flower tunnel… with dogs waiting to go inside!
Last year I planted regular cucumbers, and my daughter and I decided to try our hand at making pickles. We tried several recipes, and the results were okay but not fantastic. The pickles were kind of… flabby.
Sterilize jars and lids while simmering brine
This year I planted pickling cucumbers, and they came in last month with the idea to outstrip even the zucchini plant. Trying to find the cucumbers which were cleverly hidden and camouflaged, before they grew too long, became a game. When we had enough, we made pickles. I wanted a recipe that didn’t have too much garlic, and used cider vinegar, which is healthier than white distilled (grain) vinegar. Most recipes called for white wine vinegar, but that was very hard to find and only sold in small expensive bottles. Red wine vinegar, however, I could find in a gallon, but it would have discolored the pickles to an unappetizing greyish red, and just wouldn’t have had the right flavor. Cider vinegar was inexpensive, easy to find and has the ‘mother’ in it, which is that strandy thing that is suspended in the bottle. That is live yeasty stuff that makes the vinegar what it is, and what makes it more healthy. You should use vinegar that has at least 8% acidity, to keep the pickles from spoiling. Also make sure all the cucumbers are covered with brine or they’ll spoil, especially after opening the jar.
Use fresh whenever possible
Pickling cucumbers make all the difference. They are smaller at maturity and don’t have as many seeds, and are more crisp. Recipes wanted the cucumbers to be pickled within 24 hours of being picked. You’d have to have twenty plants to have enough cucumbers to pickle in quantity all at once, and then you’d be pickling twice a week. I kept ours in the refrigerator until we had enough, with some loss of crispness but that couldn’t be avoided. I had planted some dill, but not enough and not early enough for the recipe. It calls for the seed head, but I used dried dill instead since mine weren’t in bloom yet. We also put a grape leaf at the bottom of each jar because the tannin is supposed to help keep the pickles crisp. Many old fashioned recipes call for the addition of alum for that purpose; aluminum has been linked to Alzheimer’s, so finding and adding alum is a personal choice. I learned that you must cut off the blossom end of the cucumber because it has enzymes that will cause the cucumber to rot. That is nature’s way of making sure the seeds are dispersed, but doesn’t help with pickling. Larger cucumbers should be cut into disks or slices and pickled. If the cucumbers are yellowish and seedy, don’t pickle them. They are too old.
Grape leaf, garlic, dill and pickling spice in sterlized, hot jars
Use wide-mouth jars if you have them. I don’t, and stuffing the cucumbers into the jar would have been a lot easier if I had.
The best gadget ever for picking up hot jars
No recipes tell you when you they are done. I read where a ‘freshly’ canned food was put up in the last two years. We tried ours after 5 weeks and they were very good.
Sterilize jars and lids while simmering brine
The origins of this recipe is the Ortho Complete Book of Canning, but I have tweaked it. I hope you like it: many happy pickles to you.
In the August of one of my most successful years of vegetable growing, as the squash vines wither to reveal the graceful shapes of winter stews, and the cabbage moth caterpillers chew collards into lace, I am able to review and make notes on triumphs and things not-as-good-as-one-would-hope. Gardening is as much a practice as medicine, but healthier. What works one year may not work the next; for instance, there are melon years and no-melon years. A gardener can worry about the soil, the water, the sunlight and the bugs, but come to discuss the problem with enough other gardeners and there is sure to be at least one who didn’t have a good melon year either. Whether there is astrological truth in it or not, it matters not except to bring relief from the strain of worrying if there were no melons because of a fault in the gardener.
Here is my list of things that didn’t go as planned, and resolutions to improve next year:
1. Trim back foliage to make sure there isn’t something drinking all the water.
Ginormous Swiss chard root
2. Check for volunteers, especially those hitchhikers from the compost who decide to sprout.
One of three avocado volunteers in the collards
3. Don’t think you’re going to pinch the tomatoes back so that they grow onto a large trellis, especially since you don’t make the trellis. Tomatoes need some light to produce and ripen.
waArkansas Traveler just ripening
4. Warn visitors early about the rubber snakes.
Soybean and rubber snake
5. Count backwards from Halloween the estimated ripen days on the seed packet, and don’t plant too early. That way your pumpkins won’t be ripe in August. Also, plant herbs such as dill and cilantro early and thick long before cucumbers, so that you have the seed heads ready when it is time to make pickles.
Ripe pumpkins in August
6. There only needs to be one zucchini plant.
Monster zucchini
7. Prepare to stake everything. With wire-lined raised beds you can’t plunge a stick down into the soil next to a wobbly plant. You have to attach the stakes to the sides of the bed, or drive them down outside of the bed and make T’s. Whatever the choice, it is best done before the plants are mature.
Quinoa: pretty but floppy
8. Plant lots of kale. It is extremely tasty sauteed, and drying the oiled leaves to make kale chips (see recipe section) makes a nutritious and addicting snack.
Kale is yummy
9. Again, keep volunteers under control. This kabocha squash took over three vegetable beds and two pathways. However, it is producing some mighty fine squash.
Kabocha squash volunteer coming from the bed behind this one, around and into the end bed.
10. Rubber snakes are remarkably effective in preventing crows from eating seeds. However, besides warning visitors, don’t forget where you’ve tossed your rubber snakes if you are reaching into a leafy dark space at twilight!