Fruit
-
When Life Gives You Lemons… Make Lemon Curd!
What to do with a plethora of beautiful juicy lemons? There is, of course, just so much lemonade your dentist will allow you to drink (sugar and acid!). Here is something very British-teatime that you can do with those wonderful fruits, that you can also give to friends as a wonderful gift: Lemon Curd. You can also make curd from limes, oranges, and even passionfruit. This recipe is for lacto-ovo vegetarians, not vegans, because it contains eggs and butter.

Lemon Curd!Author: Diane C. KennedyRecipe type: CondimentPrep time:Cook time:Total time:Serves: 8 plusLemon curd goes well on bread, in pies and on cakes, and makes a thoughtful gift!Ingredients- For one cup (may be increased; I usually make it x 6):
- ⅓ cup sugar
- 2 teaspoons cornstarch
- 2 teaspoons finely shredded lemon peel (then mince)
- ¼ cup freshly squeezed lemon juice
- ¼ cup margarine or butter
- 2 beaten eggs
Instructions- In a medium saucier pan (rounded bottom rather than square, which is a sauce pan), combine the sugar and cornstarch.
- Stir in lemon peel (I use a microplane grater, then mince the peel so its very small) and lemon juice.
- Add butter.
- Cook over medium-high heat, stirring, until thick and bubbly.
- Carefully whisk half the lemon mixture into the beaten eggs, making sure that it mixes immediately so the hot mixture doesn't cook the eggs.
- When incorporated, whisk the egg mixture into the pan with the rest of the lemon mixture.
- Cook and stir for about two minutes more. Pour into sterilized canning jars, or into a serving bowl if using that day, and cover with waxed paper and cool. Makes about one cup of lemon curd.
- I give my jars of curd a turn in simmering water for about 5 minutes, just to make sure that it keeps, and I store it in the refrigerator.

Now that you have it, what do you do with it? Lemon curd is delectable served on hot scones. For something especially decadent, pair it with marscapone cheese. Oh, my! It can also be used as a cake filling, a spread for toast, pancakes, waffles, and as a pre-cooked pie filling (just bake a crust, spoon in the curd and chill. Top with whipped cream. Yum!).
If you have a lot of extra lemons, grate the peel, squeeze them all, mix the peel and juice together, and pour into ice cube trays, covering with plastic wrap. One tray holds about a cup and a half of juice. When frozen, empty the tray into a zip-lock freezer bag or freezer container, label and date, and you have juice ready for curd, lemonade or what you will, when lemons aren’t falling off the tree.
Do yourself and your friends a favor and make lemon curd for a wonderful hostess gift, a gift for a foodie, or to repay the person who gave you all those lemons!
-
Spring Is Here

Spring is here Today I really felt that Southern California had shrugged off Winter. It was warm and a little humid out, my Satsuma plum is in full bloom, and my desert tortoise (endangered species; I’m his third owner and he’s licensed) Homer came out of hibernation in the closet. He’s still sleepy and grumpy, and I can relate to that.

I also saw the first Red Diamondback Rattlesnake today, newly emerged from hibernation, sunning itself in the cleft of a boulder about head height. My hiking buddy Alex and I were at Santa Margarita River Preserve, and there was this somnamulant reptile soaking in the sun and enjoying the radiating warmth of the rock. We posed right next to him or her, and he or she didn’t care. This would not be the case on a hot summer’s day!

This intermediate dry spell is important for the construction of the permaculture garden because the soil is still too wet to allow trucks down on the property. We are investigating the best way to create the ponds, which at this time will incorporate a dry rock creekbed that will catch and channel rainwater and allow it to perculate into the soil, another pond for water holding, and a possible natural swimming pond. The swimming pond works on the same concept as a natural greywater system. Beside the swimming area is another deep area filled with different grades of rock. Water plants which clean water with their roots are planted on top in a naturalistic way. Water is pumped into this area from the bottom, and as the water rises through the gravel and plant roots it becomes clear, then is transported into the swimming area. No chemicals needed; in fact, chemicals would ruin the biological balance of the pond. The swimming pond is clean and ready for human use, and also provides riparian habitat, food and acts as a watering hole for many animals. They are popular in Europe and other countries, and are slowly catching on here in America. Of course, people throughout time have swum in gunky swimming ponds; this is just making one for oneself. This is a YouTube link to a UK pond builder. He is hawking a video on his project, which is only available in the UK and thus wouldn’t play on US DVD players, but this short video tells a lot about swimming ponds: http://www.youtube.com/watch?v=7JoQthEBl6U . Clicking on this link will navigate you away from this page. I just love his Liverpudlian accent.
Today I became the owner of clumping giant bamboo, and a Buddha’s Hand citron. So very cool! The bamboo can be used for all kinds of structures, and with the citron I can make my own candied fruit for desserts. Did you know that candied fruit is called succade? Nope, neither did I.

Creepy, but fun and very fragrant. The fruits are mostly peel, and are used to scent rooms and clothes in Asia. Also planted were various stonefruits, including 4-in-1 apples, apricot, cherry, pear, peaches, nectarines and Asian pear. I also became the proud owner of two little kumquat trees. They are loaded with fruit, and since they were purchased from an organic nursery, this crop doesn’t have to go to waste (you eat kumquats whole).
So, after a morning of Zumba at the Fallbrook Community Center, planting and feeding my many animals, then four hours of intense hiking, my legs are trying to get me to walk upstairs to bed and stay there. Sounds like a good idea to me.
-
Sun-Dried Fruit

- Drying produce is easy!
When I look outside at the over 100 degree F. sunshine baking my property, I’m frustrated that I can’t use it all. I feel the same when it rains here in semi-desert San Diego county. I am hoping to purchase solar panels for my house, but until then I have my laundry on the line and fruit on the roof. Yep. The bounty of fruit and vegetables always appears during the hottest months, and I’ve spent many summers sweltering in the kitchen cooking jam and canning tomatoes. Something in my Celtic and Eastern European genes ignores the long growing season here and sends a message to my brain to preserve everything for the coming harsh winter imbedded in my genetic memory. Survival food for the blizzardy months! Um… yeah… reality check here. Although I try to eat locally grown seasonal produce, you can buy just about anything anytime of year here, although not without a decline in the quality. To give in to my desire to not waste sun energy or food this summer I’ve been slicing and drying fruit and vegetables on trays up on the roof, with excellent results.
If you have a flat sunny spot that ants haven’t found, you too can dry food. You don’t need to use preservatives. It is a great way to save bananas that are just about to go black, or the ends of the tomatoes that are too small to put on a sandwich. The most labor is in slicing the food and then later flipping it on the trays.
Sun-Dried Fruit and Vegetables
You will need:
Produce such as fresh apricots or other stonefruit, apples, pears, berries, tomatoes, squash.
Reflective cookie sheets (not Silpat)
Cheesecloth
Thinly slice produce such as apricots, tomatoes, apples, bananas, etc. You don’t have to peel stone-fruit or tomatoes; actually the skin helps hold the innards together. If you have produce with inedible skins such as melon or bananas, then by all means take it off. I like small pieces so that the dried fruit can be directly used in baking or on top of fresh fruit or cereal without having to be cut up again. (Snipping dried apricots with a scissors is soooo time-consuming). However, don’t slice them too small or when they dry they will turn into little dots which are hard to scrape up. You can leave small fruit such as blueberries and alpine strawberries whole but they may take longer to dry.

Don't chop them too small! Place the sliced or whole fruit or vegetables on cookie sheets or pizza pans that are reflective aluminum. Space the fruit so that it isn’t touching, but the pieces can be very close together (they will shrink considerably).

Measure pieces of cheesecloth so that there is enough to cover the tops of the trays and hang over the sides so that it can be pulled taught and not touch the fruit
 .
.Place prepared trays of covered fruit on the roof, on a hot porch, or anywhere it will not be invaded by ants. Leave the trays out all day until the sun is no longer on them, then bring them in for the night. Don’t leave them out in damp weather.
Using a sharp spatula, scrape up the fruit bits and turn them over, re-spacing them not to touch, and replace the cheesecloth.
The next day set the trays out again. Depending on how hot your roof is, the fruit should be dried at the end of the second day. If using whole fruit like blueberries or grapes, it may take a few days. Fruit is dried when there are no moist pockets in them.

Ta-daaa! Store the fruit in covered jars, and use during those bleak winter months when you plot your spring garden.
-
Pomegranate Paste
4 cups fresh pomegranate juice
1 tsp. fresh lime juice to taste (if juice is sweet; you are aiming for sour)
1 tsp. salt
In a heavy four-quart saucepan combine the juices and bring to a boil over high heat. Reduce the heat to medium-high add the salt, and let simmer uncovered, stirring occasionally, until thickened, about one hour. Remove pan from heat. Store in a glass jar in the refrigerator. Makes about half a cup.
This is often combined with walnuts.
-
Pomegranate Sauce
1 tbsp. oil
1 large onion, sliced
2 cloves minced garlic
4 tablespoons pomegranate molasses
1 cup vegetable stock or broth
¼ cup whole walnuts (optional)*
Dash of sugar (optional)
In a medium frying pan heat the oil over medium-high heat and add the onions. Sauté until the onions are translucent, about 8 minutes, stirring often. Lower the heat to medium-low. Add garlic, molasses, stock or broth, and walnuts and dash sugar, if using, and combine well. Simmer until at desired thickness. Season with salt and pepper to taste. Serve warm over seitan, tofu, vegetables, rice or grains, or add browned seitan or tofu to the sauce during the last thickening stage. Serves two to four.
*Whenever using nuts or spices, toast them first in a pan or in a toaster oven. Watch carefully because they can burn quickly. This brings out the flavor and adds texture.
-
Pomegranate Syrup or Molasses (or ‘reductions’):
The difference between these two is only in the cooking time; the difference between the syrup and grenadine is the addition of sugar. If you like a tarter flavor, add ½ to 1 teaspoon of lemon juice.
4 cups pomegranate juice
½ cup sugar
Combine in a 4 quart saucepan, and stir over medium heat until the sugar dissolves. Turn heat down to medium-low and cook until reduced to 11/2 cups for syrup (about two hours), or until reduced to 1 cup for molasses (about 1 hour 20 minutes). Cool completely and store in a glass jar in the refrigerator for up to six months.
Use the syrup in beverages, jelly, over fruit or ice cream; use the molasses with vegetables and tofu, in marinades and sauces.
-
Pomegranate Fizz
3 cups fresh pomegranate juice
½ cup fresh lemon juice
1 tsp. orange blossom water (available at ethnic groceries or online)
Sweetener to taste
½ cup seltzer water
(Alternatively, instead of sugar and seltzer use a mild ginger ale or a lemon-lime soda)
Combine well and serve over ice from a glass pitcher to show off the beautiful color.
Serves four.
-
Grenadine
For one cup of grenadine, bring 3 cups of pomegranate juice (see above) to a boil over medium-high heat, then simmer uncovered until reduced to one cup, about an hour, stirring and skimming the froth now and then. Cool and store in the refrigerator.
The store-bought grenadine of my childhood Shirley Temple days is mostly sugar and red dye. This recipe produces slightly sweet pomegranate juice concentrate that isn’t cloying. For Shirley Temples, fill a glass with ginger ale, add a splash of grenadine, a twist of orange or lemon, and don’t forget the cherry! For a boy’s Rob Roy, fill a glass with cola, add a splash of grenadine, add a twist of lemon and a cherry. So sophisticated!
-
What to do with Pomegranates
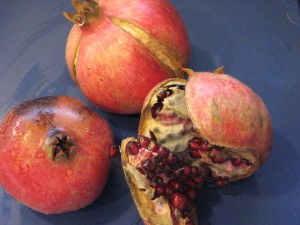
Pomegranate trees are beautifully exotic. The deciduous shrub has glossy green leaves, bell-shaped crimson flowers that hummingbirds love, and heavy handfuls of round purse-shaped fruit loaded with edible seeds. In the heat of Southern California October, pomegranates evoke colorful images of ancient Persia, the splashing of cooling fountains and the scent of roses and orange blossoms. Closer to the holidays they are joyful decorations and eloquent additions to special menus.
This partially explains why on a dry and sweltering 99 degree October day I’ve gathered pomegranates off my tree, many of them split by the heat, and am laboriously harvesting the seeds dressed in my shorts and bikini top. I know I am doing myself a favor for later.
Whether you buy or grow pomegranates, there are three basic ways to prepare them: you break them open and eat the seeds, you remove the seeds to use in recipes, or you juice them. Actually, the seeds are the little black bits inside the red flesh, and what we call seeds are called arils. To make this easier on all of us, I’ll call them seeds.
To buy pomegranates, find heavy, glossy red fruits from September through about February. Make sure they don’t have any really soft spots on them. Store them decoratively in bowls for a week or two, or in the refrigerator for longer.
To eat fresh, find yourself a stain-proof area: this is messy and the juice stains. Cut the top off the fruit, make a slit down the side and with your thumbs or with the tip of the knife, pry it apart. This should be quite easy if the fruit is ripe. Inside are sections of glossy, deep red juicy seeds encased in a bitter white cushion called pith. If you say this word around anyone with a middle-school sense of humor you will be treated to an explosion of giggles. Anyway, you eat the seeds. They are not very sweet, but they should not be overly sour, either. Whether you just consume the juicy part and spit out the inner black bit (the real seed) or not is a matter of taste; they are good for spitting contests (outside!). However that little black seed holds the most fiber, so crunching away is healthier.
To juice, you can cut the fruit in half and use a juicer, or remove the seeds as noted below, and whirl gently in a blender. For either method you need to strain the juice through cheesecloth. The problem with the juicer method is that some pith does get into it, making the juice bitter. If you are using the juicer, a hand one or one that presses the fruit rather than an electric one that whirls is better. You don’t want any of the bitter pith to be grated into it. If using a blender, liquefy quickly without causing it to foam, or it won’t strain quickly. Two cups of seeds makes about one cup of juice. Drink as is, chilled or slightly warmed, or use to make molasses, syrup, grenadine, marinades and sauces. Store in the refrigerator.
Pomegranates are acidic so avoid using aluminum and carbon steel knives or pots as they can turn the juice bitter.
To prepare the seeds for recipes, this is what you do:
Dress in old clothes.
Set a bowl of water in the sink (this isn’t like shelling peas while sitting out on the porch rocker with the bowl on your lap. You need damage control!).
Put out a container for the pith. (!) I compost it, and hopefully you can compost, too.
Put out another bowl and a sieve for the finished seed.
Set up a cutting board with a paring knife.
Make sure you have a sponge handy.
Put on a good audio book or CD. I was listening to classical selections while doing this.
On the cutting board, slice the very top off a clean pomegranate and slice down the side, just through the outer layer. With your fingers or tip of the knife, crack the fruit open.
This is important: submerge the fruit in the bowl of water! (unless you like the ‘someone was just murdered here’ look for your kitchen walls). In the water, slide your fingers under the seeds to separate them from the pith, without squishing them much (you don’t want to lose the juice). If you start daydreaming and the fruit comes out of the water, it will squirt. Use that sponge on the walls, etc. Compost or discard the pith and shell. Pick out any pith that is floating in the water. It is edible but bitter.
When finished, or when the bowl is getting full, some of the extra pith will be floating on the top, so try draining it off, or skimming it with a small sieve. Then drain the seeds into a large sieve and put them in a bowl until you have seeded all the fruit you are going to do, or are just tired from standing.
The seeds can now be used fresh in recipes, juiced, or frozen in sealed freezer baggies. One 9 oz pomegranate holds about ¾ a cup of seeds. I’ve used frozen seeds on top of fruit salads or with certain main dishes over the holidays.
I’ve let smaller, less ripe pomegranates stand on flat platters (not touching) as decorations, and they have dried well for use in arrangements.
Nutrition:
One half cup of arils (87g) has 80 calories, zero fat and 5 grams of dietary fiber (if you eat the whole aril), one gram of protein, and vitamin C, iron, and very high amounts of antioxidants.
The Pomegranate in History:
Many scholars believe that Eve’s apple in the first book of the Christian Bible was actually a pomegranate, which is the right size, shape color, and most importantly, grew in that area. The name pomegranate comes from the Latin word for apple, pomum and seeded, granatus. Indeed, the heavy red fruit with crimson arils bursting with juice against the soft white pith can be, lets say, food for thought. Ahem. No surprise then, is its symbol of fertility, new life, and most good things. Pomegranates hold strong symbolic meaning in Judaism and the Greek Orthodox Church. In Greek mythology, Persephone was tricked into eating pomegranate seeds by her kidnapper Hades, and could only then return to the world that many seasons (the number varies depending on the number of dry seasons). During the months of Persephone’s absence, her mother Demeter’s (goddess of the harvest) mourning kept anything from growing, explaining winter.
Trivia: the Spanish capitol was renamed Grenada after the fruit during the Moorish occupation.


