-
December in Fallbrook
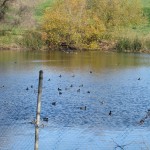
Coots on the pond 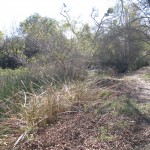
Sunlight in the sleeping willows. 
Tranquility (try not to look at the houses). 
Tough and determined roots being fed by decaying golden leaves. 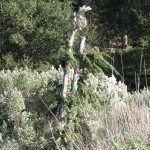
An impromptu Christmas tree: a snag decorated with juniper, cranberries and bird seed. 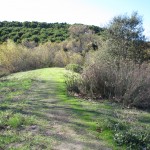
Lush green weeds keeping a low profile in the winter. 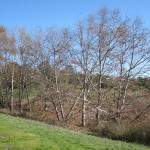
Stately sycamores; their leaves shed to keep their roots warm. 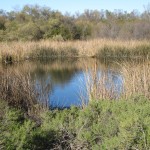
A season of greens, golds and blues. 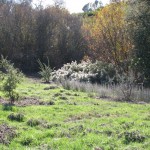
Coyote bush seed fluff glowing white instead of snow. You May Also Like

Native Insects and IPM
-
Christmas Town
I love Christmas. I am a sucker for Christmas decorations. Slowly over the years, attending after-holiday sales, I added to the Christmas decorations for me and my children. Every year for many years I would let my son and daughter pick out a Hallmark Christmas ornament of their own. Our tree is decorated with the Three Stooges, a Klingon Battlecruiser, an Enterprise Shuttlecraft, and a Mole Christmas. In fact, when the tree is plugged in three voices chime in: one is saying, “Shuttle craft to Enterprise, shuttle craft to Enterprise. Spock here. Happy Holidays. Live long and prosper.” Another is Worf from Next Generation saying, “I wish you a most honorable holiday. Ka-plah.” Thirdly, and no less spectacularly, is, “Roger. Zero G and I feel fine. Capsule is turning around. Oh! That view is tremendous!” That was astronaut John Glenn in 1962 in the Friendship-7 shuttle, having the first view of the earth by a man in space.
The most labor-intensive part of the Christmas set-up, yet the most satisfying, is Christmas town. Years of going to Michael’s crafts store after Christmas to pick up the Dickensville Christmas town piece by piece, along with small houses collected along the way (I always have had a weakness for miniature houses), has coalesced into a city that, if not always size appropriate, certainly is well planned. My son used to set up the town, then after he moved out my daughter took over the planning. There is a business district, a central park area, the docks, a residential neighborhood, both upscale and poor, alleyways, and off in the mountains stands Scrooge in front of his dark home watching with hopefully spirit-changing surprise as Santa and his reindeer fly past. The town changes every year. It is always good to see the familiar faces: a mother and daughter feeding the birds, boys on a teeter-totter, and a little man just standing there having a cup of tea. Then in January, I pack it all away again, and enjoy having my house a little less cluttered for the New Year.
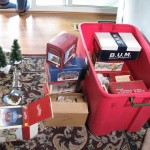
One of five boxes for the town. The B.U.M. box is where Scrooge’s house is stored. 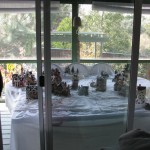
Just beginning to plan it out. 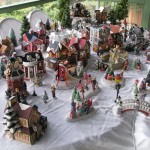
Uptown. 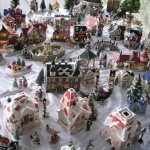
Districts seperated by roads and alleys. 
Toy factory in front of the skating rink. 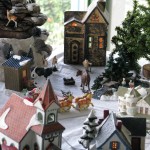
Scrooge outside his dark house in the mountains, with Santa! 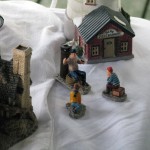
Telling tall tales by the dock. 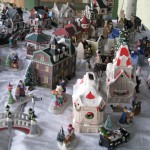
The blue-collar side of town. 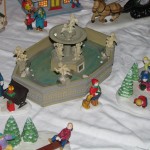
Feeding birds and playing by the town fountain. 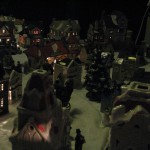
A man having a cuppa by the alleyways. 
Businesses open after dark. 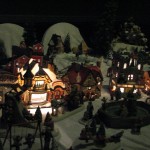
Loading a sleigh full of presents. 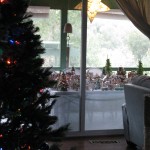
Finished town during the day 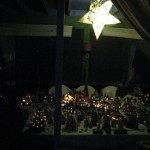
Town at night. -
Crunchy Cayenne-Cashew Candy

Bite-sized pieces of sheer yum (in my mother's candy dish). I don’t like very spicy foods. I like to taste the nuances of my food and not allow heat to overrule the flavors. However, a little heat now and then can be very nice. Heat can also be medicinal, helping everything from stomach upset and preventing colds to relieving the pain of arthritis. I have the perfect solution: a buttery, crunchy candy that has just a little burn to it. Yum! Originally from Gourmet magazine, I’ve been making it annually for Christmas for many years now, and it is hard to not polish off.

Put everything into a pan! It is simplicity itself to make. You put all the ingredients into a pan, heat it until the butter and sugar melts, turn up the heat until it begins to clump, pour it out onto a buttered cookie sheet and wait for it to harden. If it is still sticky, put the pan in the refrigerator for five minutes.

Pour out onto cookie sheet to cool. Crunchy Cayenne-Cashew CandyAuthor: Diane C. Kennedy (Gourmet magazine)Recipe type: DessertPrep time:Cook time:Total time:Buttery, crunchy, sweet, salty candy with a slight burn. Yum!Ingredients- 2 cups whole salted cashews
- 10 tablespoons (1¼ sticks) unsalted butter
- ½ cup granulated sugar
- ¼ cup packed brown sugar
- 1 tablespoon light corn syrup
- 1 teaspoon cayenne pepper
- ¼ teaspoon salt
Instructions- Butter a nonstick baking sheet and put aside.
- Combine all the ingredients in a large nonstick skillet.
- Stir over low heat until the butters melt and the sugars dissolve.
- Increase heat to medium and boil, stirring constantly until mixture turns golden brown, thickens and begins to mass together (about 5 minutes).
- Immediately pour out onto prepeared baking sheet, spreading evenly.
- Cool completely.
- Break into pieces.
- Makes about 1⅓ pounds.
-
Forget ‘Em Cookies

Store in a moisture-free container You really can’t forget these cookies. First of all, they are so tasty. Secondly, they are low fat and high in protein. Thirdly, they are exquisitely easy to make, especially after a day of baking. If you have two left-over egg whites (maybe from making lemon curd {see recipes}), you can make these merangues in a matter of minutes. Stir in some mini chocolate chips or broken chocolate pieces (or try toffee pieces, or crushed peppermint, or even some tiny mixed candied fruit), plop teaspoonfuls onto foil-lined baking sheets, put them in a 350F oven and turn off the oven. Leave sit with the door closed for 8 hours. Bingo. Beautiful, Christmassy, crunchy on the outside, slightly moist on the inside, with a definate chocolate yum. Make sure you use chocolate that you really like, because the flavor is dominate. You can also make these plain and they’d be just as wonderful. So make some, forget them… but remember them the next day! Store in a moisture-free container, because they will absorb moisture from the air and become sticky. If that happens, pop them back into the oven and turn off the heat again.

Mounds of fluffy goodness
Forget 'Em CookiesAuthor: Diane C. KennedyRecipe type: DessertPrep time:Cook time:Total time:Easy overnight meringues that take hardly any time to prepare, use up extra egg whites, and bake using residual heat from your oven. How environmentally friendly is that?Ingredients- 2 egg whites
- ½ teaspoon vanilla extract
- ¼ teaspoon cream of tartar
- ½ cup superfine sugar (or regular sugar)
- 6 oz. mini chocolate chips, chopped chocolate, crushed peppermint, toffee pieces, (optional)
- 1 cup chopped macadamia nuts or pecans (optional)
Instructions- Preheat oven to 350F
- Beat whites, vanilla and cream of tartar at high speed of an electric mixer until foamy.
- Gradually add sugar one tablespoon at a time until sugar is dissolved and soft peaks form (2-4 minutes; don't overbeat)
- Fold in chocolate and nuts, or whatever you choose. Or leave them out. It's your cookie!
- Drop mixture by heaping teaspoonfuls onto cookie sheets lines with aluminum foil.
- Place in oven.
- Turn off heat immediately.
- Forget 'em for 8 hours (don't even open the oven door!)
- Carefully remove cookies from foil
- Store in an airtight container for up to 1 week.
- Depending on whether you add chocolate and nuts, makes between 2 and 4 dozen.
-
Recipes

Recipes over time Something my mother and myself, and to some extent my mother’s mother, had in common, is the obsessive clipping of recipes. I began as a teenager, tearing recipes from the Sunday edition, storing them in a folder. The folder changed to multiple folders, then to a two-drawer filing cabinet, topped with a stuffed basket of wonderful edible possibilities glowing from scraps of magazine pages waiting to be sorted and filed.
Upon my mother’s death, I ended up with bags and bags of recipe clippings, some of which had been my grandmother’s. I couldn’t throw them away without looking through them. First of all, there might be something hidden amongst the papers that had some personal relevance. Secondly, it is like a journey back through decades, through my mother’s married life. The innocent times, post World War, when science and convenience foods would save us all from heavy labor and devastating illnesses through better nutrition and medicines. Recipes featuring the new packaged gelatins, junket tablets, buttery cream sauces and gravies. Thirdly, the love of cooking was perhaps the only strong link between my mother and myself. With forty-two years between us in age, too much history had happened in between to make us easy with each other. My generation selfishly and unquestioningly enjoyed the product of the efforts of her generation to make the world safer, healthier and more free. She had made dresses out of her aunt’s curtains as a child; I had everything I needed, therefore acted as spoiled as I was. Yet I sat on the kitchen counter feeding vegetables through the meat grinder for holiday stuffing, learned how to tell when baked goods were done by the smell, beat up bread dough and caressed pastry. Food wasn’t just good to eat, it was how my mother fully expressed her love for her family. The hard work planning, shopping, coordinating, preparing and serving nutrionally balanced meals. I learned that from her in my own way. I raised my children vegetarian, preparing all the meals, reading labels and shopping around for the best foods, trying to keep likes and dislikes in mind, never using a microwave or food processor, but making each slice personal.

Old recipe collections Going through the bags has taken me several years. It has been hard work. Being sentimental and having always been labeled as too sensitive, I am overwhelmed in the task. I think of my mother cutting, writing, making original recipes. One for peach crisp from a yellowed scrap of a New Jersey newspaper of 1959 was clipped two years before I was born. When she had four happy children still at home, in the house she and my father built amongst the trees in Point Pleasant, which I barely remember. Four hungry mouths to feed, plus my father who loved to eat, and relatives who would drop in for a game of cards. Mom would bake cakes, make sandwiches, happily feed the crowd. She wrote a cooking column called Beth’s Secrets to help support the large family. Mom entered the Pillsbury Bakeoff and won third prize, which included a trip to San Francisco for the judging. She decided that no matter what, the family would have to move to California; she was done shoveling snow.
Then there are the recipes dated when I was in high school, in college when there was just the two of them and only three of us kids left but all grown and flown. These are the ones that hurt the most, just as the ones I clip now do, too. When in our lifetime would we ever make these? Who for? Yet she still clipped up until the end. She had mountains of magazines that she hadn’t read, and as I bundled them up to recycle she insisted I leave the cooking ones because she would still go through them. I have the same bug. I have to look, I have to clip. Then when I want a recipe, I can’t find it, or I’m in a hurry and look in one of the hundred cookbooks I inherited from her, or more commonly now, Google it.
As I finish finally the last batch of her clippings, I find I’ve gleaned a small pile from it, recipes that I may just use sometime if… if I have grandchildren, if I have more mouths to feed. For recipes are hope for the future, a happy future when people can meet over a good meal and peace can reign if not on Earth, then just for a few hours over the dinner table.
My own bag of recipes is waiting for me to sort, although I’ve been much more discriminating since living alone most of the time. I really don’t want to put my children through the same emotional wringer of sorting through bags and files, but then, maybe they would just toss them. They are of the Internet age after all. I have reached to throw the clippings and files all in the recycler but something has stopped me. Perhaps that link with my past, perhaps the love of cooking, or maybe I know in my heart that if I keep them, I haven’t given up
hope for a happy future, highlighted with family and friends around a dinner table.
-
Becoming Very Behind in my Cleaning
You May Also Like
Native Insects and IPM
-
Dragonfruit

Small ripening dragonfruit Dragonfruit have to have the most incredibly sensational color of any fruit. Their blooms are wild, showy and no better than they ought to be, and the fruit has colors so loud they bedazzle the eyes. Also known as pitaya or pitahaya, dragonfruit grow on either columnar or vining cactus plants. Their history is recorded with the Aztecs, and now they are grown in Vietnam and parts of Malaysia. Due to their soft texture, the fruit isn’t conducive to shipping and handling, so finding them at Asian marketplaces or Farmers’ Markets would be your best bet. However, the popularity of this plant is catching on and since they take up little room, can be grown at home.

There, amongst the proper cosmos, a wild flaunting beauty! I have two vining dragonfruit, which I’ve propped up on the trunks of two Washingtonia palm trees for support. They receive sun there, but some protection from the intense late afternoon sun, and it is a frost-free area. One morning in late summer I went out among the small cosmos and other English-style flowers of that yard, and suddenly noticed this enormous tropical flower looking so out of place. It was gorgeous, fragrant, and sultry next to the prim annuals. The flower of the dragonfruit has a nocturnal bloom, relying on bats and moths for pollination; apparently even those that are self-fertile, as this one evidently is, needs some interaction with bats and moths to set fruit. To insure pollination, growers will make an evening event of hand-pollinating, paint brushes and flashlights in hand. The flower slowly faded during the day and was limp in late afternoon; I’m glad I was lucky enough to see it in the morning at its most sensual state.

This gorgeous, fragrant flower was as large as my face. I didn’t think that the flower would set fruit, but the plant surprised me again when I glanced over last week and saw a red dragonfruit. This particular dragonfruit has red skin and crimson flesh. Some have red skin and white flesh, or yellow skin and white flesh. The most dramatic I’ve seen was a bright green skinned fruit with crimson flesh! All have small black seeds inside.

Hey, there's a dragonfruit! Dragonfruit is famed where it grows for its health benefits which are extensive, as well as the fiber and vitamins it contains. Dried dragonfruit is supposed to be more potent than fresh in some ways, and is a better eating alternative for those who don’t care for the texture of the fresh fruit. A good website honoring the nutrition aspect of dragonfruit is http://dragon-fruit.biz/ .

Red on the outside and crimson in the middle Propagation can be done by seed, which is slow, or by one-foot-long cuttings from fruit-bearing plants. Allow the cuttings to harden off before planting, just as you would any cactus or succulent. Plants will need support, especially the vining kind. They are tropical plants, so enjoy warm weather, regular watering without standing in water, and some humidity.
For sheer spectacular showiness, you can’t beat the neon colors of dragonfruit. Eat out-of-hand, in fruit salads, blend in smoothies or for sherbets, or dry to slightly chewy bits that are packed with nutrition. You will certainly impress your neighbors; in fact, invite them over for an evening pollination party! That ought to get the homeowner’s association all worked up!
-
Mrs. Two Shacks Builds a Fowl Go-Kart and a Hen Harem

And its a... go-kart? Okay, so… my chickens are currently in a deluxe San Diego summer unmovable chicken tractor. The tractor is too heavy for me to move, and the wheels (reused) have literally crumbled apart. Now it is November and the nights are becoming chilly, and we’re on the weekend rain schedule, unlike our other dry years. (Normally it rains the weekend after Thanksgiving when all the holiday events are happening, which gives the weeds time to grow so that everyone is mowing just before New Years.) My hens are cold. I know, it isn’t Minnesota; the nights are in the 40’s, but that is nippy to Southern California-bred chickens. I’ve been pondering what to do for some time now, and my Libra self has vacillated so much that now I’m up against it. Yesterday I devoted to trying to build a warm place for the chickens. I ended up with a go-kart.

I have a cage and a crate: I'll put them on wheels! I am not one to cut wood. I go out of my way to find matching pieces of wood in my huge and glorious scrap pile just so that I don’t have to measure and cut wood, because invariably I will cut it the wrong length. Fabric, too, (I have some interesting curtains). Determined to make a warm, cozy hen structure that was safe from predators (a coyote jumped the fence and killed Kakapo and took Linnet on Saturday. I was and am heartbroken and angry. I have three hens left. Oh, and Emerson.) I found a huge wooden crate that was used for a sculpture of a rodeo rider, which belonged to my parents. This thing has been taking up space for maybe twenty years in various locations. It looked the perfect size for three hens. I dragged it down the hill to the newly-straw-covered area in front of my new two sheds.

Hammering together four pieces of wood on wheels takes skill Fifteen years ago, at another house, in another life, I built a movable chicken coop that was gosh-darn good. I didn’t cut any wood for that one, either. Anyway, I still had the casters left. Pulling two long and two short pieces of 2×4 (notice I don’t give a length) out of the wood pile, I hammered them together and attached the casters, although not in that order, which made the hammering together more difficult. I purposefully didn’t use screws: I wanted to bang away with something hard on something yielding. I attached the crate after scraping out the spider webs. Now I wanted a caged area for the hens to be able to graze and get some sun. I still wasn’t completely sure where I was headed with all of this, but I was driving anyway. I dragged down an old large animal cage, which used to support a heat lamp for my African Spur Thigh tortoise until he outgrew it and tore the door off. I could fit it onto the front part of the… thing… and the casters would go through the holes in the bottom with a little help from a PVC hacksaw. (Cutting PVC is NOT the same as cutting wood, by the way, and I have oodles of experience with it. Red Hot Blue Glue nearly runs in my veins.)

The wheels fit through the wire! Wheee! I found some brackety-gizmos that made an L shape, and attached them to the bottom so that the cage hung down closer to the ground so that the hens could get at the grass.

L-shaped thingies, and the hammer head that kept flying off I attached two pieces of wood in a ‘T’ as a handle (trying to hammer it onto the frame through the cage), and then found an old dog choke collar with some lead still attached, and wrapped that around to help pull.

The pull handle, complete with choke chain. So, what if it rained? It needed a roof. There happened to be three of these triangular things left from the shed removal. I’m glad they were put to use. They had been a failed attempt to put up cat fencing (to keep them in the yard) on top of the shed roof by a friend who was a contractor. (He’s also the reason why the 8-foot wooden fence I asked for turned into a 5-foot fence up on bricks with a teal slanted cap running along the top… which makes a nice foothold for the cats.)

I knew there would be a use for these, if I waited long enough! I nailed these suckers on the crate, (ever try to nail something triangular?),
")
Ever try to hammer something triangular? (The successful nail is on the outside end!) then pulled out a piece of corrugated aluminum that wasn’t too sharp (and was also conveniently on top of the pile). It was too long, and not wide enough, so I grabbed some big scissor things I’ve had in the shed for years and cut the aluminum in half (they were tin snips!). Roughly. On purpose. Of course, the piece I cut didn’t fit, so I had to bend it in half, stepping on it, and drape it over the triangles then nail it on. The larger of the two I used towards the front, to give a little shade. The sun was going down and I had to hurry.
Then stuffing straw in the gap for insulation, adding a milk crate and straw inside for eggs, I stepped back to enjoy my creation.

Ummm, doesn't quite fit. Well, it wasn’t quite a chicken tractor, and it wasn’t quite a warm and cozy house. It was a go-kart.

Hay insulation I had thought to move it and the hens up into the relative safety of the tortoise and cat yard, since the cats were not allowed into the yard right now because two naughty individuals escape (so everyone else has to suffer, just like in school). With much pulling and pushing, I managed to get the kart around to the front of the hen house, and there it stayed overnight. I couldn’t get it any farther. The casters would work fine if the mulch wasn’t so thick, and if I didn’t have to pull it uphill. There was no way I was going to be able to get the kart uphill through the mulch into the tortoise yard.
Today I managed to move the kart over some grass, and one by one brought the hens over and popped them in. I got some very curious looks back from them. The chickens thought it was pretty fun, and enjoyed pulling at the tops of the grass sticking up through the cage, but after awhile they set up a chorus that couldn’t be ignored. And I still hadn’t solved the problem of their being cold at night! It was again about to be dark.

Hens wondering how to make it go Grabbing a rather stinky dog blanket, an old flowery sheet and a pillowcase (they were there, all right?) and the staple gun, I went to work. I stapled the blanket all across the back of their regular hen house loft, across the roof and let it dangle down in front of where they roost at night. Sticking my head in there (and holding my breath…. very doggie-smelling) I noticed a slight breeze still, so I stapled up the sheet and pillowcase. Emerson was quite baffled as to what I was doing next door.

How to make an expensive, well built chicken tractor look like junk in ten minutes. Then I brought the hens back, and figured it would have to do until after the holiday. A day and a half’s work and I have a heavy fowl go-kart and taudry drapings around the hen house, but I think the hens are warmer tonight. And, I must say, I think the kart is pretty cool-looking.

Gipsy hens Happy Thanksgiving!
-
Subversive Gardening

Veggies I’m going to cheat on original material in this link, and urge you to watch Roger Doiron (of Kitchen Gardeners International) talk about the gardening revolution. The important points are about the famine, obesity and monoculture problems and how we can save ourselves with backyard gardening… no different a message than Geoff Lawton’s, who says that all the world’s problems can be solved in a garden. The Doiron video is entertaining as well as informative, so please take a few minutes to watch it. I found it on a link from Treehugger.com, which has today several good articles about the Occupy movement, having a beehive, making a rocket stove and a wedding dress made of rubber gloves! Scroll down this link to watch the Doiron video here: http://us.mg201.mail.yahoo.com/dc/launch?.partner=sbc&.gx=1&.rand=7do57p67k7bh0 .
-
Rain

Runoff An interesting fact, especially for those of us in low-rain areas: An inch of pH neutral, nutrient-freeing, perfect rain falling on one acre of land is the equivelent of 27,154 gallons of water. Yep. Where does it go? For most people, it runs off into the storm drains and eventually to the ocean where it becomes salty and unusable without treatment. Then a couple of weeks later, on come the sprinklers delivering not-so-good quality expensive domestic water, further locking up the nutrients and killing the microbes in the soil. How can you capture that wonderful resource of natural rainwater? Water barrels are alittle help, but mostly what you need to do is shape your soil to catch the runoff. Swales, deep loam, and strategic planting can quickly take all that water… even the amount that pours off of your roof, and capture it in the soil. The water slowly sinks and moves the way it was going before, but without taking the topsoil with it. As it moves, the plant roots absorb it over a long period of time, along with all the nutrients that pH-neutral rainwater has freed up in the soil. Your landscape will be stunning, your water bill can eventually be reduced to zero, and if you grow food plants, the nutrition level in them will rise. Here is a video from permaculturalist Geoff Lawton with graphics: http://www.youtube.com/watch?v=UFeylOa_S4c.
This is the essence of permaculture. Simple, logical effort to use what we already have to return the soil to the sponge it was before we compacted it. So how large is your plot of land? Nine acres? A back porch with pots? You can still do the math and see how much water you can capture. Look up rainwater harvesting videos on YouTube and see plots of land in the desert that harvest rainwater and are oasises of food, habitat and beauty, without supplemental water. Here is what Lawton has done with ten acres in Jordan: http://www.youtube.com/watch?v=xvmx4lcqQVw. If they can do it on that scale in that poor an area, any homeowner can do it.
