-
Soil: Weeding

Lesser goldfinch eating sow thistle seeds. Good soil is the basis of life as we depend upon it. Rich, loamy soil with a neutral pH is what every gardener dreams of. The smell of fresh soil is called geosmin, which is a scent released by happy soil. Good soil makes for healthy plants, which in turn grow healthy fruits and vegetables.
Soil is different than dirt. Dirt is what happens on a roadway after a lot of traffic passes over it and the oxygen is compressed out of it. Dirt is what is left when erosion is allowed to carry off topsoil. Dirt is what remains after unsustainable farming practices where chemical fertilizers are dumped onto plants year after year until nothing will grow anymore. Dirt is what most people have when they move into a new house, because to make the property level all the topsoil has been scraped off and buried. Dirt is nearly dead. But dirt is an ingredient in soil, and luckily Mother Nature is always trying to repair the soil. What we call weeds grow in dirt because these are plants on a mission to bring dirt back to life.
Plants have different jobs in nature. Some have deep tap roots to mine minerals from deep down, bring them up to their leaves which die and transfer the minerals to the surface. Some are groundcovers. Some attract insects. Some fix nitrogen in the soil. Some provide a shady canopy. Most provide mulch in the form of fallen leaves, twigs, flowers and fruit. Some provide habitat for animals, whose droppings fertilize the ground. Plants help each other in a symbiotic relationship, and permaculturalists call a set of these plants guilds.
Now look at weeds in a vacant lot and try to identify them. Wild radish? It has an enormous taproot that breaks apart hard soil, then mines deep minerals and delivers them to the topsoil in the form of leaves. It also attracts bees and other pollinating insects. As does mustard, which has a very tough root system that also breaks up hard soil and creates tunnels for worms and other soil creatures to move through. As the plants die off, so do the roots, which decay and feed the microbes and worms, whose castings turn dirt into perfect soil. Grasses hold onto the soil keeping it from eroding away, shades the soil from harsh sunshine, retains water and provides good habitat for worms as well as food for birds, depending upon what type of grass is growing. All plants have a purpose, even if they aren’t in their native environment.
However we don’t want our gardens to be like vacant lots. Usually, quite the opposite. Many people will look at their backyard full of weeds and poor soil and decide just to dump white sparkly rock all over it and stick in some unhappy cactus. These people are actually much kinder to the soil than those who start the relentless, expensive, laborious and deadly cycle of spraying chemical weed killer, dumping on chemical fertilizer, forcing plants to grow in areas not suited to them and yet never creating soil.
When you use permaculture practices in your garden, the most work is done in the first year. You plan your garden for functionality, plan plant guilds, plot out your own usages and desires, and then plant accordingly. You may plant close together, but keep in mind the needs of the adult tree. Don’t plant invasive plants unless they are properly contained. Don’t plant vines without installing support systems such as trellises first. Lay the groundwork for your garden. Don’t spray. Don’t pour lots of money into chemicals. Don’t even till unless your soil is horrible and you can’t wait to plant (and then, only till once and then never ever again!). There is a lot less physical labor to do in a first year permaculture garden than one with chemicals, and none of it involves poison!
Permaculture makes you look at everything in different ways, even things that conventionally seem bad. Instead of looking at your weeds as devil spawn, look at them with a view to what their purpose is in the garden. What are they telling you about the soil? I’ve talked about this in earlier posts, about what type of soil supports different types of weeds. For instance, nettle grows in high nitrogen areas. Now think of the weeds as a potential crop. Lambs quarters, purslane, even stinging nettle are all edible (boil the nettle briefly to dissolve the acid) and very healty for you. Dandelion wine! Or think of the medicinal values. Watch your weeds for awhile. Do birds eat the seeds? Are they covered in ladybugs? So now that you know your weeds a little better, you may think more fondly of them and perhaps allow some of them to live. Or even reserve a corner of the property for weeds to grow just for those birds, insects and your own harvesting. I’ve allowed purslane and scarlet pimpernel to grow over newly planted areas because they helped hold the soil, preserve moisture and helped prevent more nasty weeds from growing. Now you’re thinking: but what if they reseed? Well, of course they’re going to reseed unless you don’t let them live that long. Seeds are coming onto your property via air, animals and your own shoes every day. There is a horror about reseeding weeds that is all blown out of proportion. Have you ever cut all the weeds and had none come up the next year? Only if you dump Roundup or other chemicals on plants and kill them and everything around them in an annihilation of all that’s good along with all that you don’t want, do you keep anything from growing in that area. So how do you get rid of weeds? Okay, hold that thought.
How makes up good soil? Decomposed organic matter. It is actually the microbes and worms in the soil that make soil alive and healthy, and they are decomposing all that organic matter. How do you get good organic matter? Haul truckloads of horse manure from a farm? Save kitchen waste? Have a worm bin and harvet the castings every six months? Wait until trees are mature and harvest the leaves? Well, yes to all of these, but in the meanwhile, as it often is in nature, the answer is right in front of you: the weeds!
That’s right! Weeds are just compost that hasn’t happened yet. The fastest way to develop good soil when you have no other resources (or not enough resources) is to help nature along. Define your walkways (where foot traffic will compress the soil and where you don’t want anything to grow), and then when you pull weeds, toss them in your garden beds. If you weedwhip or mow, rake the cuttings into the beds. If you do this prior to the weeds setting seed, fine, but don’t lose sleep if you haven’t. You’ll grow some more weeds… great! More compost! I hand pull most of my weeds and then throw them in the guilds under the plants, root ball up. Within a few weeks they have decomposed, and all those nutrients they were holding in their leaves and roots have been delivered to the soil in the same areas. (If you have different types of soil on your property, keep the weeds near where they grew because they were busy amending that particular soil). The layer of weeds will also suppress other weeds from coming up, and will hold in moisture. Sure beats hauling weeds to a compost heap, and certainly beats having the trashman haul off plants that are holding nutrients from your garden soil!
There are exceptions to this practice. Invasive weeds such as Bermuda grass, Johnson grass, and anything that spreads via underground runners (rhyzomes) should not be handled this way. These useful plants for a vacant lot are terrors of your garden. However they can become useful. If you have a compost heap that really heats up, you can cook the weeds in it. What I do is put the weeds in an old trashcan, put the lid on it and let it sit in the heat for weeks until the weeds are cooked and completely dead. If it is Bermuda grass or Johnson grass, I also pound a stake through its heart. Then I compost it. Putting it in a trashbag works, too, but then you’d be contributing to the plastic industry in one more way and also to the landfill. I have set out trashcans with Johnson grass in it to go to the dump when I had so much that I had no place to cook it, and figured that sending organic weed material to the dump really can’t hurt.
How does one get rid of invasive weeds without spraying? Relentless hand-pulling in combination with occlusion, which is covering it with plywood, thick layers of cardboard, black plastic or whatever you have that will deprive it of what it needs to live.
This has been a long, lecturing post, and I apologize (if anyone actually has read to this point!) . I want you to look at the varied functionality of everything in the garden. If you have a problem, can you turn it into a benefit? For instance, if you have a wet clay area, why not harvest the clay from it to build a cob oven or garden feature, and let the depression become a natural pond? Or sheet mulch that area (what some people call lasagne mulching), which I won’t go into here but simply search the Internet for it and you’ll find hundreds of examples. Or plant peppermint or spearmint, or some other wetland-loving plant such as watercress… all of which are edible.
In subsequent posts I’ll talk more about different types of weeding and soil building. For now, go
-
Creamy Cauliflower Caraway Soup

The other night I had the February blahs. I was hungry, felt as if I was fighting a cold, worn out from laboring in the garden, and wanted comfort food. I had very little in the vegetable tray, but what I had was perfect for this soup. I made it that night, and I refined it tonight.
This is a healthy, low-calorie, vegan soup that is pureed smooth and silky. Two factors make this soup special. First, you almost char the cauliflower and caraway in a very hot pan until it is dark brown. I’ll call it deeply browning, because I don’t want that burnt flavor of charring. I was once served a tomato soup at the Four Season’s Resort which obviously used charred tomatoes, and it tasted so burned that I couldn’t eat it. In fact, it nauseated me, like when you really burn something on the stove and that smell is all over the house. I don’t think that that was the response they were looking for! Deeply browning the cauliflower brings out a wonderful rounded flavor (you can deeply brown the cauliflower, add a little broth and steam for a few minutes, and serve it this way as a side dish… delicious!). The caraway releases its flavor in the heat, and then becomes a very subtle note in the soup so that you really can’t distinguish it. If you would like a heavier caraway flavor, just increase the amount of seeds.
- Deeply brown the cauliflower.

The soup is pureed and is naturally creamy with the addition of the potatoes. While the frying pan is cooling you use it to toast the salt and cayenne, again releasing and deepening the flavors. Use this as a topping, which is then stirred into the soup by the guest. This soup doesn’t take long to make and is perfect for a cool winter’s evening, and doesn’t make the house smell like cauliflower, either.

Sprinkle heated spices on top, then have guests stir in.
Creamy Cauliflower Caraway SoupAuthor: Diane C. KennedyRecipe type: EntreePrep time:Cook time:Total time:Serves: 4A creamy, low-fat vegan vegetable soup that is fast, easy and very satisfying.Ingredients- 1 shallot, chopped
- 4 tablespoons olive oil, divided
- 1 medium head cauliflower, chopped (about 4 cups)
- 1 teaspoon caraway seeds
- 1 stalk celery, chopped (about ¼ cup)
- 1 medium potato, peeled and chopped
- ½ cup dry white wine (not sweet!)
- 1 tablespoon coarse salt
- ⅛th teaspoon cayenne pepper
Instructions- In a heat-tolerant frying pan, add two tablespoons olive oil and heat on high until almost smoking.
- Add cauliflower bits (watch for splashing!), caraway seeds and stir.
- Allow cauliflower to cook between stirring so that it develops dark brown marks on it. It should smell savory but not burned.
- Meanwhile, heat other two tablespoons of olive oil in a medium saucepan.
- Stir in shallots, celery, potato and wine.
- Cook until wine is reduced to very little.
- Add cauliflower and caraway to saucepan. Don't wash the frying pan yet.
- Add broth and one can of water to saucepan.
- Cover and bring to a boil, then reduce to simmer for 30 minutes.
- In the cooling frying pan, stir together the cayenne pepper and salt and let it darken without burning. Keep in reserve.
- When soup is done, blend it until it is smooth, and caraway is as fine as your blender or VitaMix can make it.
- Pour back into saucepan and check for seasoning.
- Ladle into bowls.
- With a spoon (not your fingers... cayenne gets everywhere!) sprinkle some of the cayenne and salt mixture onto the soup.
- Either swirl it decoratively, or have guests stir it in before eating.
- Deeply brown the cauliflower.
-
Monday Morning Surfing
Okay, so its Monday morning at ten o’clock and I’m trying to make an unsweetened cup of tea stretch out as an excuse to read funny stuff on the Internet. That’s one of the benefits of living alone… no one but the little taskmaster in my head to crack the whip. Oh, and the bank, but its President’s Day so they should all be closed. Oh, and the animals, but I’ve fed them all, with the exception of Gammera (“Feed the tortoise today, Diane! Remember to feed the tortoise!”). The unsweetened tea is a kind of torture because I usually take it with honey, but I am trying really, really hard to lose that twenty pounds that I thought I had lost for good a couple of years ago, but which found me again. I’m also using the excuse that its the Great Backyard Bird Count weekend to watch the birds swarming to the feeders as I surf. All of this, of course, is an excuse to not go dig bamboo and transplant enormously heavy trees like I did yesterday (that ingrate of a lemon tree poked me in the eye while I was trying to rescue it! I left that sucker partially dug out last night as punishment. See if it learned its lesson by now…). Oh, and its a little cool outside (what a California wimp I am!). I am also feeling the afterguilt (new word?) from having ranted on the blog yesterday. Besides, funny things happen.
For instance last night, while I was watching a couple of Rowen and Martin’s Laugh-In episodes I had waited forever for the library to get in (and can’t renew because its on hold), my fat cat Pippin was zonked out on my favorite chair. Pippin is about 18 pounds. He was a skinny boy that showed up in our yard a couple of years ago and never went away. He sucked down food as if he needed it for emotional support (um… that sounds familiar!). Only one of my other indoor cats will tolerate him. Matthew is a kind-hearted soul. He’s a peace and love kind of cat, at least he’s become that after spending his first year of being in the house hiding behind the bookcase hissing at everyone. Matthew has a deep throaty whirr when he plays wildly with cat toys. Anyway, Matthew, in search of a warm spot (I don’t turn on the house heat), perched on top of the lovely ribbon-embroidery pillow next to Pippin. Somewhere around the point in Laugh In when Miss Greer Garson hit Henry Gibson on the head with an inflated hammer I glanced over to the chair (myself wrapped in several blankets, a robe and two cats), and saw that Matthew had found a warmer place to perch!

A warm, firm mattress that purrs! Pippin is solid, like a beached whale. He protested a little by waving his paw ineffectually (his front legs stick out straight when he lays on his side) and then going back to sleep.

When Pippin moved, Matthew... didn't. So my Internet search started with Facebook, to see if there were any humorous links from my more sophisticated friends (I’m always at least a year behind in finding out the funny stuff. At least three years behind in technology!). Then I checked out Cake Wrecks ( http://cakewrecks.squarespace.com/ ) , which is a hilariously funny blog that posts disaster cakes with wonderful commentary. From there I went to The Bloggess (http://thebloggess.com/2012/02/her-name-is-juanita-juanita-weasel-unless-you-can-think-of-something-better/ ). This blog has pretty ‘mature’ language and topics, but it is laugh-till-you-choke hilarious. From there I went to Know Your Meme (http://knowyourmeme.com/ ). A meme (rhymes with cream… I looked it up) is whatever has viral popularity on the Internet. This site lists current memes, some of which are actually funny, but most of which make you really wonder about the average intelligence of the US Internet audience. Then I followed her link to Pintrest (http://pinterest.com/thebloggess/kick-ass-stuff/) which is a virtual bulletin board where people ‘pin’ interesting things they find on the Internet. Think of it like a workroom pinboard with cut-out jokes and photos hung all over it. I swear, I don’t know how people find the time to do all this Internet stuff and yet conduct normal lives or get enough exercise.
Speaking of exercise, I need to go see if that lemon tree has learned its lesson yet. Oh, and feed the tortoise.
You May Also Like

Native Insects and IPM
-
Bamboo: A Rant

It looks innocent enough... (Note: I’ve modified this rant so that its more of a grumpy bit of advice and some whining. If you want to skip the rant altogether, just scroll to the third paragraph from the end where I’ve made some heartening observations and have posted happy photos of daffodils.)
I love the look, the feel and the beauty of bamboo. It is an amazing grass that is edible, durable and because of is fast growth rate makes a renewable building resource. There is clumping bamboo, which slowly spread out from a main clump, and which can be controlled. In my parents’ driveway, surrounded by asphalt, there was a patch of clumping bamboo which had been there for… forty year? More? It never escaped its boarder. Then there is rhizomatous bamboo, which sends out underground runners in all directions and can quickly undermine any nearby growth. Rhizomatous, or running bamboo, can be grown in containers, or you can chance it in the ground if you block it in with an underground barrier that is a good two feet deep, and six inches above ground. Even then you should watch out for escapees. Surrounding running bamboo with water is another way to keep it controlled… a bamboo island?
There is a lot of bamboo planted in my yard. A lot. The larger bamboo I anticipate harvesting after the culms are several years old and using for trellises or fencing. The smaller bamboo such as the beautiful black or variegated varieties aren’t that useful to me because of the thinness of their culms, but are very beautiful.
That is until I happened to trip over something in the pathway that reared up and back into the ground like a sea serpent. It was a black bamboo runner…unconfined invasive bamboo in my garden!

Just one of the 20 + rhizomes from one plant! 
Lark and Miss Amelia cluck over the unearthed root ball with severed rhizomes. I started tracing that runner back to the mother plant. With some excavation I found that there were about 25 such runners just below the surface, all heading in different directions, all rooting and ready to send up shoots for new plants. The runners were an even 1/2 inch to 3/4 inch thick up to their tips. I stared in horror at the hydra I’d just uncovered, and then looked around. I had five clumps of black bamboo, and one of variegated, all along a heavily planted walkway. The plants were one year old and were on the verge of completely taking over one of the main areas of my garden.

Gotta give it credit for eagerness. (Here the rant really begins, as does the whining!:) Then began the backbreaking and laborious work of tracing all the rhizomes and pulling them up, making sure to get every piece. The rhizomes were 15 – 20 feet long. They snaked under my precious heirloom roses, under young citrus trees, under boulders and palm trunks, under other vines, through gopher cages and around the delicate subterranean irrigation system. The runners had to be pulled up, and since they rooted all along their lengths, when I pulled them the soil would fling up into my eyes. The clumps were planted where it was full sun and of course, it was a warm week when I tackled the project so I had to stop in the afternoon when I was roasting. I spent Valentine’s Day, which is a ‘holiday’ I’ve always disliked anyway, sweating, crying, laboring, running into the house to wash dirt out of my eyes, cursing. My dog General had had a seizure the weekend before and still wasn’t eating; I had found out that a person very dear to me had died. The bamboo was setting me back many days worth of work. It was not a good week.

Trying to unearth a rhyzome without harming an heirloom rose, but not without scratches! The mother plants themselves were deeply rooted and had heavy root balls. I had to use boards as levers to try and hoist them from their holes; several I wasn’t able to pull out on my own and they are there waiting for me to have help. I was on my hands and knees tracing rhizomes, using a trowel to unearth the runners that went right through the root balls and around the trunks of my roses and citrus. Trying to lever up a boulder or a cut palm trunk with a board while digging and pulling on a thick rhizome was very taxing. It was dirty, frustrating and exhausting work, and merited a trip to the chiropractor, and my wrists and hands are still tingly and numb from the stress. If I hadn’t tripped on the rhizome, within six months (or less!) that entire walkway area with all of its productive food plants and heirloom roses would have been taken over. Everything would have had to be dug out, the entire area emptied (and with mature plants, I would have had to kill them or hire help to dig them out) and then the bamboo hand-traced and dug out.

Rhyzome squeezing irrigation line 
Lots of irrigation repairs to make It would have been a catastrophe. It would have ruined the garden, and would probably have convinced me to give up. I am one fifty-year-old woman trying to do all the work myself, and I really can’t hire regular help until I begin earning some kind of income again. I am an organic gardener and will not go over to the enemy and use weedkilling products.

The steadily growing pile of cut rhyzomes. I haven’t finished with the bamboo. There is another one that I haven’t started on yet, and I think there is another at the top of the property where it might begin to interfere with the neighbor’s underground cable line that leads off of the pole in my yard. The access road is littered with cut rhizomes and bunches of cut bamboo. Several clumps reel in their holes awaiting me to find help to pull them out. Meanwhile we had a heavy rain and windstorm which made the stream overflow in several places, flooded my chicken coop, and ripped the roof vent off of my new greenhouse (not under warranty, Rion says! It is broken, and I have to figure out how to keep it on). Seeds need to be planted, the ragweed laughs at me and the Bermuda grass starts coming back to life. There are trees planted in areas where they are now shaded, or won’t grow successfully, and I need to transplant them; heavy work when they are in gopher cages filled mostly with wet clay. My hayfever has started up, limiting time in the garden. So much to do. And I’m weary of wrestling with the stuff. A small house with a little garden, up against a wild area, sounds very, very good sometimes. So take warning when planting anything, or having anything planted: research it yourself and plant with an eye to the future.
")
An unearthed rhyzome, a good 15 feet long (cut datura on top) On the plus side, I’ve taken a brief vacation from the cursed bamboo and have planted flats of seeds in the greenhouse. I’ve finally planted all the bulbs and sweetpea seeds that should have been in months ago. I planted cold weather veggie seeds in my raised beds, although its the end of the season for them. I’m enjoying the daffodils that are opening up along the driveway, their happy faces turned in different directions with different attitudes… I swear they have personalities.

"Eh?" Some of the fruit trees are blooming, and my two bee hives are very active. I’m drawing up plans for my outdoor composting restroom, my outside worm bin, my new (and better placed) chicken coop, and a new composting area. Best of all, I’ve been able to renew work on a middle-grade novel that I had begun and abandoned several years ago, and I am in the polishing stages before I send it off to an agent and hope for acceptance. It is very good to be creating again.

"Did you see that?" In early March, my zumba class (http://www.wadeintofitness.com/) will be touring the garden. On the second Saturday in April the San Diego Permaculture group (and anyone who wants to!) will be touring the garden and helping to finish building the cob oven that we started last summer. On May 12th, the day before Mother’s Day, the garden will be on the Association of University Women’s garden tour. After that, I hope to have groups in by appointment, with either a fee or a suggested donation. The weeks fly by and there is so much to do. Today the birds are crazy with spring, loud with stuffing themselves with seed to be if full health for mating season. It is still February, so I still have some time before the very hectic spring and summer seasons begin.
-
Valentine Flowers

Freesia, one of my favorite flower scents. Although I don’t really like Valentine’s Day, I do like the fact that spring starts here in San Diego County in February. So to celebrate the day and the season, I thought I’d post photos of some new blooms that I took after our brief… and all too rare… rainstorm today.

Cyclamen and freesia. This cyclamen had been a gift from my good friend Eileen several years ago, and every year it never fails to glow.

Strawflowers. These bright gold beauties are left overs from seed mixtures I planted at the end of last summer. Borage is the big-leafed plant behind, also in bloom.
.")
Queen Anne's Double Jonquil bud (heirloom). Over my thirteen years at this house I’ve collected heirloom bulbs and heirloom roses, even during the years when I really couldn’t afford to spend twenty dollars on something frivolous. Heirloom plants make me happy, and make me feel as if I’m contributing to the conservation of forgotten plants.

Ice Follies heirloom daffodil I buy all my heirloom bulbs from Old House Gardens (www.oldhousegardens.com). Visit them online, order a print catalog and indulge in the humor, the history and the sheer beauty of what this small company offers.

Saint Keverne heirloom daffodil. I have, as you might have guessed, a great fondness for daffodils. That includes jonquils and narcissus, of course. They are such happy, homely flowers; beautiful in their unusual form, and such a bright harbinger of spring! I’ve planted cheaper, non-heirloom daffs all around trees throughout my gardens and along my driveway. The heirloom ones I have separated in my front yard.

Louise de Coligny heirloom daffodil. We don’t have many native bulbs in Southern California. That is logical, since we don’t have severe winters and plants never had to store their resources underground, protected from snow and ice. Many of our flower seeds, such as those of California poppies, need light to germinate and are best sown right on the ground. So bulbs such as my lovely daffodils don’t quite fit into a native garden, but instead remind me of colder climates. Also, gophers won’t eat the poisonous daffodil bulbs!

California redbud tree Several trees are breaking out in bloom; the crabapples around the pond, several apple trees, a plum, and this California redbud. I’m not thrilled about redbuds, but they do offer spring flower color, nice summer foliage, and fall color. What I like best about them is that they are nitrogen fixers, and improve the soil all around their roots.

Calla lily Far too early for Easter, this Calla Lily appeared this week and made me remember my mother, who always bought them for spring. Mom’s favorite color was white, and although not her favorite flower (which was the orchid), the Calla lily seems the most like her: clean lines, unique shape and the glowing whiteness of sophistication.

Single heirloom freesia. Freesia is one of my favorite flower scents. It is fresh and not cloying or heavy. My other very favorite scents are yellow primrose (only the yellow ones have a fragrance!) and sweet violets (my favorite flower). And, of course, roses. The form that the freesia flower stalk takes, almost serpentile, adds so much to a garden’s shape. I like the yellow freesia the best, and they are also the most fragrant.

Ivy Geranium Growing up, I used to hate geraniums. Martha Washington and ivy geraniums covered the embankment of the backyard of the tract house we lived in in Carlsbad, CA. Every time a ball was lost in it, or one of our Shelties ran through them, the obnoxious smell of the geranium leaves was overwhelming to me. As I matured, however, I found out what a reliable friend geraniums can be. They take so much abuse and yet bloom all year ’round. The bright and dark reds are stunning and add just the right touch to other color combinations. I still prefer the less smelly vining ivy geraniums over the big-leaved Martha Washington varieties, and I let them clamber over my chain link fence, turning an eyesore into a trellis for beauty.
I hope my bouquet of flowers makes you happy. Happy Valentine’s Day!
-
A Few of my Favorite Things

Buckets are wonderful creations. I now spend part or all of each day working in the gardens. Most of it is heavy labor, such as hauling clay, digging out plants, weeding; you name it. You can depend on Sublime Gardens to provide you with all the quality garden equipment that you need. Without these tools, I’d be lost. Here are my pick for the best tools in my garage.
Buckets. I have buckets with assorted PVC pieces and repair tools in them, buckets with planting tools and seeds in them, buckets under my wonderful, incredible outdoor sink to catch the water, buckets for brewing compost soup, and buckets for whatever else might come up, such as hauling heavy clay up the hill to my reponding project. A wheelbarrow is a great tool for moving loose soil on even ground, but when you’re fairly small, a wheelbarrow can get the better of you. Buckets are the answer.
Buckets can be pretty heavy, though, and the hauling of buckets is one of the many uses I have for my garden cart. It is the savior of my garden.

A cart is worth ten wheelbarrows. I move heavy potted plants, buckets filled with clay, urea or water, rocks, and bags of amendment with my cart. I can tip over heavy boxes, such as the two 60-pound containers my greenhouse arrived in, and haul them where I need them. Most of the time I need to transport things up or down the hill, over uneven ground and mulch, or around the narrow pathway by my house. The cart does it all. What a workhorse! I have a wheelbarrow, but I’ve used it more to mix up large batches of mud for clay oven building than I have for hauling dirt. The cart is just more stable. I love my cart. Best thing I ever bought.
My usual working outfit comprises of decent work shoes, a hat, gloves and my pruners which I shove in my back pocket along with some tissues (if I don’t have tissues, I’ll need them. Hayfever, bleeding cuts, drying PVC pipe before gluing, wiping ick off my hands…. I should have included tissues as a main feature!).

Good snippers are valuable I have a pair of ratchoting pruners, and they are useful for tough wood, but just plain solid pruners are the best. I never know when I need to whip them out. Just walking around the garden I’ll find a dead stalk, new shoot or overenthusiastic vine that needs a nip, and if I don’t have my pruners handy chances are I’ll forget all about them within minutes. I’ve used them for cutting out a mass of yarrow whose roots are so invasive they’ve grown between stepping stones making the walkway impassable. I can’t dig them out, so I’ve had to cut. I’ve also learned to take better care of my pruners: I don’t twist them. I’ve ruined pruners by doing this, and its easy to do when you’re trying hard to cut something a little too thick for the tool.
For years I’ve started out with work gloves and ended up bare-handed. My hands are certainly evidence to that! Leather gloves would be too thick to manipulate and would irritate my skin, and cloth gloves would be too thin to handle small thorns and would become too hot. Finally they’ve created a glove that is not only inexpensive but it durable, breathable, works for small thorns (if you’re careful!), and doesn’t irritate my skin.

These gloves breathe, and are tough. I find that at the end of the day, I’m still wearing them, much to my surprise. They allow me to plant and still feel what I’m doing. To my surprise, these same gloves were issued to me when I worked in the horticultural department of the San Diego Zoo Safari Park a couple summers ago. I buy them at WalMart. I’ve worn the first right finger down on a couple of pair, but it took awhile.
I pull weeds. I want to get the roots, and this tool is perfect.

The best weeder It is just the right weight to not put undue stress on the wrist and arm, yet heavy enough so that you don’t have to stress your hand striking. The sharp end effectively cuts into the soil at the root so that you can pull the weed right up. The pronged side helps pop root masses right out. Its long enough so that when you are on your knees weeding, you don’t have to lean over too far, stressing your lower back. It is also good for uprooting old cornstalks and other veg that have a good grip on the earth. Also, it is formidable enough that anyone wanting to sneak up on you will think twice!
Finally, my favorite tool for just about anything: the round-point shovel, or spade.

I can do anything with a round-point shovel. I have a wonderful relationship with my spades. A nice round sharp edge slightly pointed, with wide foot rests for stepping on, and a good long handle that keeps stress off your lower back and is perfect to use as a leanin’ post. If I was given a selection of all garden tools, this is the one I’d go to without hesitation. I weed with it, move dirt, dig holes, scoop water, carry transplants, scoop gravel, flip compost, harvest potatoes… if I found a way to cook with it I would. (Actually, hoecakes are made on hoe blades held over a fire… I could use my shovel….!). If only I could find a single man who was as useful, reliable and fun as my round-point shovel! (Um… you don’t have to repeat that). I have three, one stationed by my house for the upper gardens, one by my garage for the driveway area and thereabouts, and one down by my veg gardens. That way I never have to look around for one. (Maybe that’s the tactics I need with men, too!)
There are of course other tools which I use. My cordless drill is a godsend. In fact, I should add it to this list, but I wanted to highlight simple, non-mechanical tools. I could live without my cordless drill, but life would be much more difficult, and it doesn’t relate directly to gardening since there are other ways of building without the use of screws.
So, if the apocalypse happened right now, with my aboveforementioned favorite tools I could continue on growing food. Until my buckets break, anyway.
- Animals, Bees, Birding, Chickens, Gardening adventures, Heirloom Plants, Other Insects, Permaculture and Edible Forest Gardening Adventures, Photos, Ponds, Rain Catching, Vegan, Vegetables, Vegetarian
Garden’s One Year Anniversary
Happy Anniversary! One year ago on Feb. 1, 2011, I signed a contract with landscape architect Roger Boddaert (760-728-4297) to create a permaculture garden. For twelve years I’ve had this sloping property that was covered in weeds and worthless Washingtonia palms. Not only do these 2 acres slope down to a barranca, but it was filled in due to catching all the rainwater that runs from the street and properties above. I have to give credit to friend Gary B., who brought up the subject of permaculture in a conversation the year before. I’d heard the term and thought I knew what it was about, but months later when I was researching what to do with my property I remembered him mentioning it, and looked it up. I found what I was looking for. I’ve been an organic gardener for many years, have owned chickens for their eggs, have refused to till the soil so as not to kill microbes, have worked naturally with animals and plants, have created habitat, composted, recycled, collected rainwater… and all of that was permaculture. And so much more. How can one not be attracted to the term Food Forest? Certainly not a foodie and gardener like myself.
What happened on the property starting the week of Feb. 1 for the next six months altered the land so that it is truly two acres of habitat. It is useful, it is natural, and it is beautiful. Roger’s team led by Juan built beautiful walls of urbanite, planted and hauled, worked in scorching sun and frosty mornings and made what was dreamed into reality. An integral part of the garden has been diverting the water from erosion points and into rain catchment basins and natural ponds, and that is where Aart DeVos and Jacob Hatch of Aquascape (760-917-7457) came in. They also installed the irrigation. Dan Barnes did the rough and the precise tractor work (760-731-0985) and I can’t recommend his experience and skill enough. Fain Drilling dug the well (760-522-7419) and the wonderful sheds were built by Quality Sheds of Menifee (http://www.socalsheds.com) .
Along with some volunteer help from Jacob, I am the sole caretaker of the property. I am planning the plant guilds, weeding, improving soil, moving problem plants and trees and, did I mention, weed? Oh yes, then there is weeding. On Saturday May 12th, the garden will be on the Garden Tour of the Association of University Women of Fallbrook, and hopefully many people will be inspired to go organic, to create habitat, conserve water and grow extra food for the Fallbrook Food Pantry. We’ve come a long way, baby!
The following photos are comparisons between the precise location last year at this time, and today.

The property last February. 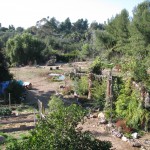
The property today. 
Sophie and General loved all the excitement. 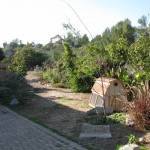
They love the new gardens and pond even more. 
My veggie beds with the old sheds behind. 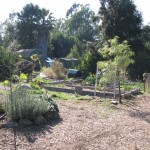
My veggie beds with the new sheds and greenhouse behind. 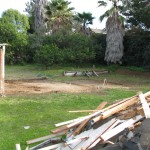
Where the big sheds were: everything usable was reused. 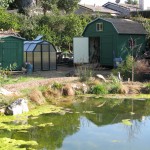
New sheds that aren’t a safety hazard, and the greenhouse. 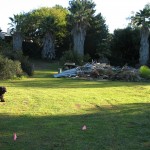
The lower area with shed debris (lots of mowing area!). 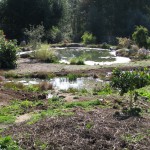
Hey, there are ponds there now! 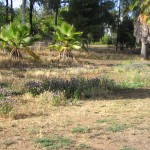
Not much for the neighbors to look at. 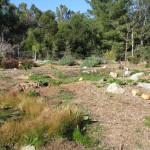
Quite a lot for the neighbors to look at! 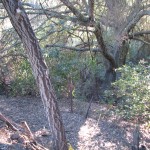
Access to the old oak was hazardous. 
Palm stairs lead past the oak to a birding area. 
Stonefruit were old when I moved in. 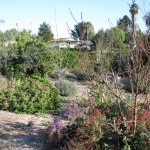
New stonefruit adorn what is now the Bee Garden. 
An erosion area sloping down to the barranca. 
Water won’t flow through here anymore. 
Lots of mowing and palm frond removal. 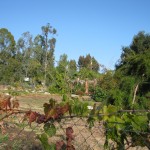
Not so anymore. 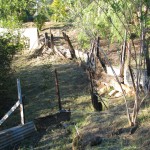
Horrible looking debris failed to hold back the embankment. 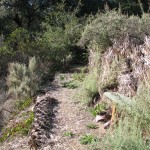
Palms were used to stabilize the new paths and camoflage the supports. 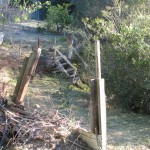
Old unstable stairs led to washout areas. 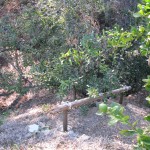
New railings, stairs and urbanite retaining walls lead to another viewing area. 
The view from my balcony. Part of the old shed remains. 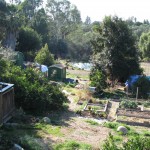
Hey, there’s a pond there! You May Also Like
Native Insects and IPM
-
What I Accomplished Today

It takes a village... to put on a roof! (Thanks, Julie, for the photo.) The roof of the greenhouse was lifted by a whole group of my friends, who all helped to try and fit it onto the base. After a good half an hour of futzing, we gave up and left it. The roof was on but wouldn’t slide into place anywhere. Today I returned to spray it with cooking oil, bathe it in soapy warm water, pour capfuls of boiling water onto it, and remeasure and re-balance the entire thing. Still no luck. I circled around it dozens of times poking and prying at the panels with the included glazing tool. Finally, I put the door on (which wasn’t easy, either), and said, “That’s it for today, folks!” Tomorrow I’ll try their customer service and see if they have any miracle solutions.
 on.")
The roof is (almost) on. Besides that, though, I hooked up my outdoor sink! Something I’ve wanted for at least ten years. I saved the kitchen sink when I had my kitchen remodeled and it has been disappearing under red apple iceplant between times I’ve had to lug it into a new storage place. Now it sits on top of an old fishtank stand, which stands on the top of an old picnic table. I bought an extremely cheap plastic shower sprayer and connected it to a garden hose and… voila! An outdoor sink! Two buckets underneath catch water. Now not only can I wash my hands, but I can rinse my veggies (especially the root veggies) outdoors and throw all that good dirty water right back into the garden. Some women want diamonds… silly them! They don’t know about outdoor sinks!

My outdoor sink! Not beautiful, but 100% recycled! Maybe I should make a little curtain for it. I also was industrious and fixed a leaky water pipe, attached handles to the doors of my two sheds,

Shiny handles. Its the small things in life that can make you happy. and planted many flower bulbs. The bulbs were purchased in a bulb frenzy, as I am wont to experience, before Christmas. They all should have been in the ground already, but I only managed some daffodils which are now coming up. All around the trees I’m planting ranunculus, daffodils, crocus, tulips (with protection!), and my favorite flower scent freesia. A productive day, even if the @#$%* greenhouse roof didn’t fit yet!
-
Building a Rion Eco-Grow Greenhouse

Greenhouse in a box! Yes, I finally decided upon which greenhouse to buy. It took a year and a lot of research and waiting. I did go back and forth about just throwing some plastic over bowed PVC pipes, but I wanted something that lasted and didn’t look like a piece of junk. Most greenhouses that I wanted were over $1,000, and that was just not going to work. Also, I needed diffused light rather than clear glass or plastic because most of the year here the sun really cooks things. Diffused light will help keep the seedlings from scorching. Since I’m absolutely not a carpenter, and would be assembling this myself, I needed something that went together fairly easily. I found the Rion Eco-Grow, a small greenhouse that snaps together and yet can be enlarged later (http://www.riongreenhousekit.com/rion-ecogrow.php). It isn’t made of aluminum, which can bend easily, and the double plastic ‘windows’ diffused light. It is delivered by standard carrier, not flatbed truck, so the packages are manageable and you aren’t expected to help unload them. It came with a seven-year warrenty and had very good customer reviews on other websites. I not only bought it on sale, but it came with a choice of a gift, and I chose the solar light.

I guess they didn’t fit through the little package door! Last Wednesday I came home to find a couple of friends waiting for me. The boxes were about 60 pounds apiece, but I just levered them onto my garden cart (the best thing I ever bought!) and hauled them down to where the greenhouse was going.

Sorting the parts and leveling the ground took a whole afternoon. Well, it wasn’t easy, putting that thing together. After sorting parts, many of which were not labelled, and then leveling the area where the base would be constructed, it was already an afternoon shot. The next day I started fitting pieces together and trying to figure out the miniscule diagrams. It really is ingeniously thought out.

Pushing together the hardware was fun. Only when it came to fitting glazing on over the roof panels did the very, very bad time happen. I worked for a day and a half on just those glazing; they wouldn’t go in! They recommend soapy water. I had so much soapy water that it was dripping in my shoes. Finally I brought down my electric kettle and poured hot water on some of them. It worked for all except one end, which still isn’t going anywhere. It will have to stay like that.

In pergatory they make you try to assemble the roof parts… forever. When I started work, the ground was pretty dry. Then a puddle was forming in the mud at my feet and I realized that there was a leak in the pipe nearby, so I shut off the outside water until I can fix it. Then I was hurrying to be done before the rain last week, and I didn’t make it. Then, since it was very muddy and I was having so much trouble with the roof I thought I’d back out my riding mower out of the shed and haul the roof inside onto level flooring constructed using waterproof materials Miracote to see if that made any difference. I didn’t get far. I started the mower, tried to reverse, couldn’t clear the entrance way with the mower deck, then realized in only about two minutes time that the exhaust had filled the shed and I was getting sick. I shut off the mower and got out of there. That was the end of that work day, as I recovered my breathing and severe headache in the house. I tasted exhaust in my mouth for a long time afterwards.

Sophie checking on my progress. Then it rained again, and I spent a day running errands. Today I constructed the door and then noticed a spot in the middle that wouldn’t brush off.

What is that mark in the middle….? A spider had worked its way down between the lines of the panel and made a little web! He would certainly die in there, and I’d be watching him do it. So of course I took apart the entire top part of the door, wedged out the panel and blew down the lines, and he popped out the other side. Nothing I can do about the web he left, though.

A spider! Had to get that poor guy out of there I managed to complete everything except for placing the roof on the top. Tomorrow I’ll have help and we’ll do a ‘barn raising’, or, at least, raise the roof, after that, I’ll finally be able to start my project on organic greenhouse production.

All ready to raise the roof! Assembly tips: sort out every piece of equipment. Not all of the pieces are labeled, and some of the panels are only a hair’s difference in size, so measure and mark them all… it will save a lot of re-doing and cursing. Wear gloves. Not so much that the panels will cut you, but they really help save your hands when you are pressing and pressing and pressing and sliding your hands up and down plastic pieces to get them to fit together. If you have issues with your hands and wrists (as I especially do now!) this will be tough on you. Use lots of warm soapy water, and for pieces that either absolutely won’t go together, or for those that did and now need to come apart because they popped out of place, pour boiling water slowly down all pieces concerned. It really does help! Be sure to work on a level surface, even for constructing the roof. Give yourself a break and go do something else for awhile, then come back to the problem. Don’t use a rock to force a piece into place because the plastic will chip off. Ahem.
I’ll post a final photo when I set up shop!
-
Streusel Gingerbread Muffins

Gingerbread Streusel Muffins I love gingerbread. Take gingerbread, put some extra zing to it with freshly grated ginger, deepen the dark flavor with a tablespoon of cocoa, and sprinkle some gingery streusel on the top and wow, what a muffin!
Streusel Gingerbread MuffinsAuthor: Diane C. KennedyRecipe type: Breakfast/DessertPrep time:Cook time:Total time:Serves: 18These gingerbread muffins have an extra kick and a deeper flavor from special ingredients.Ingredients- 2 cups all-purpose flour
- 1½ teaspoons baking soda
- 1½ teaspoons ground ginger
- 1 tablespoon unsweetened baking cocoa
- 1 teaspoon salt
- 1 teaspoon cinnamon
- ⅛ teaspoon ground nutmeg
- ⅛ teaspoon ground cloves
- 1 tablespoon freshly grated ginger root
- ½ cup dark molasses
- ½ cup granulated sugar
- ½ cup vegetable oil
- ½ cup boiling water
- 2 large eggs, whisked
- Streusel topping:
- 1 cup granulated or brown sugar
- 2 tablespoons cinnamon
- ½ teaspoon ground ginger
- 2 tablespoons finely minced candied ginger
- 1 cup all-purpose flour
- ½ cup (one stick) butter, softened
- ½ cup all-purpose flour
- 4 tablespoons butter, softened
Instructions- Preheat oven to 325F.
- Line or grease 18 muffin cups.
- In a large bowl, sift together flour, baking soda, ground ginger, salt, cinnamon, nutmeg, cloves and cocoa powder.
- In a medium bowl, whisk together molasses, sugar, oil, water, eggs and grated fresh ginger.
- Add molasses mixture to flour mixture until well combined.
- Divide batter evenly among prepared muffin cups (an ice cream scoop really works!), each cup half full.
- In a medium bowl, combine the sugar, cinnamon, ground ginger and flour.
- Cut the butter into small bits and using a pastry blender, forks or your fingers, work the butter into the mixture until it is crumbly and there are no large chunks of butter.
- Stir in minced candied ginger.
- Sprinkle streusel on top of muffins, pressing lightly to firm it up.
- Bake 18 - 24 minutes, or until wooden toothpick inserted in the centers of the muffins comes out cleanly.
- Remove muffins from oven and cool.