Soil
- Bees, Compost, Gardening adventures, Health, Heirloom Plants, Other Insects, Permaculture and Edible Forest Gardening Adventures, Soil, Vegetables
Integrated Gardening

Wildflowers, tasty borage, milkweed for the Monarch butterflies, and herbs. There are still those who prefer to have all their plants separate, each plant type confined to its own space. Vegetables should definitely not be allowed in the flower garden; herbs may be there only if more ornamental than useful, but don’t ever mix desert, country cottage or rose gardens together. That style of design is a matter of preference, and many gardens following those rules are very beautiful. They are usually also high maintenance, heavily fertilized, watered and sprayed, with poison set out for rodents.

A breadseed poppy is emerging in the sage. The blending of useful and ornamental plants is certainly not a new idea, and yet it isn’t often done. When it is, gardeners should find that the loss rate of plants to pests is quite low, and the yield of the vegetables is high.

Onions, native mallow, tarragon and sweet potatoes under a white fringe tree. Why is this? For one thing, planting mixed seeds which include ornamentals, herbs and vegetables masks the scent of the most yummy plants from its preditors. There aren’t rows of the same type of plant for the insects to find. Since different plants take up different nutrients from the soil, the soil isn’t depleted of one particular nutrient, so mixed plantings usually make for healthier and tastier plants.

My first tomatoes of the season, off of a volunteer along the pathway. Oh so yum! Wildflowers with cilantro, dill and basil not only are more successful and appealing to look at, but if let go to flower are excellent pollen sources for bees.

Young parsley, California poppy, cilantro and dill by rain lilies. Allowing desirable plants to reseed not only saves you money, but makes the new plant hardy and adapted for your particular garden.

Volunteers are welcome, such as this squash. Of course mixing plants is what an edible forest garden is all about, although the mixing isn’t random. Each plant serves a purpose. I use fava beans as a great edible nitrogen-fixer, along with other beans, peas, sweet peas, lupine, and nitrogen-fixing trees and shrubs. Artichokes grow quite large, and their leaves when cut and left on the ground make superb compost, as do the leaves of comfrey. Artichoke leaves keep growing back, and the plant will produce many very yummy artichokes. (Artichoke hint: wipe Vaseline around the stem below the bud to keep ants and earwigs from finding their way between the leaves.)

Artichoke and fava beans beneath an apricot tree. Melons and squash make an incredible ground cover during the hottest months. Their large leaves shade the soil surface and block evaporation. Remember that raccoons aren’t supposed to like going through squash vines, so plant them around your corn.
.")
Green melon and corn by a variegated lemon (Sophie the dog by the car). Integrating your plants, especially when following the edible food forest guidelines, helps increase soil fertility (different plants remove different things from the soil). Mostly this is done by keeping the soil a more moist and inviting habitat for soil microbes and worms, but also by dropping their leaves which become mulch.
 with onions interplanted, wildflowers, artichoke, scented geranium, borage, cowpeas, fava beans and Swiss chard under a small avocado tree.")
A guild: kabocha squash, heirloom squash and gourd (on wire) with onions interplanted to keep seedlings safe, along with something else that I don't remember planting, wildflowers, artichoke (under the milk carton for bunny protection), scented geraniums, lavender, borage, orgeano, sweet potatoes (not up yet), cowpeas, fava beans and Swiss chard by a small avocado tree. You May Also Like

Native Insects and IPM
- Compost, Composting toilet, Gardening adventures, Houses, Natural cleaners, Permaculture and Edible Forest Gardening Adventures, Photos, Soil
I Went to a Garden Potty (adventures with a composting toilet)

A very pretty outhouse! I asked Roger Boddaert to have his men build a simple composting toilet out of the scraps of wood left over from my sheds. This is what he came up with! It is a gorgeous little building painted to match the sheds. Wood features stand out decoratively, and two cloud-shaped windows covered with trellis adorn the sides. Good for ventilation and for watching birds on the pond!

Inside there is a $5 toilet seat on a bench that conceals a bucket. Inside is a raised seat that conceals a bucket underneath. The least expensive toilet seat I could find is attached to smoothed wood. Above the seat Roger attached a shelf with flower pots. I stashed the organic cleaner bottle and extra toilet paper behind some cut status flowers.

In the back you can see the bucket placed high enough to prevent accidents. Underneath is a Home Depot bucket, with the lid close at hand. I had to make it stand taller by shoving boards underneath so that there weren’t any room for mistakes.
The way a composting toilet works, is that you do your business, including the toilet paper, and then add a scoop of organic material to the bucket equal to what you had put in there. That’s it. The organic material can be sawdust, wood shavings for pet bedding, compost, etc. As long as it is easily scoopable.

When the bucket is full, you put the lid on and store it for a year. Or you can dig a deep hole, dump the bucket in, cover it up and mark it, and in a year plant on it or use it otherwise. I don’t have the exact science for this, but within a year all those microbes will consume the humanure and neutralize all the stuff that is in there that could be harmful, such as medicines. Very simple, very clean, very useful.
Composting toilets – the ones that look like real toilets – are tremendously expensive and not that efficient. What a waste of money! The bucket system is amazingly efficient. I have visited several, one a private one and the others at Audubon preserves. There are no flies, no smells. My outhouse was used a lot during the Garden Tour last Saturday, and I peeked in there today to check. Smells great! No flies.
The outhouses at the Audubon centers have the same system, but on a larger scale for more visitors. Instead of a bucket there is a wheeled compost bin underneath. One in rainy Oregon was a solar composting toilet, where part of the bin was under the toilet seat, and the rest under clear corrugated plastic roofing that amplified the ambient light and helped ‘cook’ the compost. The waste in the bin was stirred around frequently with the compost so that it could cook better. Still no smell, no mess.
Simple solutions are there for everything, and through studying permaculture and seeing what works for other people is very enlightening. The answer rarely has to be expensive. And, as is my new outhouse, it can be fun, too.
- Animals, Bees, Birding, Chickens, Compost, Gardening adventures, Health, Other Insects, Permaculture and Edible Forest Gardening Adventures, Photos, Ponds, Quail, Rain Catching, Reptiles and Amphibians, Soil
I Went to a Garden Party….

AAUW Garden Tour Saturday was the AAUW Garden Tour. What a glorious day. I expected about a hundred visitors, and made 120 handouts. Sometime in the early afternoon I guess they ran out, and I didn’t know about it for awhile. I made 25 more for the last two hours, and have five left. One of the docents said that some had been turned back in during the morning. Every couple probably took just one… wow, that’s a lot of people.
I’d been talking to the garden all week, asking the blooming plants to hold that thought for a few more days, and encouraging the nonblooming ones to get a move on. The plants did what I asked! There were so many flowers out Saturday, it was amazing. Heirloom roses, Gideon’s Trumpet, ranunculus, herbs, wildflowers, and waterlilies. The garden, apparently, also was also all for proof in advertising, as in standing behind the NWF Habitat sign on the front gate. So many kinds of butterflies and dragonflies were out for the first time this year that people remarked on it. In the afternoon, there were sightings of a king snake all over the property; I think it had to have been three kingsnakes. One was moved from the refreshment area, but he came back, and then as I was standing by the pond talking to some ladies one came past us. Another was sighted up in the driveway. Roger sighted a gopher snake. No one shrieked or complained; either these were hardy people, or the idea that this was a habitat yard made them keep calm. It also backed up my claims of letting snakes deal with gophers and rodents! One man spotted a baby bunny under the Withy Hide bench. By one o’clock, it was funny. It was as if a button had been pressed to turn the garden on, and all the features were working! What a glorious day.
Jacob (Aquascape Associates) and Roger (landscape architect) and I answered questions for most of the day; the last four visitors left at four. So many people asked questions about permaculture, soil, beekeeping, cob ovens and rain catchment that I know that I couldn’t answer everyone’s questions. Of course there were some who like a tidy, orderly garden, and that is fine. If everyone came away with some idea how to work with nature rather against it, to use chemicals less, to grow organic food, to repurpose, to compost their kitchen waste and weeds, then what a lot of small ripples of good will come of it.
Thank you to my dear friends who helped prepare the garden so that it looked stunning. And thank you to the snakes, butterflies, bees, dragonflies, birds, bunnies and who-knows-what-else that came out to perform for the visitors! And thank you to everyone who visited! No casualities; all good.
Here are some photos, although my camera doesn’t do the colors justice:

AAUW Garden Tour 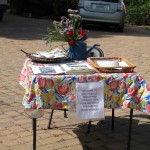
Welcome! Look at photos of how it was. 
Main entrance walkway 
Walkway into the Nest 
One of the many trails 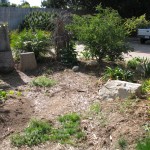
A palm sitting stump between guilds by the driveway 
A green melon under variegated lemon, with native grasses. 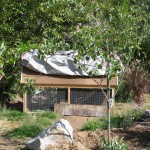
Quail hut, with privacy boards up. 
Status and wildflowers across the stone walkway 
Cool spot under the upper pepper tree 
Roger and visitors by the Withy Hide 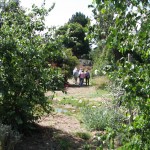
Some of the first visitors of many 
Pickerel blooming in the little pond 
Gideon’s Trumpet keeping blooms and aroma until the tour 
Jacob teaching about natural ponds 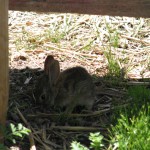
Baby bunny under the Withy Hide bench 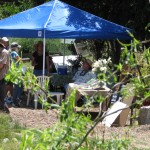
Roger answering questions 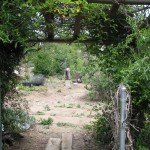
View from the Bee Garden gate 
Cool spot under the pepper tree You May Also Like
Native Insects and IPM
- Animals, Chickens, Compost, Gardening adventures, Permaculture and Edible Forest Gardening Adventures, Soil, Vegetables, Worms
Fifty Ways To Leave Your Compost

Its not fruit; its pre-compost! I have no idea how many years I’ve composted kitchen scraps. So many that when I see anyone dump veggie bits, egg yolk and shells, plate scrapings, old leftovers and even floor sweepings into the regular garbage it sets off all of my alarms. How can anyone waste all that good stuff? That is like throwing gold away! Its not dead stuff… its all living and ready to transform in to perfect soil, which shoots health into your plants! Most people say that they don’t have the time to compost, or they don’t want to turn a heap.
Well.
Here may not be fifty ways to compost easily, but certainly enough for ANYONE to keep their compostables out of the mainstream trash. And apologies to Paul Simon.

A blurry glimpse into my sink composting bucket. Egg shells, tea bags, banana peels, and tissues! 1. You Just slip out the back, Jack, with that little pail you have in or under your sink, into which you scrape everything compostable. They warn you about bones and meat because of animals digging through your heap to get to them, but if you bury your compost deeply, you won’t have that problem. I use a little bucket that they gave me for heaven-knows-what-reason at the hospital when I had my gall bladder out. It isn’t pretty, but it does the job. When I had both my children at home there was a lot more veggie peels to deal with, so in my kitchen I had a woven laundry basket, and inside I had two plastic liners, one for recycling and one for compost.

Big ol' basket, divided in half inside. One part recycling, the other compost. I only emptied it once a week. I didn’t like using so much plastic, but I’d put the plastic bag in the recycling. They sell all kinds of really nifty compost buckets now. Get one with a lid to keep those annoying little fruit flies from developing. Or if you have an open bucket like mine, just fill it partly with water so that the compost is submerged. It is easier to dump out that way and keeps cleaner, too. Especially if you’re going to…

Is it a Vita-Mix, or is it a composting machine? Make a new plan, Stan, and instead of making a compost heap, you put all those scraps (barring big pits and nut shells) with water into a blender and whip it up. Then march outside and pour that brew around your plants! You can always kick a little dirt over it if its thick. This gives your plants a fantastic compost boost. Since it is undecayed pureed plant matter, you don’t want to bind up the nitrogen around seedlings or young plants, so pour it outside the drip line (how far the roots come out), or in an area you are preparing to plant in the future. This compost will decompose with days, depending on how warm the ground is (cold weather kills off or slows down microbes and wormies). If it is snowy winter where you are, then you might just freeze the stuff, in ice cube form or in paper cups. When the soil warms, plant those cubes! (Be sure to label them when in the freezer so no one thinks they are smoothie-pops!)

Freeze your blended compost, then empty the cubes into a bag and LABEL. You don’t need to be coy, Roy, but depending on your neighbors you may not want them to see you burying your compost. That’s right, you don’t have to make a heap, or blend it up. Just march outside with your bucket and a shovel or trowel, dig some small holes and bury it! The wormies will turn it into soil for you in weeks. Sometimes you’ll get surprises, like when a potato sprouts…. free veg! Here again for those who have frozen winters, you can pop the compost as is in a bag in the freezer. The only problem is freezer space. Just think, though, every bit you can save helps your garden!

Dig it in! Just get yourself free from all your hangups about compost heaps and go buy a compost bin. I’ve a Rubbermaid bin for about twelve years. When my compost container is full I march it down, open the top, toss in the contents and away I go. When I pull weeds or thin the garden, I throw that in there too. Do I turn it? Heck, no! But if I wanted to I could very easily. The sides and two halves of the top fit together like enormous puzzle pieces, so I just need to take them all off, reassemble them right next to the heap, then pitchfork the compost back into it. The stuff that was on the top would now be on the bottom. Fresh compost can be shoveled out of a hole in the side on the bottom. Compost that is turned is not only matured faster, but is of a better quality and more broken down than that which isn’t turned. But as the bumperstickers say, compost happens! Stuff breaks down. Throw stuff into the top of the bin, and rake it out the bottom. Free your mind from compost regulations! Just go for it!

Throw it on! Compost happens! Hop on the bus, Gus, and become a real composter. You can build compost bins very cheaply. If you can nail things together so that they actually stay together (I can’t), you can build a three-section compost bin out of old pallets. There are lots of YouTube videos showing how. The best kind have removable slats in the front so that you can start low and gradually add to the front as the heap grows. Then when you want to turn it into the next bin, you may easily remove the slats for quick access. You can also just take a section of wire and make a cylinder out of it, then pitchfork in the weeds, grass, and throw in the kitchen trimmings. When its time to turn it, just undo the wire or slip it off, and set it up next to the pile again. Or have a line of wire cages. I have three, plus my bin. Do I turn them either? No. I keep throwing on excess weeds, and it keeps sinking down. Remember: compost happens!
You don’t need to discuss much with wormies because they can’t answer you: their little mouths are so full of your kitchen waste that they can’t talk! Make yourself a worm bin. Or buy one. You’ll need two dark plastic bins (one fits inside the other). Drill holes all through the lid for ventilation, and in just one of the bins drill some holes along the top of the sides, then drill tiny holes in the bottom for drainage. Fit the drilled bin inside the non-drilled bin. Put wads of newspaper, or paper from your paper shredder (unless you are saving it all to pack your mail-out Christmas gifts with instead of those nasty Styrofoam things) in the bin up to about half way. Lightly sprinkle with water. Throw a little soil in there, but not much for these kinds of worms. Find someone who has worms, or buy some red wigglers. You don’t want earthworms. Put these little guys gently into the bin. Take your compost and put it into one corner. Cover with a dampened sheet of newspaper and put the ventilated lid on the top. Keep the wormies from extreme temperatures. Some people keep a bin under their kitchen sink. Many school kids keep wormies as projects and for fun (baby wormies are white and wiggly!). As the wormies devour your compost they’ll leave behind castings, which look like sticky dirt. This is gold. If they had worm castings in Fort Knox instead of all that gold bullion our dollar would never fluctuate. What collects in the bottom bin is ‘worm tea’, which is just as valuable. Pour this stuff into your houseplants or directly on your plants. Commercial worm bins have several sections to hold more compost, are a little easier to manage and have a spigot for the worm tea. A perfect Mother’s Day gift! That or a compost bucket or bin!
Just drop off the key, Lee, with your housesitter when you go on vacation, and don’t forget to let her know to throw those kitchen scraps in with your chickens! Or goat! Or miniature pig! You don’t even need a heap when you have beaks! All those scraps are pure vitamins and minerals and chickens will not only devour them, but give you the best eggs you have ever tasted. Don’t forget to crush eggshells and give them right back to the chickens! They need that calcium to keep their eggs nice and hard. Chickens turn your compost into great eggs for you and great poo for the ground. Chicken manure can be used right away in your garden. Goaties will eat just about anything, as will piggies, so kitchen waste is perfect (slops).

Feed it to the chickens! And get yourself free from all that guilt that you shoulder when you throw food into the trash. Oh, and separate your recycling, too!
You May Also Like
Native Insects and IPM
- Animals, Gardening adventures, Heirloom Plants, Permaculture and Edible Forest Gardening Adventures, Ponds, Reptiles and Amphibians, Soil, Vegetables
Earth Day at Finch Frolic

Snowy egret hunting. "Get the bullfrogs!" In celebration of Earth Day, I worked in the garden. You can stop laughing now. Yes, I know that I work in the garden nearly every day, and then spend time not volunteering or exercising, recovering from working in the garden. It was an overcast day, which beach-bound teenagers probably cursed, but I found perfect for working outside.

Roses in bloom everywhere. I had a visitor wishing me a Happy Earth Day.

Do you notice anything about this wreath? This is an alligator lizard.

"Hello!" Hopefully he enjoyed the ride as I opened and closed the door several times to photograph him.

Alligator lizard from inside. Among other things today, I sifted compost. I had moved my compost bin, and this good compost was still on the ground from where it had been.

Sifting compost through a screen. I put it into a new raised (and wire-lined) bed.

Adding sifted compost to the bed, which has been dusted with organic non-animal based fertilizer. Then I planted two rows of rice in it. Yes, rice. It is an heirloom variety from Baker Creek Organic Heirloom Seeds (http://rareseeds.com/rice-blue-bonnet.html), and it doesn’t need to stand in water to grow. Just something new and fun to try out.

The rubber snake guards a freshly planted bed of rice. I’m also growing red seeded asparagus beans, the seeds of which were given to me by the woman who made the quail house. She also introduced me to Baker Creek, and for that I’m sincerely indebted. (http://rareseeds.com/red-seeded-asparagus-bean.html .)

Spinach, carrots, edamame, sesame, Kentucky pole beans, endive and tomatoes are finally coming up. The other veggie beds are finally sprouting, now that the evenings have warmed up.

Collards and carrots, transplanted from another bed and doing well. 
An incredible parsley setting seed, peas, parsnips, spinach, rhubarb, carrots and beans. 
Castor bean seeds were in the mushroom compost, and I'm pulling them quickly. Here are a few views from other areas of the garden. Three weeds until the AAUW Garden Tour. Yikes!
 and is irrigating native plants.")
General Mischief waiting near the quail house for dinner. The hose connects to the 700 gallons of cootie water (compost tea) and is irrigating native plants. 
A happy harvest. Strawberries and eggs. I'm freezing the berries for later to make jam. 
Lamb's Ear, whitebud, passionfruit and Bermuda grass 
Stunning blue iris in the pond. 
Fringe tree in bloom. 
Iris You May Also Like
Native Insects and IPM
-
Harry Mud Has a New Look

Harry Mud with his bald pate This morning a Meetup was held at my property (Finch Frolic) for the San Diego Permaculture group (http://www.meetup.com/SanDiegoPermaculture/ ). The agenda was to tour the garden and build the second layer – the insulation layer – on Harry Mud, the cob (earthen) oven begun at a similar Meetup last July. There are three installments posted on my blog; you can search for cob oven, or read about the third installment here: http://www.vegetariat.com/2011/07/cob-oven-3/ ) (sorry, I can’t seem to get the hyperlink to work).
During all this time Harry has patiently sat under his tarp awaiting a second layer. Today was his day.
One of the reasons I wanted to work on Harry is that my garden will be on the Association of University Women’s garden tour on May 12th (OMG! Only four weeks away!!!). I’m hoping to inspire a lot of people to research permaculture for their own properties, and to show off earthen building. Harry will be a star.
With 29 people signed up to come today and projected rainshowers, I scrambled a bit to make sure there would be cobbing opportunities for all. However about 15 people toured, the weather although windy was dry and beautiful, and all goals were accomplished. Hopefully everyone came away with what they wanted to hear about, and not so much dog poo on their shoes.

A dirt and straw pedicure. Although I enjoy speaking with groups of people, the drawback is that I don’t have the chance to speak with individuals and find out their stories or learn from them. Everyone has wells of experience and tidbits of knowledge (or buckets full!), and you never know how your life can change with just a passing comment or chance encounter.
Anyway, many of us had mud manicures and pedicures, the group dwindled, and Harry became even more handsome, if that is even possible. Three intrepid souls stayed for Harry’ First Fire, and we lunched and chatted about all kinds of interesting topics, such as communication between plants. It was a good day. Now that I’ve soaked the mud off of myself in a hot bath with epsom salts, I’ll show you what went on.

Sifted soil in wheelbarrow being resifted through smaller mesh. To create the insulation layer, we sifted dirt through two progressively smaller screens.

Screening dirt. That was mixed with water and a lot of straw, which took a lot of time but was fun.

Fancy cob footwork. Cob is a community event. That cob mixture was formed in a four-inch layer around Harry.

Harry looks as if he's going bald, but he's actually getting a straw afro! Just in case all 29 people showed up, I had prepared an extra cob project. I thought a work table next to the oven would be a good idea, so stacked two old tires, topped by a tire with the wheel still in there. These had been part of the fill on my property when I moved in 13 years ago. Two intrepid permaculturalists then filled the inside with rubble (small bits of urbanite left over from walls) and sand left over from Harry Mud. A piece of wood was propped in the center to hold the top in place. At some point the entire thing will be cobbed.

Filling stacked tires with cement rubble and sand for future cob table. Harry’s First Fire was set. Handsome, isn’t he?

Harry Mud, all fired up! He is a little thicker towards the bottom (I know how he feels!) because the mixture slumps a little, but he’s thick enough all over to insulate well. Harry will eventually receive a slip coating on the outside, which will help protect the insulation layer and be decorative. The urbanite base will be covered as well. I’d like a shade structure over the area, built out of the shed leftovers of which I have plenty. Harry will have to be protected from rain by a tarp as usual.
Thank you everyone who helped out!
- Gardening adventures, Humor, Permaculture and Edible Forest Gardening Adventures, Rain Catching, Soil
Seven Hundred Gallons of Cooties

That's a lot of tea. One of the amazing and useful things I learned in my Permaculture Design Course was how to brew microbes in a bucket. Yes, I know, most women like champagne and jewelry. I like compost and worms. Whatever. Microbes are the microscopic creatures that make dirt into soil. By brewing a microbial tea you can so supersaturate the water with microbes that giving your plants just a small drink of it will greatly improve their health. That is because microbes eat plant litter and other decaying things and make available (and by ‘make available’ I mean ‘poop out’.) (Sorry.) more of the nutrients such as minerals that can be locked in the soil. Adding microbes to poor soil is a good thing.

Fish tank water, paint strainer and aerator: tools for microbial brewing. To make a microbial brew, you put good compost in a mesh bag such as a paint strainer or layers of cheesecloth. Obtaining compost from various sources gives you a good mix of microbes because not all the same microbes live in all soils. Suspend this bag in a five-gallon bucket of water, add a little organic molasses for the microbes to eat (like sugar to yeast), and if you want other soil additives such as rock sulphate, blood or bone meal, etc. I used water from my fish tank. Then you oxygenate the water with a fish tank aerator. After thirteen hours the microbes will have reproduced to a maximum capacity and the brewing is finished. You should use the brew within a few hours.

I'm not sure what made it foam, but it looked more like a brew. So, I did this a couple of times last Fall. Meanwhile, Jacob, who still maintains the Aquascape projects and volunteers some time here, managed to have donated to me a 700-gallon tank. It had been used for organic fertilizer.

The tank. The target: under the balcony. Jacob brought it over in his pick-up, and with the building of an impromptu scaffold he, my daughter and I (but mostly him) rolled it into place by my garage without damaging the propane tank or each other. Then he re-routed a rain gutter from my paltry 50-gallon rain barrel into the 700-gallon tank.

Trying not to crush the propane tank. The tank filled after a few rains, and I used most of the water recently between rains. Then the last two rains filled it to the top. Jacob, who is into aquatic microbes with which to balance natural ponds, microbes being referred to as ‘cooties’, suggested turning the entire tank into a cootie-brewing container. That way I’d not just be watering the plants, I’d be giving them a microbial smoothie. A cootie cocktail.

The tank, full of rainwater from the gutter, becoming a microbe farm. Always up for doing the improbable, I filled a paint strainer with some fine samples of soil from several long-established areas of my yard, and suspended it inside the tank. In went an entire bottle of molasses, which is a drop in the bucket, so to speak. Then in went my little fish tank aerator, quivering in fear at the impossible task of aerating 700-gallons of water. I took a water sample and then plugged the thing in. That was a few days ago. I have no idea how well the microbes are brewing, since the aerator is barely stirring the water. The water has turned brownish, which I take to be a good sign. The warmer temperature is perfect for the little guys; springtime for microbes. I think I may have a microscope left over from my older brothers – circa 1950-something – in the garage somewhere, with which I can compare water samples to see if anything is happening. I figure, even if it isn’t, there is no harm done, and even if some microbes have flourished the water has improved.

The aerator down inside the now-brownish cootie water. There are many quips I can make about this whole project. For instance, here are several million pets I don’t have to take to the vets. Or, I really love to cook, and since I enjoy making soup this project is a natural. However I just think the whole idea of making 700 gallons of microbial tea is so funny that no matter how the project ends up, I think the laugh is worth it. If I can’t do something bizarre, it isn’t worth doing!

Microbes are amazing, aren’t they?
And so are tadpoles, which are thriving not unlike microbes, but in my pond. (A belated happy April Fools.)
- Gardening adventures, Heirloom Plants, Permaculture and Edible Forest Gardening Adventures, Ponds, Soil
Finishing Flagstone

The task this morning: move and place flagstone and dirt. Today I finished cleaning up the disaster that I made when I dug out my upper pond (see Reponding). There have been piles of dirt, stacks of flagstones and rocks, and mess everywhere for two months too many. The reponding project is still not a complete success as the decomposed granite mixed with clay soil allows seepage in the pond. I have to keep filling it up, but at least it is with well water, and eventually I believe it will seal.

My faithful hound growing bored waiting for me past the heirloom daffodils. I didn’t want or need the same flagstone surround that I previously had holding down and covering the pond liner. I wanted a more natural look, but yet I had all this flagstone! So I completed the walkway around the pond, adding some overhanging flagstone under which the Pacific Chorus frogs may hide. One jumped out indignantly when I moved a rock. I did a little planting, and Jacob began to plant aquatic plants now that the season is beginning and transplants are possible. I found that the pond was full of mosquito larvae, and much to my surprise and joy, tadpoles! More mosquito fish were added. They are now lolling around groaning and holding their fishy stomachs with all the larvae they have (and still have to) eat.

Moist soil and a tangle of flowers and weeds... magical. I made flagstone stairs through the overgrown embankment, for access to the bird feeders. The grass, borage, daffodils, weeds and wildflowers are so dense in there that as I was kneeling in the moist dark soil I felt as if I were in a Beatrix Potter book, or some other English garden story. It was magical and redolent of springtime.

A pathway up through an English children's story. When I finally placed or stored all the flagstone, I had great piles of dirt to contend with. Some I carried in buckets over to the side yard where I’d placed some flagstones. That got old pretty fast. I only carried them full twice, then only filled them 3/4 full for the rest of the trips. My arms are a little longer now. I really didn’t want to haul wagonfulls of dirt down to the lower property again, so I stood and thought about what I could do. Then I spotted leftover scalloped edging bricks and decided to use them and the soil to make another garden bed. Why not? I can always take it out. It sure beat hauling all that dirt out of there this afternoon!

Have extra dirt and edgers? Make a new bed! Finally I was able to plant some herbs and flowers I’d purchased for this area. Violas and violets, two of my favorites! I’ll plant seeds another day. I’m hoping all this newly moved dirt won’t wash into the pond when we have our predicted heavy rain this weekend. Maybe I’ll cover the new beds, just in case.

Violets and violas... big favs. I watered everything in, which caused mud to scum up the newly swept flagstones (grrr!), filled the bird feeders (it is Project Feederwatch count days Thurs. and Fri.), and closed the gate on this project (for now!). Once again, I shall have no trouble getting to sleep, but probably some trouble getting up in the morning!

A touch of flagstone and rock; plants will fill in. 
Finished! -
Soil: Weeding by Sheet Mulching

Sow thistle For this next part of how to build soil by weeding, I’ll discuss one of the easiest and laziest ways. If you want nothing to grow in an area, and don’t care about how it looks or length of time, then sheet mulching may be for you. I’ve used cardboard and newspapers around my vegetable beds with great success. To fully knock out tough weeds such as Bermuda grass, you should put down a good inch of newspaper or cardboard (or a combination). If you are using newspaper, leave the sections intact or else the wind will blow it everywhere, or cover it with a piece of cardboard. Water it in and let it rot.
If you have old plywood lying around, drag it over to your weed patch and pop it on top. Walk over it all you want, just watch out for old nails.

Sheet mulching with plywood... at work! Another method is to water your weeds, then cover them with thick black plastic held down with rocks. On hot days the weeds will cook under the plastic. I’ve used this before successfully, but now I would only use it if I had the plastic already. I’m trying hard to not contribute to the creation of more plastic.

The area after the plywood was removed. Then there is sheet mulching where you actually build your soil over the top of weeds. The new catch-phrase for this is lasagna gardening. Start with a layer of corrugated cardboard or three layers of newspapers (or a combination!) right on top of your weeds and where you want to plant (this isn’t for clearing pathways). Water this in really well. Then gather together compost items such as coffee grounds, weeds (without seeds), grass clippings, shredded paper, seaweed or algae… whatever you can compost. Sort your compost into browns and greens. Browns are mostly dead stuff such as leaves, shredded paper, pine needles and dried plant clippings. Greens are fresh things like dinner scraps, green cut grass… anything with some life still left in it. Manure is perfect for your ‘greens’ pile. Chasing down landscapers as they rake leaves and bag up grass from their lawnmowers is a good way to collect ingredients. Now start layering. The best ratio would be two parts brown to one part green, but don’t stress over it. The green stuff will heat up and cook the browns. Depending on how much stuff you can layer, your bed should be about two feet high, and however long that you want it. Water it regularly. Within weeks your lasagna will have sunk down into fantastic garden soil. If you want to plant right away, then add several inches of compost to the top. Otherwise, let it sit a season and you’ll be able to plant right into it. The newspaper or cardboard at the bottom will help suppress weeds and keep it moist. Remember that the deeper your loam, the more rainwater it will hold and the less you’ll need to water.
What all of these methods of weeding does, is to decompose the weeds right where they are. The minerals that they hold in their leaves are distributed into the soil, and as their roots decompose they leave tunnels for worms and other soil creatures to move around in. You are keeping the soil moist and dark, which are wonderful conditions for our soil friends to flourish. I’ve left plywood down on pathways during the entire growing season, and when lifting a piece have discovered treasures such as newts and salamanders underneath, that I wouldn’t have seen otherwis. They are great bug eaters for the garden. Sheet mulch also can harbor slugs and ants, but they are easily dealt with, especially if you have chickens!
Sheet mulching is very easy, it combats even tough weeds, it builds soil, and it repurposes things you might normally put into the trash. So save all those boxes from Christmas, the contents of your paper shredder, what newspapers you didn’t use to light the fireplace, your garden waste, your kitchen waste, and whatever your neighbors want to get rid of (tell them you’re making lasagna with it!) and begin layering. You are helping your garden, helping your soil creatures, building loam, opening underground stores of minerals for usage by plants, making your fruit and vegetables rich with nutrition, lightening your impact on the dump, creating a beautiful garden, and all without backbreaking work and certainly no chemicals! Just say, “NO!” to Monsanto!