Gardening adventures
Wrestling with the great outdoors.
-
A Cob Table, or How To Camouflage Tires

The project: tire table and Harry's hat. When I moved to this property thirteen years ago, I inherited a lot of ‘leftovers’ from the previous owners. Included were three truck tires, one with the wheel. I’ve used them over the years to block a hole under the fence to keep my dogs in and to direct rainwater. When rolling them once again across the property to hide them, I realized that they needed to be re-purposed. If I stacked all three tires together, they’d be just tall enough to be a table. And a table is just what I needed next to Harry Mud, the cob baking oven. Cob, you remember, is an olde English term for building material made of sand, organic material and clay. I wanted to demonstrate cob building material at the AAUW Garden Tour, so earlier that week I cobbed.
I also wanted to add a chimney (or stovepipe hat!) to Harry, since I found a piece left over from my wood burning stove. The chimney would direct smoke up rather than out the front and into one’s face. A chimney isn’t essential for a cob pizza oven, but it can’t hurt.

Harry's fancy new stovetop hat, in progress. I built a sand base to represent the new hollow space in front of Harry. I cobbed around the sand, and around the top hat (stove pipe). Joining wet cob to dry cob can certainly be done; I moistened the dry cob slightly first and had no trouble with separation with this small project.

I sifted some dirt, but then realized for this layer I didn't need to. Cob can be done on a tarp, which helps mix the ingredients when you pull the ends towards you. Making cob is simple and everyone can enjoy it!
")
Marge does a great job mixing cob! (She adds some organic material, too!) The tires were stacked with the wheeled one on top; a post just taller than the middle of the wheel was inserted down the center for stability and then filled with leftover sand, rubble left over from urbanite, and broken bottles that had been dug up on the property. All candidates for landfill, all of which became useful. Across the top I put a board to firm the counter

Broken bottles joined bits of rubble and sand as filler. I began to cob around the bottom of the tires, making a thick base.

A wide cob base. I kept mixing and cobbing, making sure to push the new layers of cob well into the one below so they wouldn’t crack and fall off.

The work area; about 85 degrees that afternoon, too. I was trying very hard to make a mushroom-shaped table, but I failed completely and settled for a cylinder. This layer is shaggy with straw because I needed very firm cob to hold together, since it wouldn’t adhere to the tires. Another time I’ll put a smooth, decorative slip coat on both the table and Harry.

Nearing completion. The cob was done for the tour and there were many interested people looking it over. I especially saw many husbands shrink into themselves as their wives grew more excited about an outdoor cob pizza oven!

Cob table and Harry's hat, with information sign for Garden Tour. - Gardening adventures, Heirloom Plants, Permaculture and Edible Forest Gardening Adventures, Recipes, Vegan, Vegetables, Vegetarian
Kohlrabi: A New (Old) Vegetable

Cute hot air balloon veggie Once, my mother came home from the grocery store and was laughing about a woman who stood hands on hips in front of the produce section and announced, “I wish they’d come up with a new vegetable!”
I entirely sympathize.

The whole plant is edible! This year I planted a vegetable that I hadn’t grown, and perhaps had never eaten before. Kohlrabi. It certainly isn’t new; its been mentioned since Roman times and used on many continents. But it was new to me. The name is German, and it can be found in (East) Indian, Italian, French as well as Asian cuisine. It is very low in calories, yet very high in fiber, potassium and other vitamins and minerals.
It also is very cool looking. You can either imagine an alien, or a hot air balloon. The entire plant is edible, and can be eaten raw.

Peel the outer layer of older bulbs. When young, the leaves, stems and bulbous base can just be munched on, chopped up in salads, grated for slaw, used like jicama for dips, stir-fried, and even barbecued. When older the leafy parts should be separated from the tougher stems, like older chard leaves. The base should then be peeled before use.
The flavor is very mild, and is kind of turnip-radish-broccoli tasting. There are two types, a purple and a light green. I grew the light green, but have read that the purple variety is sweeter. I don’t know if that’s a good thing or not, but I may try that next year.
I braised and steamed the leaves, ate some of the bulb raw and stir-fried the rest. It was tasty. It was cute. It was fun to say. It was NEW.

Stir-fried kohlrabi with sesame oil and seeds, served with brown rice noodles and fresh orange. And, if you want to send a grocery store checker into confusion and hold up the line, buy some kohlrabi. They’ll have no idea.
- Compost, Composting toilet, Gardening adventures, Houses, Natural cleaners, Permaculture and Edible Forest Gardening Adventures, Photos, Soil
I Went to a Garden Potty (adventures with a composting toilet)

A very pretty outhouse! I asked Roger Boddaert to have his men build a simple composting toilet out of the scraps of wood left over from my sheds. This is what he came up with! It is a gorgeous little building painted to match the sheds. Wood features stand out decoratively, and two cloud-shaped windows covered with trellis adorn the sides. Good for ventilation and for watching birds on the pond!

Inside there is a $5 toilet seat on a bench that conceals a bucket. Inside is a raised seat that conceals a bucket underneath. The least expensive toilet seat I could find is attached to smoothed wood. Above the seat Roger attached a shelf with flower pots. I stashed the organic cleaner bottle and extra toilet paper behind some cut status flowers.

In the back you can see the bucket placed high enough to prevent accidents. Underneath is a Home Depot bucket, with the lid close at hand. I had to make it stand taller by shoving boards underneath so that there weren’t any room for mistakes.
The way a composting toilet works, is that you do your business, including the toilet paper, and then add a scoop of organic material to the bucket equal to what you had put in there. That’s it. The organic material can be sawdust, wood shavings for pet bedding, compost, etc. As long as it is easily scoopable.

When the bucket is full, you put the lid on and store it for a year. Or you can dig a deep hole, dump the bucket in, cover it up and mark it, and in a year plant on it or use it otherwise. I don’t have the exact science for this, but within a year all those microbes will consume the humanure and neutralize all the stuff that is in there that could be harmful, such as medicines. Very simple, very clean, very useful.
Composting toilets – the ones that look like real toilets – are tremendously expensive and not that efficient. What a waste of money! The bucket system is amazingly efficient. I have visited several, one a private one and the others at Audubon preserves. There are no flies, no smells. My outhouse was used a lot during the Garden Tour last Saturday, and I peeked in there today to check. Smells great! No flies.
The outhouses at the Audubon centers have the same system, but on a larger scale for more visitors. Instead of a bucket there is a wheeled compost bin underneath. One in rainy Oregon was a solar composting toilet, where part of the bin was under the toilet seat, and the rest under clear corrugated plastic roofing that amplified the ambient light and helped ‘cook’ the compost. The waste in the bin was stirred around frequently with the compost so that it could cook better. Still no smell, no mess.
Simple solutions are there for everything, and through studying permaculture and seeing what works for other people is very enlightening. The answer rarely has to be expensive. And, as is my new outhouse, it can be fun, too.
- Animals, Bees, Birding, Chickens, Compost, Gardening adventures, Health, Other Insects, Permaculture and Edible Forest Gardening Adventures, Photos, Ponds, Quail, Rain Catching, Reptiles and Amphibians, Soil
I Went to a Garden Party….

AAUW Garden Tour Saturday was the AAUW Garden Tour. What a glorious day. I expected about a hundred visitors, and made 120 handouts. Sometime in the early afternoon I guess they ran out, and I didn’t know about it for awhile. I made 25 more for the last two hours, and have five left. One of the docents said that some had been turned back in during the morning. Every couple probably took just one… wow, that’s a lot of people.
I’d been talking to the garden all week, asking the blooming plants to hold that thought for a few more days, and encouraging the nonblooming ones to get a move on. The plants did what I asked! There were so many flowers out Saturday, it was amazing. Heirloom roses, Gideon’s Trumpet, ranunculus, herbs, wildflowers, and waterlilies. The garden, apparently, also was also all for proof in advertising, as in standing behind the NWF Habitat sign on the front gate. So many kinds of butterflies and dragonflies were out for the first time this year that people remarked on it. In the afternoon, there were sightings of a king snake all over the property; I think it had to have been three kingsnakes. One was moved from the refreshment area, but he came back, and then as I was standing by the pond talking to some ladies one came past us. Another was sighted up in the driveway. Roger sighted a gopher snake. No one shrieked or complained; either these were hardy people, or the idea that this was a habitat yard made them keep calm. It also backed up my claims of letting snakes deal with gophers and rodents! One man spotted a baby bunny under the Withy Hide bench. By one o’clock, it was funny. It was as if a button had been pressed to turn the garden on, and all the features were working! What a glorious day.
Jacob (Aquascape Associates) and Roger (landscape architect) and I answered questions for most of the day; the last four visitors left at four. So many people asked questions about permaculture, soil, beekeeping, cob ovens and rain catchment that I know that I couldn’t answer everyone’s questions. Of course there were some who like a tidy, orderly garden, and that is fine. If everyone came away with some idea how to work with nature rather against it, to use chemicals less, to grow organic food, to repurpose, to compost their kitchen waste and weeds, then what a lot of small ripples of good will come of it.
Thank you to my dear friends who helped prepare the garden so that it looked stunning. And thank you to the snakes, butterflies, bees, dragonflies, birds, bunnies and who-knows-what-else that came out to perform for the visitors! And thank you to everyone who visited! No casualities; all good.
Here are some photos, although my camera doesn’t do the colors justice:

AAUW Garden Tour 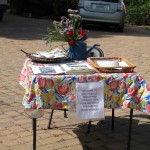
Welcome! Look at photos of how it was. 
Main entrance walkway 
Walkway into the Nest 
One of the many trails 
A palm sitting stump between guilds by the driveway 
A green melon under variegated lemon, with native grasses. 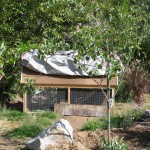
Quail hut, with privacy boards up. 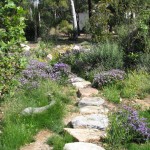
Status and wildflowers across the stone walkway 
Cool spot under the upper pepper tree 
Roger and visitors by the Withy Hide 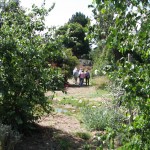
Some of the first visitors of many 
Pickerel blooming in the little pond 
Gideon’s Trumpet keeping blooms and aroma until the tour 
Jacob teaching about natural ponds 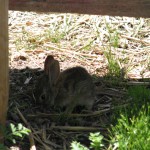
Baby bunny under the Withy Hide bench 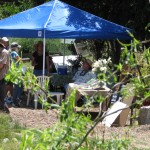
Roger answering questions 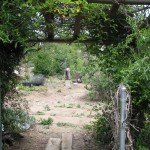
View from the Bee Garden gate 
Cool spot under the pepper tree You May Also Like

Native Insects and IPM
-
What I Punch Now

Sundial on the stump Its a Thyme Clock. So clever of me, I can hardly stand it. There is a sundial that I picked up at a thrift store, which sits on a stump. Around it are planted fourteen kinds of thyme! A Thyme Clock! I don’t have to punch a time clock at work… I can ‘punch’ (theoretically speaking that is) a Thyme Clock in my yard! (Or is the concept of a time clock too lost in history?). Ha!!!!
Sorry. Too much time in the sun (or should I say Thyme in the sun!) preparing for the Garden Tour tomorrow. I’m thinking its bedtime. Or bedthyme!!! No, it won’t stop anythyme soon. But it must, somethyme.
Sorry again.

The Thyme Clock -
Kingsnake in the Pond

Coming down to the watering hole. With the AAUW Garden Tour coming up in three days (yikes!) and so much still to do, and of course working in the 80+ degree heat this week, I haven’t been doing much else. However the heat did bring out our annual visitor to the upper pond.

More than a drink... he's going in! He (or she) visits a couple of times a year, and seems to enjoy the new shape of the pond with its long shallow end.

Swimming the channel. I wish he’d go after the bullfrog!

Beautiful bands. Siblings can be striped or banded. Kingsnakes are mild snakes that will eat other snakes, including rattlers. I’m glad to see him!
You May Also Like
Native Insects and IPM
- Animals, Chickens, Compost, Gardening adventures, Permaculture and Edible Forest Gardening Adventures, Soil, Vegetables, Worms
Fifty Ways To Leave Your Compost

Its not fruit; its pre-compost! I have no idea how many years I’ve composted kitchen scraps. So many that when I see anyone dump veggie bits, egg yolk and shells, plate scrapings, old leftovers and even floor sweepings into the regular garbage it sets off all of my alarms. How can anyone waste all that good stuff? That is like throwing gold away! Its not dead stuff… its all living and ready to transform in to perfect soil, which shoots health into your plants! Most people say that they don’t have the time to compost, or they don’t want to turn a heap.
Well.
Here may not be fifty ways to compost easily, but certainly enough for ANYONE to keep their compostables out of the mainstream trash. And apologies to Paul Simon.

A blurry glimpse into my sink composting bucket. Egg shells, tea bags, banana peels, and tissues! 1. You Just slip out the back, Jack, with that little pail you have in or under your sink, into which you scrape everything compostable. They warn you about bones and meat because of animals digging through your heap to get to them, but if you bury your compost deeply, you won’t have that problem. I use a little bucket that they gave me for heaven-knows-what-reason at the hospital when I had my gall bladder out. It isn’t pretty, but it does the job. When I had both my children at home there was a lot more veggie peels to deal with, so in my kitchen I had a woven laundry basket, and inside I had two plastic liners, one for recycling and one for compost.

Big ol' basket, divided in half inside. One part recycling, the other compost. I only emptied it once a week. I didn’t like using so much plastic, but I’d put the plastic bag in the recycling. They sell all kinds of really nifty compost buckets now. Get one with a lid to keep those annoying little fruit flies from developing. Or if you have an open bucket like mine, just fill it partly with water so that the compost is submerged. It is easier to dump out that way and keeps cleaner, too. Especially if you’re going to…

Is it a Vita-Mix, or is it a composting machine? Make a new plan, Stan, and instead of making a compost heap, you put all those scraps (barring big pits and nut shells) with water into a blender and whip it up. Then march outside and pour that brew around your plants! You can always kick a little dirt over it if its thick. This gives your plants a fantastic compost boost. Since it is undecayed pureed plant matter, you don’t want to bind up the nitrogen around seedlings or young plants, so pour it outside the drip line (how far the roots come out), or in an area you are preparing to plant in the future. This compost will decompose with days, depending on how warm the ground is (cold weather kills off or slows down microbes and wormies). If it is snowy winter where you are, then you might just freeze the stuff, in ice cube form or in paper cups. When the soil warms, plant those cubes! (Be sure to label them when in the freezer so no one thinks they are smoothie-pops!)

Freeze your blended compost, then empty the cubes into a bag and LABEL. You don’t need to be coy, Roy, but depending on your neighbors you may not want them to see you burying your compost. That’s right, you don’t have to make a heap, or blend it up. Just march outside with your bucket and a shovel or trowel, dig some small holes and bury it! The wormies will turn it into soil for you in weeks. Sometimes you’ll get surprises, like when a potato sprouts…. free veg! Here again for those who have frozen winters, you can pop the compost as is in a bag in the freezer. The only problem is freezer space. Just think, though, every bit you can save helps your garden!

Dig it in! Just get yourself free from all your hangups about compost heaps and go buy a compost bin. I’ve a Rubbermaid bin for about twelve years. When my compost container is full I march it down, open the top, toss in the contents and away I go. When I pull weeds or thin the garden, I throw that in there too. Do I turn it? Heck, no! But if I wanted to I could very easily. The sides and two halves of the top fit together like enormous puzzle pieces, so I just need to take them all off, reassemble them right next to the heap, then pitchfork the compost back into it. The stuff that was on the top would now be on the bottom. Fresh compost can be shoveled out of a hole in the side on the bottom. Compost that is turned is not only matured faster, but is of a better quality and more broken down than that which isn’t turned. But as the bumperstickers say, compost happens! Stuff breaks down. Throw stuff into the top of the bin, and rake it out the bottom. Free your mind from compost regulations! Just go for it!

Throw it on! Compost happens! Hop on the bus, Gus, and become a real composter. You can build compost bins very cheaply. If you can nail things together so that they actually stay together (I can’t), you can build a three-section compost bin out of old pallets. There are lots of YouTube videos showing how. The best kind have removable slats in the front so that you can start low and gradually add to the front as the heap grows. Then when you want to turn it into the next bin, you may easily remove the slats for quick access. You can also just take a section of wire and make a cylinder out of it, then pitchfork in the weeds, grass, and throw in the kitchen trimmings. When its time to turn it, just undo the wire or slip it off, and set it up next to the pile again. Or have a line of wire cages. I have three, plus my bin. Do I turn them either? No. I keep throwing on excess weeds, and it keeps sinking down. Remember: compost happens!
You don’t need to discuss much with wormies because they can’t answer you: their little mouths are so full of your kitchen waste that they can’t talk! Make yourself a worm bin. Or buy one. You’ll need two dark plastic bins (one fits inside the other). Drill holes all through the lid for ventilation, and in just one of the bins drill some holes along the top of the sides, then drill tiny holes in the bottom for drainage. Fit the drilled bin inside the non-drilled bin. Put wads of newspaper, or paper from your paper shredder (unless you are saving it all to pack your mail-out Christmas gifts with instead of those nasty Styrofoam things) in the bin up to about half way. Lightly sprinkle with water. Throw a little soil in there, but not much for these kinds of worms. Find someone who has worms, or buy some red wigglers. You don’t want earthworms. Put these little guys gently into the bin. Take your compost and put it into one corner. Cover with a dampened sheet of newspaper and put the ventilated lid on the top. Keep the wormies from extreme temperatures. Some people keep a bin under their kitchen sink. Many school kids keep wormies as projects and for fun (baby wormies are white and wiggly!). As the wormies devour your compost they’ll leave behind castings, which look like sticky dirt. This is gold. If they had worm castings in Fort Knox instead of all that gold bullion our dollar would never fluctuate. What collects in the bottom bin is ‘worm tea’, which is just as valuable. Pour this stuff into your houseplants or directly on your plants. Commercial worm bins have several sections to hold more compost, are a little easier to manage and have a spigot for the worm tea. A perfect Mother’s Day gift! That or a compost bucket or bin!
Just drop off the key, Lee, with your housesitter when you go on vacation, and don’t forget to let her know to throw those kitchen scraps in with your chickens! Or goat! Or miniature pig! You don’t even need a heap when you have beaks! All those scraps are pure vitamins and minerals and chickens will not only devour them, but give you the best eggs you have ever tasted. Don’t forget to crush eggshells and give them right back to the chickens! They need that calcium to keep their eggs nice and hard. Chickens turn your compost into great eggs for you and great poo for the ground. Chicken manure can be used right away in your garden. Goaties will eat just about anything, as will piggies, so kitchen waste is perfect (slops).

Feed it to the chickens! And get yourself free from all that guilt that you shoulder when you throw food into the trash. Oh, and separate your recycling, too!
You May Also Like
Native Insects and IPM
- Animals, Gardening adventures, Heirloom Plants, Permaculture and Edible Forest Gardening Adventures, Ponds, Reptiles and Amphibians, Soil, Vegetables
Earth Day at Finch Frolic

Snowy egret hunting. "Get the bullfrogs!" In celebration of Earth Day, I worked in the garden. You can stop laughing now. Yes, I know that I work in the garden nearly every day, and then spend time not volunteering or exercising, recovering from working in the garden. It was an overcast day, which beach-bound teenagers probably cursed, but I found perfect for working outside.

Roses in bloom everywhere. I had a visitor wishing me a Happy Earth Day.

Do you notice anything about this wreath? This is an alligator lizard.

"Hello!" Hopefully he enjoyed the ride as I opened and closed the door several times to photograph him.

Alligator lizard from inside. Among other things today, I sifted compost. I had moved my compost bin, and this good compost was still on the ground from where it had been.

Sifting compost through a screen. I put it into a new raised (and wire-lined) bed.

Adding sifted compost to the bed, which has been dusted with organic non-animal based fertilizer. Then I planted two rows of rice in it. Yes, rice. It is an heirloom variety from Baker Creek Organic Heirloom Seeds (http://rareseeds.com/rice-blue-bonnet.html), and it doesn’t need to stand in water to grow. Just something new and fun to try out.

The rubber snake guards a freshly planted bed of rice. I’m also growing red seeded asparagus beans, the seeds of which were given to me by the woman who made the quail house. She also introduced me to Baker Creek, and for that I’m sincerely indebted. (http://rareseeds.com/red-seeded-asparagus-bean.html .)

Spinach, carrots, edamame, sesame, Kentucky pole beans, endive and tomatoes are finally coming up. The other veggie beds are finally sprouting, now that the evenings have warmed up.

Collards and carrots, transplanted from another bed and doing well. 
An incredible parsley setting seed, peas, parsnips, spinach, rhubarb, carrots and beans. 
Castor bean seeds were in the mushroom compost, and I'm pulling them quickly. Here are a few views from other areas of the garden. Three weeds until the AAUW Garden Tour. Yikes!
 and is irrigating native plants.")
General Mischief waiting near the quail house for dinner. The hose connects to the 700 gallons of cootie water (compost tea) and is irrigating native plants. 
A happy harvest. Strawberries and eggs. I'm freezing the berries for later to make jam. 
Lamb's Ear, whitebud, passionfruit and Bermuda grass 
Stunning blue iris in the pond. 
Fringe tree in bloom. 
Iris You May Also Like
Native Insects and IPM
-
They Followed Me Home, I Swear

Viola and Madge How many times do you go to the store for a couple of items and come back with a bag full? Too often for me. Yet, I persist in shopping. I went to the feed store for chicken scratch, and came back with new friends.

Madge's bad eye. She can find her food pretty well, though! These are two Rhode Island Red hens, about a year old, who had been victimized to the point of injury by sister hens. Too many birds in a small holding pen will do that, plus the whole pecking order thing. Most of us are familiar with that from living through middle school.

Viola's limp isn't this bad; she's just being dramatic for the camera. The larger bird is blind in the right eye. Her name is Madge (she looks like a Madge!). The smaller girl has a limpy leg, and her name is Viola (Twelfth Night). (Have you ever really looked at the word twelfth? I spelled it phonetically as twelph, and knew it was wrong but then had a hard time figuring the real spelling out after seeing it. Sorry… digression). Both are missing a lot of feathers in various places. These two were in a cage by themselves, and get along famously. The poor dears each laid an egg in the cardboard box in which they were transported.

A surprise in the box. Poor girls! I’ve put them in Emerson’s old run (oh, and his price has gone down to $15 and the warning sign is off his pen) until I can build the Hen House of my Dreams.

Temporary shelter in Emerson's cage. My other three girls, Lark, Chickpea and Miss Amelia are a happy trio and I don’t want to upset the apple cart, nor have the newbies subjected to pecking order again.
 with Chickpea and Miss Ameila.")
Lark (getting a bit fat) with Chickpea and Miss Ameila. I bought this fantastic chicken house some months ago, thinking it would be a warm spot for my three hens (wasn’t that a TV show? It should be one!) but they rejected it wholeheartedly. My girls are used to more space. I figured this pen would be good for some smaller breed. I’ve been looking for frizzle hens, but no one seems to have them. If I order from a hatchery it is straight run, which means unsexed chicks, and I don’t want to do the rooster thing again.

The Quail House. I’d like to establish California quail on the property, but since they are the state bird it is illegal to farm them here. Hatcheries in other states will send eggs, but at this moment I don’t have the time to care for eggs (and I’m too heavy to sit on them, although I do get broody a lot). I contacted Project Wildlife for rehabilitated quail for release, but they release within three miles of where the animals were found, which is an excellent policy. I’ve posted on Craigslist for both frizzle hens and Ca. quail, but no responses yet.
The quail that is commonly sold is the coturnix. These are Japanese quail. Because of their looks they are also called Egyptian quail, Pharaoh quail, and other names. They are less nervous than Bobwhite or button quail, they don’t fly up a lot so they don’t bang their heads on the top of the cage. They lay delightful brown speckled eggs. The feed store had a new shipment in, and they weren’t just selling pairs, so I bought three beautiful little girls, about six months old.

Saki. Very contempletive. My daughter did a quick and imaginative search for names and came up with a lot of really good ones. With a nod to the breed’s origin and alternative names, the dark brown one is called Saki, short for sakura which is Japanese cherry, rice wine, or also short for the Sakkara, which is an Egyptian city of temples. Covers all bases there. The mostly white one is called Benu, which is an Egyptian bird god you can read about here: http://www.thewhitegoddess.co.uk/articles/ancient_egypt/the_benu_bird.asp . The light brown one, incongruously, is named after Agatha Christie’s character Miss Felicity Lemon, most notably played by Pauline Moran in the Poirot television series. It was too good a name not to use, although rather long for such a handful of a bird.

Benu in the back, and Miss Felicity Lemon in the front. The quail don’t have much personality as yet. Of course, they had been raised crammed in cages with many other birds, shipped through the mail service, then moved to another cage with many other birds. They had arrived at the store on Sunday. These three are settling in slowly, enjoying the personal space and the tall weeds that have grown inside the coop (it is bottomless). After all the strange sounds and smells become commonplace, they’re personalities will emerge. They don’t scare or fly when approached, but hunker down in a fatalistic “this is my last moment on earth” kind of way. Already they are showing more hope in small ways as they react to my voice. I put them upstairs in the coop last night, but they were down again this morning. Their cage has handles so it can be moved when they’ve thoroughly manured that area. (There, I’ve said the ‘m’ word again!).

The RIR's eggs are on the left. Americauna and Silver Wyondotte on right. So more beaks to feed. At least I’m staying away from the Fallbrook Animal Sanctuary, at least for awhile. General Mischief and Sophie are too old for a new dog, and I certainly don’t need any more cats.
Of course, the llamas at the feeds store, and those really cute guinea pigs, could really use a home….
You May Also Like
Native Insects and IPM
-
Harry Mud Has a New Look

Harry Mud with his bald pate This morning a Meetup was held at my property (Finch Frolic) for the San Diego Permaculture group (http://www.meetup.com/SanDiegoPermaculture/ ). The agenda was to tour the garden and build the second layer – the insulation layer – on Harry Mud, the cob (earthen) oven begun at a similar Meetup last July. There are three installments posted on my blog; you can search for cob oven, or read about the third installment here: http://www.vegetariat.com/2011/07/cob-oven-3/ ) (sorry, I can’t seem to get the hyperlink to work).
During all this time Harry has patiently sat under his tarp awaiting a second layer. Today was his day.
One of the reasons I wanted to work on Harry is that my garden will be on the Association of University Women’s garden tour on May 12th (OMG! Only four weeks away!!!). I’m hoping to inspire a lot of people to research permaculture for their own properties, and to show off earthen building. Harry will be a star.
With 29 people signed up to come today and projected rainshowers, I scrambled a bit to make sure there would be cobbing opportunities for all. However about 15 people toured, the weather although windy was dry and beautiful, and all goals were accomplished. Hopefully everyone came away with what they wanted to hear about, and not so much dog poo on their shoes.

A dirt and straw pedicure. Although I enjoy speaking with groups of people, the drawback is that I don’t have the chance to speak with individuals and find out their stories or learn from them. Everyone has wells of experience and tidbits of knowledge (or buckets full!), and you never know how your life can change with just a passing comment or chance encounter.
Anyway, many of us had mud manicures and pedicures, the group dwindled, and Harry became even more handsome, if that is even possible. Three intrepid souls stayed for Harry’ First Fire, and we lunched and chatted about all kinds of interesting topics, such as communication between plants. It was a good day. Now that I’ve soaked the mud off of myself in a hot bath with epsom salts, I’ll show you what went on.

Sifted soil in wheelbarrow being resifted through smaller mesh. To create the insulation layer, we sifted dirt through two progressively smaller screens.

Screening dirt. That was mixed with water and a lot of straw, which took a lot of time but was fun.

Fancy cob footwork. Cob is a community event. That cob mixture was formed in a four-inch layer around Harry.

Harry looks as if he's going bald, but he's actually getting a straw afro! Just in case all 29 people showed up, I had prepared an extra cob project. I thought a work table next to the oven would be a good idea, so stacked two old tires, topped by a tire with the wheel still in there. These had been part of the fill on my property when I moved in 13 years ago. Two intrepid permaculturalists then filled the inside with rubble (small bits of urbanite left over from walls) and sand left over from Harry Mud. A piece of wood was propped in the center to hold the top in place. At some point the entire thing will be cobbed.

Filling stacked tires with cement rubble and sand for future cob table. Harry’s First Fire was set. Handsome, isn’t he?

Harry Mud, all fired up! He is a little thicker towards the bottom (I know how he feels!) because the mixture slumps a little, but he’s thick enough all over to insulate well. Harry will eventually receive a slip coating on the outside, which will help protect the insulation layer and be decorative. The urbanite base will be covered as well. I’d like a shade structure over the area, built out of the shed leftovers of which I have plenty. Harry will have to be protected from rain by a tarp as usual.
Thank you everyone who helped out!