Compost
- Compost, Gardening adventures, Permaculture and Edible Forest Gardening Adventures, Rain Catching, Soil, Worms
Why Plant Natives?
The following article was written for and published in the summer 2012 Fallbrook Land Conservancy’s newsletter, the Conservation Chronicle (http://www.fallbrooklandconservancy.org/News/Chronicles/Summer2012/Summer2012.pdf, pg. 6). It was slightly edited and retitled for publication.
Why is planting native vegetation a good idea? We all know that native plants arranged in natural combinations and densities provide safety corridors for our native animals. San Diego’s plant communities have, like all established ecosystems, developed a symbiotic relationship with native and migratory fauna. Our plants leaf out, bloom and fruit when native animals and insects need the food, and provide appropriate nutrition that imported or invasive plants may not. Wildlife then disperses seed and pollen in methods that suit the plants, as well as providing the fertilizer for which the plants have adapted. Flora and fauna have set up symbiotic relationships to an extent where some species rely solely on a single other species for their existence. A balanced ecosystem is a dance between inhabitants who know each other’s needs and satisfy them for their own survival.
We plant natives in our yards because they are hard-wired for our soil and climate. They naturally conserve water and do not need fertilizer or insect control. They also can be beautiful. Planting native plants is good for our wallet, our resources and our health. But there is more to the equation. Living in every handful of good soil are billions of microscopic creatures and fungi collectively called microbes that make nutrients available to plant roots. The smell of fresh soil is a chemical released by these microbes called geosmin. Scientists now know that the microbes in undisturbed soils form a communication network between tree and plant roots. When a tree is attacked by insects, communication is sent out chemically by the tree’s roots and carried via this microbial network throughout the ecosystem, and other trees set up defense mechanisms to lessen their own damage.
Plants also communicate via scents not detectable by humans. Lima beans and corn planted downwind of brother plants which had been subjected to grasshopper attack lowered their sugar content to be less desirable. Such plants received 90% less insect damage than those planted upwind. California sagebrush (Artemisia californica) allows sibling plants to grow nearby because when attacked, it emits an airborne chemical to repel insects. The more sagebrush in the area, the better the protection as other sages respond in kind. Some plants when attacked will release a chemical that attracts the predatory insect which will feed upon the bug that is attacking the plant.
Thus plants communicate via airborne chemicals and through their roots via the microbial network. They call for help, they send out alarms and insect invitations and what’s more, they respond to each other. The why of planting natives is therefore also this: It is important to plant natives because they all speak the same language. Plants introduced to an area by humans are like strangers in a strange land. They cannot communicate well with other plants. They don’t know which bugs are bad until it’s too late. They have no one to call for help; the pheromones they emit are for beneficial bugs that live far away. Their seeds cannot supply the proper nutrition for the wildlife, and the wildlife may not be able to supply the plant with what it needs to keep healthy. They struggle to succeed in our soils and become stressed and sickly. We pour fertilizer and pesticides on them to help them survive, which kills the microbes that create good soil. Also, without the natural checks and balances found at the plant’s native ecosystem it may well become invasive and rob space, water and nutrition from our natives. The weeds you see in reclaimed properties are mostly non-native. Foxtails and wild radish do not belong here. Hike in some of the preserves which have not been previously farmed. There you’ll see the real native wildflowers, such as California peony, rattlesnake weed, tidy tips and Blue-Eyed Mary, living in harsh decomposed granite soils on little water, in relationships with the other chaparral surrounding them. You’ll understand a little more about how plants form guilds to support each other, and create that wholesome rightness that we feel when we walk in undisturbed nature. Recreating those guilds in your garden, adapted to provide human food, medicine and building materials, is called Permaculture.
- Compost, Gardening adventures, Permaculture and Edible Forest Gardening Adventures, Soil, Vegan, Vegetables, Vegetarian
Fava Beans

Fava flowers Have you ever eaten Italian, Greek or Middle Eastern food and found some enormous beans in it? Most likely those were fava beans. Commonly called broad beans or horse beans, these ancient beans are native to Africa and Asia, but can be found in cuisines worldwide.
There are a lot of reasons to grow them, even if you don’t eat the beans. First of all, they are nitrogen fixers, being a legume. However they don’t tendril like green beans do. The plant is a tall stalk (different varieties grow different heights) that sets beautiful flowers down the trunk. From these flowers grow some very weird-looking veggies. The pods look like clusters of swollen green fingers, I kid you not. The stalk can grow unsupported, but may topple over once the heavy pods are set.

Another reason to grow them is that they are hardy and can tolerate cold, and soils that are heavy in clay and salts (which pretty much describes my yard). Often broad beans are grown as a cover crop, then cut and allowed to decompose on the soil surface while the roots release the nitrogen under the soil.

Then there is the reason that these very industrious plants produce an interesting protein-rich bean that enjoys notoriety worldwide (hence, easy to find different recipes for them!). The young leaves and flowers are edible as well.
To harvest favas, pull the swollen (but not too lumpy or they’ll be tough) pods from the stalks. Here comes the drawback: you have to shell the beans and it is a chore. Turn on a movie, pull up a bag of fava beans and an empty compost bucket, and go to. You may want to use a sharp knife to run down the seam, but I just used my fingernails. I watched the 1980’s TV show Cheers, which I never saw because I haven’t had television in about 17 years. Three episodes and I finished a big bag of favas!

When you’ve shelled the beans, you must blanch them for 3 minutes, then drop them in an ice bath. Rub the beans to remove a waxy coating. Then you can sautee them, mash them with potatoes, use them in fritters and soups, try an exotic Middle Eastern recipe with them. Fry them until they are crisp and serve salted as a snack. If you want to freeze them, then give the beans the blanch and ice water treatment, dry them and freeze them on a cookie sheet. Put them into a freezer bag. When you want to use them, then thaw, remove waxy shells and use. Some people don’t remove the coating, but its better if you do.
Fava beans have a nutty, slightly bitter and earthy flavor that becomes quite addictive. Two warnings, though. Some people, particularly those of Mediterranean decent, may be allergic. Also if you are taking anti-depressants, the beans are rich in tyramine and should be avoided by those taking monoamine oxidase (MAO) inhibitors – a type of medication used to treat severe depression.

Add fava beans to your garden and landscape. Just tuck the seed into the ground and stand back. Mine weren’t nibbled by rabbits or bothered by anything; however last year I grew six plants in a raised bed, and something opened all the pods and ate the beans. This year I have them planted all over the property to help build the soil, and the harvest appears to be all mine. I’m glad that Cheers ran so many seasons!

- Bees, Compost, Gardening adventures, Health, Heirloom Plants, Other Insects, Permaculture and Edible Forest Gardening Adventures, Soil, Vegetables
Integrated Gardening

Wildflowers, tasty borage, milkweed for the Monarch butterflies, and herbs. There are still those who prefer to have all their plants separate, each plant type confined to its own space. Vegetables should definitely not be allowed in the flower garden; herbs may be there only if more ornamental than useful, but don’t ever mix desert, country cottage or rose gardens together. That style of design is a matter of preference, and many gardens following those rules are very beautiful. They are usually also high maintenance, heavily fertilized, watered and sprayed, with poison set out for rodents.

A breadseed poppy is emerging in the sage. The blending of useful and ornamental plants is certainly not a new idea, and yet it isn’t often done. When it is, gardeners should find that the loss rate of plants to pests is quite low, and the yield of the vegetables is high.

Onions, native mallow, tarragon and sweet potatoes under a white fringe tree. Why is this? For one thing, planting mixed seeds which include ornamentals, herbs and vegetables masks the scent of the most yummy plants from its preditors. There aren’t rows of the same type of plant for the insects to find. Since different plants take up different nutrients from the soil, the soil isn’t depleted of one particular nutrient, so mixed plantings usually make for healthier and tastier plants.

My first tomatoes of the season, off of a volunteer along the pathway. Oh so yum! Wildflowers with cilantro, dill and basil not only are more successful and appealing to look at, but if let go to flower are excellent pollen sources for bees.

Young parsley, California poppy, cilantro and dill by rain lilies. Allowing desirable plants to reseed not only saves you money, but makes the new plant hardy and adapted for your particular garden.

Volunteers are welcome, such as this squash. Of course mixing plants is what an edible forest garden is all about, although the mixing isn’t random. Each plant serves a purpose. I use fava beans as a great edible nitrogen-fixer, along with other beans, peas, sweet peas, lupine, and nitrogen-fixing trees and shrubs. Artichokes grow quite large, and their leaves when cut and left on the ground make superb compost, as do the leaves of comfrey. Artichoke leaves keep growing back, and the plant will produce many very yummy artichokes. (Artichoke hint: wipe Vaseline around the stem below the bud to keep ants and earwigs from finding their way between the leaves.)

Artichoke and fava beans beneath an apricot tree. Melons and squash make an incredible ground cover during the hottest months. Their large leaves shade the soil surface and block evaporation. Remember that raccoons aren’t supposed to like going through squash vines, so plant them around your corn.
.")
Green melon and corn by a variegated lemon (Sophie the dog by the car). Integrating your plants, especially when following the edible food forest guidelines, helps increase soil fertility (different plants remove different things from the soil). Mostly this is done by keeping the soil a more moist and inviting habitat for soil microbes and worms, but also by dropping their leaves which become mulch.
 with onions interplanted, wildflowers, artichoke, scented geranium, borage, cowpeas, fava beans and Swiss chard under a small avocado tree.")
A guild: kabocha squash, heirloom squash and gourd (on wire) with onions interplanted to keep seedlings safe, along with something else that I don't remember planting, wildflowers, artichoke (under the milk carton for bunny protection), scented geraniums, lavender, borage, orgeano, sweet potatoes (not up yet), cowpeas, fava beans and Swiss chard by a small avocado tree. You May Also Like

Native Insects and IPM
- Compost, Composting toilet, Gardening adventures, Houses, Natural cleaners, Permaculture and Edible Forest Gardening Adventures, Photos, Soil
I Went to a Garden Potty (adventures with a composting toilet)

A very pretty outhouse! I asked Roger Boddaert to have his men build a simple composting toilet out of the scraps of wood left over from my sheds. This is what he came up with! It is a gorgeous little building painted to match the sheds. Wood features stand out decoratively, and two cloud-shaped windows covered with trellis adorn the sides. Good for ventilation and for watching birds on the pond!

Inside there is a $5 toilet seat on a bench that conceals a bucket. Inside is a raised seat that conceals a bucket underneath. The least expensive toilet seat I could find is attached to smoothed wood. Above the seat Roger attached a shelf with flower pots. I stashed the organic cleaner bottle and extra toilet paper behind some cut status flowers.

In the back you can see the bucket placed high enough to prevent accidents. Underneath is a Home Depot bucket, with the lid close at hand. I had to make it stand taller by shoving boards underneath so that there weren’t any room for mistakes.
The way a composting toilet works, is that you do your business, including the toilet paper, and then add a scoop of organic material to the bucket equal to what you had put in there. That’s it. The organic material can be sawdust, wood shavings for pet bedding, compost, etc. As long as it is easily scoopable.

When the bucket is full, you put the lid on and store it for a year. Or you can dig a deep hole, dump the bucket in, cover it up and mark it, and in a year plant on it or use it otherwise. I don’t have the exact science for this, but within a year all those microbes will consume the humanure and neutralize all the stuff that is in there that could be harmful, such as medicines. Very simple, very clean, very useful.
Composting toilets – the ones that look like real toilets – are tremendously expensive and not that efficient. What a waste of money! The bucket system is amazingly efficient. I have visited several, one a private one and the others at Audubon preserves. There are no flies, no smells. My outhouse was used a lot during the Garden Tour last Saturday, and I peeked in there today to check. Smells great! No flies.
The outhouses at the Audubon centers have the same system, but on a larger scale for more visitors. Instead of a bucket there is a wheeled compost bin underneath. One in rainy Oregon was a solar composting toilet, where part of the bin was under the toilet seat, and the rest under clear corrugated plastic roofing that amplified the ambient light and helped ‘cook’ the compost. The waste in the bin was stirred around frequently with the compost so that it could cook better. Still no smell, no mess.
Simple solutions are there for everything, and through studying permaculture and seeing what works for other people is very enlightening. The answer rarely has to be expensive. And, as is my new outhouse, it can be fun, too.
- Animals, Bees, Birding, Chickens, Compost, Gardening adventures, Health, Other Insects, Permaculture and Edible Forest Gardening Adventures, Photos, Ponds, Quail, Rain Catching, Reptiles and Amphibians, Soil
I Went to a Garden Party….

AAUW Garden Tour Saturday was the AAUW Garden Tour. What a glorious day. I expected about a hundred visitors, and made 120 handouts. Sometime in the early afternoon I guess they ran out, and I didn’t know about it for awhile. I made 25 more for the last two hours, and have five left. One of the docents said that some had been turned back in during the morning. Every couple probably took just one… wow, that’s a lot of people.
I’d been talking to the garden all week, asking the blooming plants to hold that thought for a few more days, and encouraging the nonblooming ones to get a move on. The plants did what I asked! There were so many flowers out Saturday, it was amazing. Heirloom roses, Gideon’s Trumpet, ranunculus, herbs, wildflowers, and waterlilies. The garden, apparently, also was also all for proof in advertising, as in standing behind the NWF Habitat sign on the front gate. So many kinds of butterflies and dragonflies were out for the first time this year that people remarked on it. In the afternoon, there were sightings of a king snake all over the property; I think it had to have been three kingsnakes. One was moved from the refreshment area, but he came back, and then as I was standing by the pond talking to some ladies one came past us. Another was sighted up in the driveway. Roger sighted a gopher snake. No one shrieked or complained; either these were hardy people, or the idea that this was a habitat yard made them keep calm. It also backed up my claims of letting snakes deal with gophers and rodents! One man spotted a baby bunny under the Withy Hide bench. By one o’clock, it was funny. It was as if a button had been pressed to turn the garden on, and all the features were working! What a glorious day.
Jacob (Aquascape Associates) and Roger (landscape architect) and I answered questions for most of the day; the last four visitors left at four. So many people asked questions about permaculture, soil, beekeeping, cob ovens and rain catchment that I know that I couldn’t answer everyone’s questions. Of course there were some who like a tidy, orderly garden, and that is fine. If everyone came away with some idea how to work with nature rather against it, to use chemicals less, to grow organic food, to repurpose, to compost their kitchen waste and weeds, then what a lot of small ripples of good will come of it.
Thank you to my dear friends who helped prepare the garden so that it looked stunning. And thank you to the snakes, butterflies, bees, dragonflies, birds, bunnies and who-knows-what-else that came out to perform for the visitors! And thank you to everyone who visited! No casualities; all good.
Here are some photos, although my camera doesn’t do the colors justice:

AAUW Garden Tour 
Welcome! Look at photos of how it was. 
Main entrance walkway 
Walkway into the Nest 
One of the many trails 
A palm sitting stump between guilds by the driveway 
A green melon under variegated lemon, with native grasses. 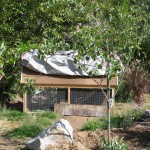
Quail hut, with privacy boards up. 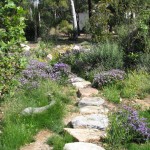
Status and wildflowers across the stone walkway 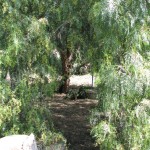
Cool spot under the upper pepper tree 
Roger and visitors by the Withy Hide 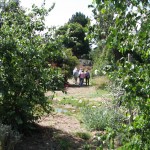
Some of the first visitors of many 
Pickerel blooming in the little pond 
Gideon’s Trumpet keeping blooms and aroma until the tour 
Jacob teaching about natural ponds 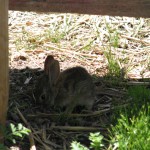
Baby bunny under the Withy Hide bench 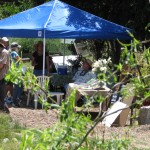
Roger answering questions 
View from the Bee Garden gate 
Cool spot under the pepper tree You May Also Like
Native Insects and IPM
- Animals, Chickens, Compost, Gardening adventures, Permaculture and Edible Forest Gardening Adventures, Soil, Vegetables, Worms
Fifty Ways To Leave Your Compost

Its not fruit; its pre-compost! I have no idea how many years I’ve composted kitchen scraps. So many that when I see anyone dump veggie bits, egg yolk and shells, plate scrapings, old leftovers and even floor sweepings into the regular garbage it sets off all of my alarms. How can anyone waste all that good stuff? That is like throwing gold away! Its not dead stuff… its all living and ready to transform in to perfect soil, which shoots health into your plants! Most people say that they don’t have the time to compost, or they don’t want to turn a heap.
Well.
Here may not be fifty ways to compost easily, but certainly enough for ANYONE to keep their compostables out of the mainstream trash. And apologies to Paul Simon.

A blurry glimpse into my sink composting bucket. Egg shells, tea bags, banana peels, and tissues! 1. You Just slip out the back, Jack, with that little pail you have in or under your sink, into which you scrape everything compostable. They warn you about bones and meat because of animals digging through your heap to get to them, but if you bury your compost deeply, you won’t have that problem. I use a little bucket that they gave me for heaven-knows-what-reason at the hospital when I had my gall bladder out. It isn’t pretty, but it does the job. When I had both my children at home there was a lot more veggie peels to deal with, so in my kitchen I had a woven laundry basket, and inside I had two plastic liners, one for recycling and one for compost.

Big ol' basket, divided in half inside. One part recycling, the other compost. I only emptied it once a week. I didn’t like using so much plastic, but I’d put the plastic bag in the recycling. They sell all kinds of really nifty compost buckets now. Get one with a lid to keep those annoying little fruit flies from developing. Or if you have an open bucket like mine, just fill it partly with water so that the compost is submerged. It is easier to dump out that way and keeps cleaner, too. Especially if you’re going to…

Is it a Vita-Mix, or is it a composting machine? Make a new plan, Stan, and instead of making a compost heap, you put all those scraps (barring big pits and nut shells) with water into a blender and whip it up. Then march outside and pour that brew around your plants! You can always kick a little dirt over it if its thick. This gives your plants a fantastic compost boost. Since it is undecayed pureed plant matter, you don’t want to bind up the nitrogen around seedlings or young plants, so pour it outside the drip line (how far the roots come out), or in an area you are preparing to plant in the future. This compost will decompose with days, depending on how warm the ground is (cold weather kills off or slows down microbes and wormies). If it is snowy winter where you are, then you might just freeze the stuff, in ice cube form or in paper cups. When the soil warms, plant those cubes! (Be sure to label them when in the freezer so no one thinks they are smoothie-pops!)

Freeze your blended compost, then empty the cubes into a bag and LABEL. You don’t need to be coy, Roy, but depending on your neighbors you may not want them to see you burying your compost. That’s right, you don’t have to make a heap, or blend it up. Just march outside with your bucket and a shovel or trowel, dig some small holes and bury it! The wormies will turn it into soil for you in weeks. Sometimes you’ll get surprises, like when a potato sprouts…. free veg! Here again for those who have frozen winters, you can pop the compost as is in a bag in the freezer. The only problem is freezer space. Just think, though, every bit you can save helps your garden!

Dig it in! Just get yourself free from all your hangups about compost heaps and go buy a compost bin. I’ve a Rubbermaid bin for about twelve years. When my compost container is full I march it down, open the top, toss in the contents and away I go. When I pull weeds or thin the garden, I throw that in there too. Do I turn it? Heck, no! But if I wanted to I could very easily. The sides and two halves of the top fit together like enormous puzzle pieces, so I just need to take them all off, reassemble them right next to the heap, then pitchfork the compost back into it. The stuff that was on the top would now be on the bottom. Fresh compost can be shoveled out of a hole in the side on the bottom. Compost that is turned is not only matured faster, but is of a better quality and more broken down than that which isn’t turned. But as the bumperstickers say, compost happens! Stuff breaks down. Throw stuff into the top of the bin, and rake it out the bottom. Free your mind from compost regulations! Just go for it!

Throw it on! Compost happens! Hop on the bus, Gus, and become a real composter. You can build compost bins very cheaply. If you can nail things together so that they actually stay together (I can’t), you can build a three-section compost bin out of old pallets. There are lots of YouTube videos showing how. The best kind have removable slats in the front so that you can start low and gradually add to the front as the heap grows. Then when you want to turn it into the next bin, you may easily remove the slats for quick access. You can also just take a section of wire and make a cylinder out of it, then pitchfork in the weeds, grass, and throw in the kitchen trimmings. When its time to turn it, just undo the wire or slip it off, and set it up next to the pile again. Or have a line of wire cages. I have three, plus my bin. Do I turn them either? No. I keep throwing on excess weeds, and it keeps sinking down. Remember: compost happens!
You don’t need to discuss much with wormies because they can’t answer you: their little mouths are so full of your kitchen waste that they can’t talk! Make yourself a worm bin. Or buy one. You’ll need two dark plastic bins (one fits inside the other). Drill holes all through the lid for ventilation, and in just one of the bins drill some holes along the top of the sides, then drill tiny holes in the bottom for drainage. Fit the drilled bin inside the non-drilled bin. Put wads of newspaper, or paper from your paper shredder (unless you are saving it all to pack your mail-out Christmas gifts with instead of those nasty Styrofoam things) in the bin up to about half way. Lightly sprinkle with water. Throw a little soil in there, but not much for these kinds of worms. Find someone who has worms, or buy some red wigglers. You don’t want earthworms. Put these little guys gently into the bin. Take your compost and put it into one corner. Cover with a dampened sheet of newspaper and put the ventilated lid on the top. Keep the wormies from extreme temperatures. Some people keep a bin under their kitchen sink. Many school kids keep wormies as projects and for fun (baby wormies are white and wiggly!). As the wormies devour your compost they’ll leave behind castings, which look like sticky dirt. This is gold. If they had worm castings in Fort Knox instead of all that gold bullion our dollar would never fluctuate. What collects in the bottom bin is ‘worm tea’, which is just as valuable. Pour this stuff into your houseplants or directly on your plants. Commercial worm bins have several sections to hold more compost, are a little easier to manage and have a spigot for the worm tea. A perfect Mother’s Day gift! That or a compost bucket or bin!
Just drop off the key, Lee, with your housesitter when you go on vacation, and don’t forget to let her know to throw those kitchen scraps in with your chickens! Or goat! Or miniature pig! You don’t even need a heap when you have beaks! All those scraps are pure vitamins and minerals and chickens will not only devour them, but give you the best eggs you have ever tasted. Don’t forget to crush eggshells and give them right back to the chickens! They need that calcium to keep their eggs nice and hard. Chickens turn your compost into great eggs for you and great poo for the ground. Chicken manure can be used right away in your garden. Goaties will eat just about anything, as will piggies, so kitchen waste is perfect (slops).

Feed it to the chickens! And get yourself free from all that guilt that you shoulder when you throw food into the trash. Oh, and separate your recycling, too!
You May Also Like
Native Insects and IPM