-
Skunk in a Can
I worked for San Diego County Parks and Recreation for ten years as a Senior Park Ranger. My first assignment was at Flinn Springs County Park, near Lakeside in East County. Flinn Springs is a small oak-filled park with a stream running it’s length. My year there was interesting and quite a learning curve. I was lucky enough to meet some very wonderful people. One such person was Mel. Mel and his wife, both in their early 80’s, were seasonal volunteers at the park. The volunteer program with the County is a good one for the right people. In exchange for free utilities and a place to park a motorhome or trailer, the volunteer must perform twenty hours a week of service to the park. Some volunteers stay at a park for years. Others, like Mel and his wife, spend six months in our mild winter climate, then head to colder states where their home or family is for the summer and Fall.
Mel was tall and thin in his khaki volunteer uniform. His job was to clean the restrooms in the park every day. That entailed removing all the toilet paper, hosing down the inside (called ‘field day’), scrubbing toilets, and emptying the large aluminum trash cans that stood outside the doors.
Mel and I were talking once, not long before he and his wife would be driving North. He was telling me that at the first restroom that morning, which stood just above the streambed and foot bridge, there had been a young skunk in the trash can. Mel said that he’d looked down into the trash can to see if it needed emptying, and there was this young skunk looking up at him. It gave him a start, but he figured that he’d given the skunk a start, too. He thought that the skunk had been searching for food and had become stuck in the can. Mel addressed him kindly, then very gently tipped over the trash can. The skunk waddled out obligingly and without a backward look or spray, disappered under the footbridge where Mel thought might be the den.
Mel came up to me about a week later and, shaking his head, said that I wouldn’t believe it but every morning he’d look in that same trashcan and the skunk would look up at him. He’d say a few words of greeting to the little fellow then gently tip the can over and the skunk would waddle off. Mel said that he’d enjoyed his morning ritual with the skunk, but since during the week in the off-season there wasn’t anything in the trash can, he wondered why the skunk would get himself trapped into the can like that, morning after morning.
That weekend was the last for Mel and his wife, who were driving up to Minnisota for six months to be with their children. In fact, Mel didn’t even own a house anymore, but the two of them lived in the mobile home and had their furniture in storage. Up in Minnisota they volunteered at another park for the other six months, and this life suited them both just fine. I really liked the pair, who were very lively for octigenarians.
With no volunteers in their space, and being the newest Ranger at the park, I took over Mel’s routine. The morning after they’d left I headed down the hill to the restroom. Not thinking about much, I glanced into the trash can to see if it needed emtying and, lo-and-behold, there was a half-grown skunk at the bottom, pointy nose raised and beady eyes looking at me. I froze and looked at him, and he froze and looked at me. Then I remembered what Mel had told me and I greeted the little fellow. Examining me with his beady black eyes, he appeared to become agitated. Gently I tipped over the trash can and the skunk waddled out and down the embankment to under the footbridge and at a quick rate.
The next morning I smiled to myself as I went down to the restroom to clean, thinking about seeing the skunk again. I looked into the trashcan and… no skunk. I never saw that skunk again.
I guess the game wasn’t any fun without Mel.
- Animals, Bees, Gardening adventures, Permaculture and Edible Forest Gardening Adventures, Photos, Vegetarian
Moving Bees

Honeycomb with Capped Cells Backyard beekeeping is catching on in the United States, and there is more pressure on local governments to relax laws that prevent people from doing so. There are many misconceptions about beekeeping, and many keepers treat the bees cruelly in their pursuit of bee products. Bees are honey hoarders, so taking some honey from a hive isn’t going to do them harm. Taking too much starves the hive during non-pollen times and is cruel. Bees are complex, fascinating, and are disappearing for unknown reasons. The most evidence to explain Colony Collapse Disorder links it to a combination of Genetically Modified crops, pesticides and herbicides, and the waves from cell phone and power towers. In other words, we are screwing them up, and we will suffer for it.
About six years ago, a bee swarm set up house in an old couch I had outdoors for my dogs to lay on. They stopped laying on it. I left the hive until I had to get rid of the couch. I was writing for the magazine Edible San Diego and interviewed a couple who were beekeepers (http://www.ediblecommunities.com/sandiego/pages/articles/summer08/secretDances.pdf ). They came over and helped me move the hive. Actually, I took photos and watched as they worked as a team. When they turned the couch over, the honeycomb hanging in contoured patterns from the springs was incredibly beautiful. I thought at the time that I understood organic beekeeping, but I doubted many of the things that I was hearing. Since then, I’ve learned a lot more about working with bees without doing harm. I glean a lot of information from Organicbeekeepers@yahoogroups.com , which is a listserve that fields questions about natural beekeeping.

What Was Under the Couch 
Comb and Bees around Couch Springs That hive was put in Langstroth boxes and my daughter and I kept them for several years. This last December during the same week, this hive and a swarm that had settled in my shed wall both disappeared. Bees don’t die in their hives if they can help it, and for both hives to abscond was strange, so it sounds like Colony Collapse. Since then I’ve planted a Bee Garden in the lower half of my property, flush with flowering plants, particularly in the color blue, that bees love and that flower at differnent times of the year. I also had a couple of Top Bar Hives built to accompany the Langstroth hive which is the American standard hive you see everywhere. I’ll talk about TBHs in another post. A friend had a swarm in a stack of enormous tree-sized black plastic nursery containers, and I took the opportunity to move them to my new bee garden.The best time to move a hive of bees is after dark. Bees are all home at that time, and they don’t fly. They will crawl, however, so you have to watch your pant legs. The stack of containers was far heavier than I had anticipated, and getting them onto the back of my truck without jolting the hive too badly (don’t want to kill the queen) was more than what we had bargained for. However it was done, roped on, and I made my unusual journey back to my house… not that far away, thank goodness!
Bees at Night are a Delight My son and I off loaded the heavy thing and left it in front of the Langstroth hive where the colony would be moved to. That way the bees could familiarize themselves with their surroundings and mark pollen-gathering sites while still in their comb. The other day I took apart the containers and moved the colony into the hive. It was a good thing that I did because the comb was so convoluted that the swarm would probably have suffered soon. Bees build comb hanging down from a surface, securing it to sides if it is available. They do this by festooning, which is where they hold on to each other’s legs across and down, and make wax from bodily secretions into linked chambers in perfect distances apart. The containers had been tipped over, stood up and moved over the roughly year and a half that the swarm inhabited them, and the comb was proof of it. The following image is of the container on its side.

Inside the Container 
Bees on Underside of Second Container It wasn’t a large hive, only about 15,000 bees. A large colony like what was in my couch could contain 30,000 to 60,000 bees during peak pollen season.
Feeling awful about having to disrupt the bees, but knowing that I was actually helping them (ants were also getting into their hive), I began to cut out the comb, looking for larvae, and attaching it to frames that would fit into the Langs. To do this you need a knife, empty frames and pieces of pre-cut wire, rubber bands, or I’ve heard, those jaw-like hair clips. All your equipment should be ready to go because it is very, very hot in the bee suit, the bees are angry with you and the more time you spend the more harmful for them, and your gloves are covered in honey and you stick to everything that you touch. When bees are under attack they send out a pheramone (which smells a little like banana) telling the returning workers that there is trouble. When they sting, they also release a smell that tells other bees that there is an intruder. However, it also alerts bees from other hives that there is a ruckus, and they are attracted so they can try to rob the hive of honey. Very much like looters taking advantage of an emergency.

Being Gentle 
Carefully cutting out comb My son was nice enough to take these photos, up until the bees took exception to paparazzi and stung him on the end of his nose. Fortunately he doesn’t swell up.
Honey Dripping from Comb I do use a smoker. Smoke doesn’t calm the bees, it just makes them order their priorities away from attacking you. They think that fire is imminent, so they begin gorging themselves with honey in an attempt to save as much food as possible in the event of hive destruction. I use only a little smoke because too much hurts the bees and doesn’t make them eat any faster. Mostly the smoke ends up blowing in my face the whole time. I used to not have any reaction to bee stings, but in the last couple of years I develop a large swelling with blisters, so I wear the full bee suit with thick clothes underneath despite the heat, rubber bands around the pant legs or boots, I use smoke and take allergy medication before I begin (I’m usually sneezing from hayfever anyway so it helps keep my nose from running while I’m suited up.)

Placing Cut Comb onto Frames The comb must be cut to fit, hanging the same way it did originally, and must be attached so that it hangs evenly. Otherwise the bees will attach it to the next frame with burr comb (comb that is used to attach honeycomb to support surfaces) and it will be hard to later remove the frames for examination without harming the bees and brood.

Placing Comb Into Hive Comb with brood goes into the middle of the bottom box, which is larger and called a brood box. A couple of frames with honeycomb go on either side of the brood for insulation and food. The frames are spaced evenly… bees like a particular width between combs. In the second box which is shallower, called a super, more honeycomb goes in along with enough frames to fill the box. Frames are traditionally fitted with pre-made wax comb on which the bees build more comb, ensuring that the comb is straight and giving them more time into honey production rather than comb production.

Pre-formed wax foundation in a frame Some use a plastic comb. Also, if you are extracting honey with a centrafugal extractor, the pre-made comb doesn’t break off as easily as regular comb, and it can be re-used. I’ve always wondered about this, since I’m not a large-scale honey producer and am mostly interested in giving the bees safe harbor, although I do like honey and pollination. I’ve recently learned from a seminar from the Backwards Beekeepers (http://beehuman.blogspot.com/) in Los Angeles that using empty frames is just fine. Giving the bees a place to start, like a thin line of beeswax or a popsicle stick helps. For these first two boxes I put in pre-formed wax frames… just a couple… between the moved honeycomb. In the other boxes that I’ll gradually stack on top as the hives grows, however, I’m going with empty frames. Let the bees do what they want. Also it has been shown that bees naturally make slightly smaller rounds in their comb than the ones of the pre-pressed wax foundation, and may be less suseptible to the mites that are a deadly scourge of honeybees.What comb I couldn’t fit into frames I swept clean of bees as well as I could and dropped into a covered pail for later crushing and honey extraction.
With most of the comb gone, there were still several thousand bees in the container that needed to be moved. I hadn’t seen the queen, and she may well have been in that last batch. I had to lift the container (which was big, round and heavy) and gently tap the bees into the open box.

- Tapping Them Out Into Hive
The ones that didn’t tap out I gently brushed with a bee brush.

Brushing Bees into Hive Still more bees were on the bottom of the other container. I placed the hive lid on the ground in front of the opening to the hive like a ramp and tapped and brushed those bees onto it. Bees like to climb, so up they went into the box! There was a lot of debris in the containers such as dirt and leaves, so I had to be careful not to get too much of it into the hive with the honeycomb.
After I moved all the bees I could into the hive, I moved my equipment away and left pieces of honeycomb on the piece of plywood next to the hive. The hive stand rests on long screws, which are placed in cans of oil to prevent ants from invading the hive, so I didn’t worry about all the drips of honey being invaded. Many bees sat on the outside of the hive and waggled their bottoms in the air producing pheramone messages. One of the messages was to inform returning gatherers how to get into the new hive, another would be the state of emergency and who to look out for. I’d hate to know what they were waggling about me!

Spreading Pheramone I covered the hive with a California off-set cover, which allows ventilation in our hot climate and another place for entry. The bees settled in and by this morning they were gathering pollen, cleaning up the honey and going about their business.
There is so much to say about bees, and there is so much we don’t know about them yet. Some interesting facts are that honeybees are not native to the US, and of the 3,000 types of bees they are the only ones that make honey. Almost all bees are female except a handful of drones who have the purpose in life of hopefully mating with a new queen. Worker bees start out tending their queen, where they acquire her particular pheramone, then they move up to housekeeping and then feeding larvae. When they get to middle age, they go out for their first flights and spend the rest of their lives as gatherers. That yellow blotch on your windshield is first-flight bee poo. Worker bees make the larvae develop into drones, queens or workers by feeding them different foods such as bee bread, honey and royal jelly.
If you are interested in backyard beekeeping, attend a meeting of the San Diego Beekeeping Society (http://www.meetup.com/The-San-Diego-Beekeeping-Meetup-Group/ ), which meets the third Monday of each month at 6 pm at Casa del Prado, Balboa Park, room 104. Read books such as the Barefoot Beekeeper by P. J. Chandler or Natural Beekeeping by Ross Conrad, or read this wonderful blog http://beekeeperlinda.blogspot.com/2007/06/honey-harvest-crush-and-strain.html. I live in San Diego County, and I have a permit for beekeeping.
Honeybees sting in defense of their colony, and with the sting comes part of their abdomen and they die. Here is a photo of the stinger that was left on the tip of my son’s nose while he was photographing me. Although stung through the suit many times (with the regretful loss of bee life that entailed) no sting reached me during this process.

Stinger -
Homemade Ginger Beer

Fresh Ginger Root I remember drinking bottled ginger beer on the rare occasions that my mother allowed us to drink soda. It’s strong gingery, spicy taste was wonderfully refreshing. I hadn’t had it for years until lately, when a friend brought some to a picnic. The kind she brought was from a small brewer and it had a richer flavor to it than what I remembered. Apparently ginger beer, which doesn’t have to contain alcohol, has made a resurgence in popularity. Some is carbonated, and some is fermented or has alcohol added.
My friend remembered her mother making a big, cloudy, thirst-quenching batch of it, but didn’t have her recipe. I had found some recipes and she and I made different batches, her with more success.
What I learned was that fermented ginger beer relied on wild yeast and was traditionally brewed in Europe by passing on the starter. World War Two was the death of the tradition.
I tried a batch of ginger beer hoping to catch wild yeast spores, but it didn’t work. I also tried a batch adding brewer’s yeast, but that didn’t work either. I made a batch with brown sugar and spices that was slowly added to day by day for a week. The results were not what I was looking for. The brown sugar was too sweet and didn’t complement the ginger flavor, and the drink itself too sharp to be pleasant.
The best recipe so far, which my friend made with success, was of course the easiest. It is from Martha Stewart Magazine, and except for the shredding of the ginger, very easy to make. It has only four ingredients.
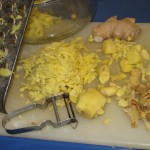
Methods of Shredding Ginger 
Shredded Ginger Homemade Ginger BeerAuthor: Martha StewartRecipe type: BeveragePrep time:Total time:Serves: 16A tasty, non-alcoholic old-fashioned drink.Ingredients- 2 pounds fresh ginger root (get the plumpest you can find or it will be fiberous and hard to cut)
- 1 gallon boiling water
- 1½ cups freshly squeezed lime juice (about 8 limes. Yellow limes are just limes that are ripe and are much jucier).
- 1½ cups white sugar
Instructions- Cut ginger root into 1-inch pieces and place in bowl of a food processor or Vita-Mix, and process until finely chopped. If you have neither machine, you can use a grater with the largest holes, but watch your fingers!
- Transfer the chopped or grated or shredded ginger to a large pot or bowl
- and add the boiling water.
- Allow to stand for one hour, or overnight.
- Drain through a fine sieve. If you would like the drink less cloudy, line the sieve with a double thickness of damp cheesecloth. Compost the solids or spread them on the ground around your plants for mulch.
- Add lime juice and sugar, stirring to dissolve.
- Serve over ice, or plain, or mixed with orange juice, or whatever suits your fancy. Refrigerate to store. I poured mine into mason jars. Stir or shake before serving. Makes 16 cups.

Add Boiling Water to Ginger 
A Drink with a Kick - Gardening adventures, Permaculture and Edible Forest Gardening Adventures, Photos, Vegetables, Vegetarian
Eating from the Garden

Mesculn Mix Beginning last week, I’ve been able to serve at least one thing from the vegetable garden every night at dinner. Peas, Swiss chard, lettuce, cilantro,radish, more peas, chives, carrots, strawberries, and, of course, peas. I munch as I water and weed, and feel that for a moment, here at least, all is right with the world. Like so many gardeners everywhere, I await the taste of my first tomato, but since my plants are no more than three inches high, I have awhile to wait.

Purslane Every year I have a bumper crop of purslane growing as a weed in my beds, and this year is no different. However, I’ve read where purslane has more Omega-3 fatty acids than many fish, something we vegetarians should be aware of. Originally from India, and supposedly Ghandi’s favorite food, this succulent member of the Portulaca family offers other nutritional benefits as well. See http://www.nutrition-and-you.com/purslane.html . If uprooted and left on the soil, the plant uses its stored liquids to produce seed and scatter them. “So there!” it says. I must admit that the thick leaves and stems are off-putting for me texture-wise, but I’ve begun to snap off young stems and include them with the lettuce I’m harvesting. I’ll have to be bold and find better uses for it in my kitchen. After all, its free!

Purslane I created two new raised beds, lined with aviary wire (which is a devil to work with. I have scratches all over.)

New raised beds I still have two more raised bed kits, which I bought last Fall in a clearance sale. I’ve leveled them, placed cardboard on the ground to deter weeds (especially the dreaded Bermuda grass!), used a staple gun to attach aviary wire across the bottom and up the insides a little, then filled with topsoil and very wormy mushroom compost, then watered it all in. I still have to add more good soil, then I’ll mix in some Garden’s Alive non-animal organic vegetable fertilizer and some microbes, just to start the beds off right.

Seed Sprouting These beds will be for the vining plants such as squash, pumpkin and melons. There is room for vines outside the beds. Already I have the seeds sprouted and awaiting transplanting, but that won’t happen until early next week.
Roger and his crew hauled over prunings from grape growers, and have used them to sparkle up the trellises to wonderful effect.

Grape vines on trellises I think they add a wonderful ethereal look to the structures.
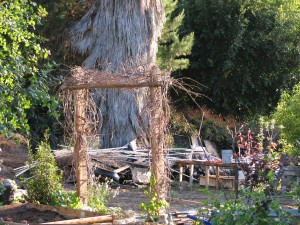
Viney trellis As far as the ponds go, contouring is slowly being done and we all await the coming of the pump on Monday. I will not be blogging for the next few days because I will be attending the Southern California Permaculture Convergence in Malibu http://www.socalconvergence.org/ , and as I will be sleeping in a bunkhouse at Camp Hess, I’m thinking that bringing my laptop would be a bad idea. I’ll take photos and be excited to share what I’ve learned with you when I return. Have a wonderful weekend!
-
Chickens in the Tractor

Grass? Easter Sunday brought new horizons to the chickens. Finally they were allowed out into the tractor. The largest bird, one of the Americaunas, was almost touching her head to the screen over the top of the Sterilite container in which they lived. The girls were a little startled at the sunlight, and didn’t quite understand about grass at first. Then they got into scratching with their already huge feet and pecking off weed tips.

First Scratches Unfortunately, the Barred Rocks girls are still smaller than the others and were being pecked and chased by the larger girls. They chose their corner and the big girls grouped on the other side of the tractor. They all wandered and changed positions with some pecking going on. The BRs were just too frightened, so I set the bird cage in which they had been living into the chicken tractor and put them into it. They have their own food and water, perches, and are able to be with the big girls without being set upon. Funny thing, though, the BRs would hop up onto the two cross-boards when escaping the big girls, but I’ve never seen one of the big ones up on the boards. I think this is because the BRs lived in the bird cage and learned to perch!

Barred Rock Corner I was wary about allowing the dogs out into the yard with the chickens in the tractors. In their younger days, these two killed all of our chickens who were loose in our backyard. It was a Valentine’s Day massacre. That was the day DC met her end (see post about DC the chicken). Now that the dogs are senior citizens and mostly deaf, they didn’t take as much interest as before.

General Interest in Chickens When they came too close to the cage, I used a spray bottle of water and admonishments. It seems to have done the trick. That spray bottle is what keeps the cats under control in the house, too. I just have to pick it up and all bad activity stops. I wish it worked on kids as well!
At night, the chickens still don’t know how to get up onto their loft. After dark my son and I go out there and drape a blanket around the BR’s birdcage for warmth, and find the big girls in a group on the ground. Chickens at night are like footballs, and can be picked up easily and placed into their loft. We’ve tried to get them to walk up the ramp, but it is too much of a learning curve for them. We’ve also set them up on their loft during the day, but they just flutter down. I have to believe that they’ll grow into it.
It is nice to have the chickens out of the side room, and really good for them to be scratching and pecking and enlarging their diet with grass and bugs. They certainly eat a lot of chicken food. Pretty soon it will be lay mash time!

Pretty Girls -
Happy Spring
-
Peas

Tendrils Peas are certainly one of the most joyous vegetables of Spring. They should be planted early when the weather is still cool. Their emergence from the seed through topsoil is one of such strength and energy during what are normally pretty dreadful months weatherwise. Peas are plants of hope.

Peamergence Not only are peas a nutritious early vegetable, but the plant itself is important to your garden. It belongs to the Leguminocea family of plants, or legumes, many of which host bacteria known as rhizobia in their root nodules in a symbiotic relationship. These bacteria take airborne nitrogen gas and convert it into a form usable by the plant in a process called nitrogen fixation. In English, peas fix nitrogen in the soil. Higher nitrogen absorption makes legume seed higher in protein than non-legumes. The legume family includes some plants that you are familiar with such as beans, peas, clover, alfalfa and lupines, and some you may be amazed at such as mesquite and acacia. The importance of the Leguminocea family, which is the third largest plant family, is a perfect example of the idea of plant guilds, where every plant has a different purpose that helps the other plants in its guild. When I think of mesquite, I think of Westerns and deserts. I’m in wonder at the idea of this beautiful hardy plant fixing nitrogen in the sandy soil. Legumes can be used for crop rotation to boost poor soil, or as in the case of clover and vetch, turned under as a green manure. So growing peas in your garden benefits your soil, as long as you leave the roots in the ground when pea season is finished. In fact, you can just turn under the whole plant, and before long it will have composted.

Pretty Plants Preparing peas brings to mind stories of the women-folk sitting on their front porches in rocking chairs shelling hundreds of peas. Quaint, but perhaps not practical for many time-challenged people. Although picking and shelling peas does take time, it is quiet time, a time for reflection and planning. Peeling open a fat pea pod and scooping out the sweet, slightly starchy bright green treasures inside is as much a pleasure as biting into the first tomato of the season. There are, of course, alternatives to shelling peas.
Three Types of Peas Snow peas have a tender, crisp shell and the inner seeds don’t swell significantly enough to shell. Found mostly in Asian cooking, snow peas can be added to any dish or salad. They are much better fresh than the stringy, hard green sheaths found in many frozen vegetable mixes. Of course, there are shell peas, which you leave on the vine until the pods are nice and fat, then string the pod and scoop out the inner seeds to eat, composting the pod. A wonderful compromise is the edible-podded shell pea. It can be eaten small, like a snow pea, but if you leave it on the vine the peas inside the pod will swell and you can eat it like that or shell them. Since once peas get started emerging, there seems to be no end of them of all sizes for awhile, the edible-podded shell pea is a less harsh taskmaster . My favorite way of cooking pea pods is to stir-fry them in hot olive oil for just a couple of minutes. Or they can be steamed, or added directly to soups. They are also good to use as dip scoops along with other fresh vegetables.
Snow Peas Large edible-podded or snow peas need a little preparation. Their bud-end should be snapped off, and if there is any string down the side, it can be pulled off in the same movement.Pea tendrils are edible, too, and are sometimes found as the new fancy food in magazines. I’ve tried them and wasn’t impressed. The flavor was green and the feel of the little tendrils in my mouth wasn’t comfortable. Watching tendrils seek a support, then grab on and pull the plant over in a tight grasp, has always impressed me as such intelligent behavior that I feel funny about snipping them off and cooking and eating them!Speaking of grabbing tendrils, peas need support in your garden.
Training They usually grow about three feet high, so train them up string, wire, thin stakes, or whatever your imagination cooks up. Since harvesting peas takes a little time, plant the peas close to the edge of your bed, or where you can comfortably reach the pods without tearing out the whole plant or wrecking your back.Peas are bright green with pretty, easily accessible (to bees) flowers, and make a handsome addition to your garden. This year I
Pea Flower planted fresh organic seed, and then because I had several very old packets of peas left, planted them around too. Of course, they all came up! I planned to turn the extra under as green manure, but didn’t have the heart. The extra peas that I can’t immediately eat I’m blanching and freezing. Blanching is to take a vegetable and immerse it in boiling water for no more than a couple of minutes, then immediately dip in cold water to stop the cooking process. The vegetable should be dried then frozen in freezer-proof bags or containers. Blanching doesn’t take long, can be done with water boiled for pasta or steaming vegetables for dinner.

Small Is Best for Snow Peas -
Pond Progress
Happy Earth Day!
As of today, I have a very large hole in the ground with a little puddle in it!

A Vernal Pool? The major tractor work was finished by Dan Barnes (if you need mowing, disking, or any kind of tractor work, he’s the guy to call at 760-731-0985). A pump was set up in our shallow well and it started… then stopped. The water was so silty that it plugged the pump, and the refill rate isn’t very quick in the tube, either. So unfortunately the goal of having a full pond by the end of the day today was not realized.

The Pump Work will resume on Monday with a flushing of the well. Dan found a lot more bottles buried in the middle about three feet down. No Inca gold, though. Dan also moved some boulders around and disked the soil along the pathway that rainwater will take through the property.

Dragging Boulders 
Tilled watercourse Finish work with the small tractor will be done beginning next week. The good thing about the pond not being filled yet, is that my dog General, who is a cross between two waterdogs, won’t be soaking wet for Easter. He’s still enjoying being in the house while there are trucks and tractors in the yard.

Pond in the Evening with a set rock Also today more stairs were created at my request by Roger’s team of Juan and Francisco in the area leading down the hill, which was just too slippery. They squared up the hearts of some palms this time rather than just cutting off the tops. The resulting white rectangles look incredible.

Palm Stairs I’ve noticed a lot more birds and lizards in the yard, even with the workmen disturbing the peace. I really can’t wait until the project is finished and I have regained tranquility on my property. After the ponds are in there is still more planting and irrigation to be installed. Sigh. Have a wonderful Easter Sunday!
-
Partial Pond

The Grading Begins Today the work finally began on the series of ponds, swales and rain catchment basins that are the heart of the permaculture project. Their object is to catch, channel and hold rainwater so that it percolates slowly down into the ever increasing loam of the forest garden, making water available longer for the plants rather than sheeting off the top of my property and eroding the embankments.

First Scoops The blue stakes delineate where the water will fill to. The edges are irregular to create more edge space for plants and animals.

Tractor Dan with Greenie Dan Barnes Tractor Work ( at 760-731-0985) has worked with Roger Boddaert in the past, and has done some work on my project already. Dan is an artist with the tractor. Although much of his work is mowing and disking, he has created ponds and swales in the past and really knows what he is doing. If you need tractor work, Dan is your man. He owns several different sized tractors, or he rents the appropriate size and does what you need in excellent time for very reasonable rates. Plus, he’s just a great guy.

Dan, Jacob and Aart Discussing Grades Here Dan, Aart de Vos and Jacob Hatch discuss the grading plan. Aart owns Aquascape Associates pond landscaping, specializing in natural ponds. Drawing from his Northern European heritage and knowledge, Aart believes in simplicity, old technology that is proven to work, small footprint and natural environments. He and his manager Jacob Hatch knew exactly what I wanted, and the work that I’ve seen of theirs looks as if man had nothing to do with forming the ponds. Not only did they know what I wanted and were already experienced at it, but their prices are very reasonable in comparison to some quotes we received for ponds that would have looked artificial and have been electricity monsters.

Canine Clay Treatment At lunch break, my dog Sophie loved the excavation and gave herself a very good roll in the clay.

Mostly Done At the end of the first day, the rough work on the lower pond is almost done. Tomorrow Dan will finish this and move on to the rough work of the next area. Jacob and his team will begin the contouring of the big pond with the small tractor and by hand.

Shiny Clay.. for once a good thing At the depth of six feet, there was a wonderful layer of clay. The ponds are not going to be lined with plastic or polymer; instead, Aart believes that the compacted natural clay should be good enough to keep the pond filled. The water source for all the ponds, besides seasonal rainwater, is a four-inch wide drill hole that was augured near where the lower pond sits. Water was found nine feet down. A small submersible pump will be lowered to pump water into the ponds. At first the pump will be run by an extension cord. Then it will be replaced by either solar or a windmill… I’m looking into the noise that windmills make because I need and desire my quiet.

Culvert Cleaned This is where all the neighbor’s runoff funnels through to my property in the upper corner. Before it would make a 90 degree turn (or attempt to) in a narrow cement culvert and be diverted all the way down my property and off into the streambed below. Except for when it really rained hard or the culvert became silted in from the neighbor’s topsoil. Then it would flood the entire property and erode everything in it’s wake. This entrance area was cleaned today by Cody, who works with Jacob. The water will still channel through here, but it will be diverted into a dry streambed and on into the swales and ponds. Then it will be held, slowly perculating into the loam and soil to be available for the deep roots of the trees and plants.

Entrance to the Bee Garden Also worked on today by Roger’s team was this arbor to the entrance to the Bee Garden for honeysuckle and other vines to grow over. I’m sprouting luffa gourd seeds; perhaps some can grow up these and hang down over the entrance.
When me and my chilren moved here twelve years ago, we hoped to find buried treasure on the property. What we found in the areas most suseptable to erosion was piles of palm fronds, auto tires, and a buried toilet (which is still there). At the end of the day today Dan called out to me that he’d found the buried treasure.

Treasure One of the bottles was capped and was half full of liquid. I sniffed it…. only muddy water. Shucks.
More tomorrow!
- Gardening adventures, Permaculture and Edible Forest Gardening Adventures, Photos, Vegetables, Vegetarian
My Gardens Today
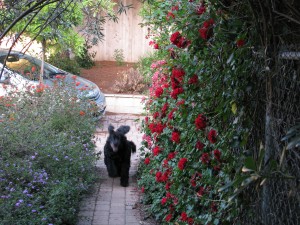
Entranceway with Running Dog April and May are months that I often don’t remember when reflecting back at the end of the year. Spring is such a busy season. When I was raising children, and when I was working as a school librarian, these months rushed past in the haste towards summer break. As a gardener, Spring is one season when I turn into one of those Garden Designers London and since it is also the season of intense growth of both weeds and desirables, insects and increasing dryness, and for me and so many others, the inevitable allergies that keep me out of the garden for days. So I thought I’d post photos of my gardens as they stand today, in the middle of April, on threshold of Summer.

By the Front Door I’ll start at my front door and work downhill. The walkway to the front door is lined with purple lantana and a mixture of red geraniums, honeysuckle, butterfly bush and Double Delight rose. It is being enjoyed by my very silly old dog General Mischief, who just realized that I was going to let him into the house. He looks a bit like a vampire dog in this photo, though!
By my front door I have a collection of miscellaneous plants, as most people do. Two staghorn ferns given me by my mother have attached themselves in a very satisfactory way to the chain link fence. There is also a dark red ivy geranium, needlepoint ivy, some bulbs just out of bloom, a traveling (or Egyptian) onion (it’s seeds are bulbets grown on the flower) that my brother gave to me, and some sedums. When I water here I usually disturb a Pacific Chorus Frog or two. I’ve thinned and weeded and replanted this collection, but there are always more that magically appear.
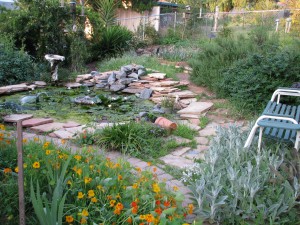
Front Pond The front yard pond is full of algae, but that is all right for the moment. I don’t want a crystal clear pond; I want habitat. Because of the clear blobs of frog spawn and wriggling tadpoles hiding from the hungry mouths of the mosquito fish I keep the algae until it is no longer inhabited. Waterlilies (even the monster one! Look at other posts for an explaination) are blooming with last weekend’s sudden heat. In the foreground are Jewel Mix nasturiums with heirloom tuberoses emerging, a grey mound of lamb’s ear which has begun to pop up where I don’t expect it, and rosemary by the bird feeders. Our kitchen table has the view of the feeders, and it is from this yard that we count birds seasonally for Cornell University’s Project Feederwatch. Oh, and try not to focus on the weeds, please.
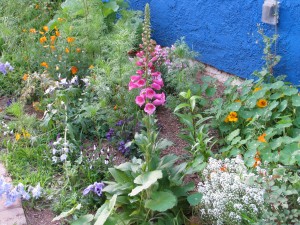
Side Gardens On the South side of my house I’ve painted the wall a Mediterranean blue to reduce the glare and create a colorful backdrop for flowers. I keep annuals in this bed, along with some bulbs and a rose that is still small that my daughter gave to me. In th photo just blooming are naturtium, alyssum, foxglove, pansies, and a delphinium that fell over and started growing upright again. My library window overlooks this yard. I was trying to keep the color scheme focusing on apricot to show up well agains the wall, but I end up planting whatever I want in here. Cosmos have again reseeded and are starting to grow rapidly; they’ll block the window by summer and be full of goldfinches. I’ve also planted a couple of bleeding hearts that I picked up in one of those bulb packages at WalMart. Usually the plant is pretty spent and they aren’t worth the money, but I somehow think that I am rescuing the poor thing. These came up but haven’t yet bloomed.
Lady Banksia Along my driveway is a Lady Banksia rose that has taken off, along with a bush mallow, a Hidcote lavender, and a late daffodil. Farther along the driveway (not shown) is a Pride of Madera (I love that name!) that is going gangbusters, a small liquidamber, rockrose, a mixture of natives and incidental plants such as a tomato that survived the winter, a Joseph’s Coat rose, and an established pine tree with a crow’s nest at the top. There are other roses and plants here, too, like a prostrate pyracantha for berries, a white carpet rose, native milkweed for the Monarch butterflies (perennial ones; the annuals are usually gone by the time the butterflies migrate here), an apricot penstamon, aloe vera, and probably the kitchen sink, too, if I root around long enough. I love tinkering around with this mess of plants, seeing what will grow and trying new combinations.
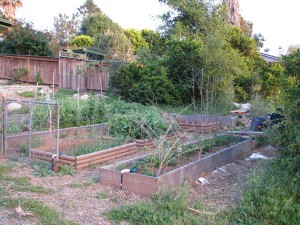
Raised Vegetable Beds In my raised vegetable beds the peas have been producing well. The shorter ones had been nibbled by crows as they were emerging, but after I put a rubber snake amongst them, the nibbling stopped. Potatoes are nearing harvest time, and I’ve already snuck out a few new potatoes and they were very good. Sometimes I’ve had potatoes with brown fiber in them and a bitter taste; no doubt due to irregular watering and soil problems. I worked hard on improving my soil and giving it a boost with natural fertilizers from Gardens Alive. There are so many peas in the garden because I planted all my old packets so that the roots will set nitrogen in the soil.
I also have growing carrots, broccoli, cilantro, parsley, endive, salad mix, parsnip, strawberries, blueberries, breadseed poppies, horseradish, asparagus, bush beans, fava beans, a yellow tomato and a red slicing tomato, garlic, shallots, red and white onions, Swiss chard, leeks, collards and basil. Most are just small guys right now.

Seedlings In my temporary nursery area I have sprouting pickling cucumbers, zucchini, quinoa (first time!), more basil, Dukat dill, cantalope, and a cooking pumpkin. I’ll sprout more squashes and maybe popcorn and sweet corn soon.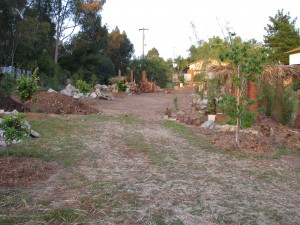
View up the Middle This is a view of the middle of my property, from the lower end up.
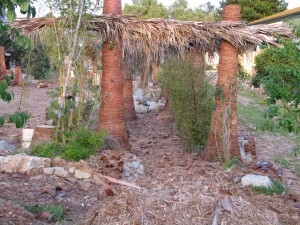
Palm Tree Walkway This is the palm tree walkway as it stands now.

Pre-Pond And this is the lower area. Notice the stakes in the ground and the tractors? They are there because today is the day the ponds will be excavated! The rain-catchment ponds, permanent habitat pond and swales will be carved, shaped and filled in the next two days, fed by water from a 4-inch well augered in the lower property. I have hired Aquascape to create habitat and rain catchment ponds; the demostrations of their work look as if humans hadn’t messed with anything. In about an hour from now, the action finally begins! After the ponds are installed, then the final plant guilds will be established, the minor amount of irrigation installed, and that will be that! I’ll keep you posted on pond development!

